ESP8266 UART WIFI Shield use guide

UART WIFI Shield is a low power consuming wifi extension working for Arduino Uno and Mega2560
Features:
1) Use ESP8266 wifi chip, extension pin layout fit both Arduino UNO and Mega2560 board
2) WiFi data sent through serial port, Arduino no need extra configuration
3) wifi and searial port config through web page.
4) can work as ESP8266 extension or Arduino extension ( there is a 2-bit switch for the function change);
Specifications:
- Wifi protocol 802.11 b/g/n ;
- STA/AP work mode;
- integrated TCP/IP stack, support one socket;
- work as TCP/UDP Serve or Client mode;
- serial portbaud rate: 1200/2400/4800/9600/19200/38400/57600/74800/ 115200 bps;
- serial port width:5/6/7/8 bits;;
- Extended Arduino Pin D2/3/4/5/6/7/8/9/10/11/12/13;
- Extended ESP8266 GPIO Pin 0/2/4/5/9/10/12/13/14/15/16/ADC/EN/UART TX/UART RX;
- RESET;
- KEY reset;
- WiFi current:working:≈70mA(200mA MAX),sleep:<200uA;
- wifi speed:110-460800bps;
- working temp:-40℃~+125℃
- weight:20g
LED instructions:
ESP8266 wifi module has two LEDs. Red LED is for power. Blue LED indicates different function meaning as following:
continues fast flashing 4 times——————————–>Wifi or Serial port get data
flash every half second————————————->the module is in configuration mode
flash every second—————————————–>wifi module works in STA mode trying to connect wifi router
Steady on———————————————–> enter into AP or STA mode
Quick start:
Example A: Enter configuration mode
The wifi module factory default is in configuration mode. You should complete configuration and then start transmission mode. If you are working in transmission mode, you can push and hold KEY button for more than 1 second and back to configuration mode. Please take following steps to config the module
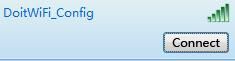
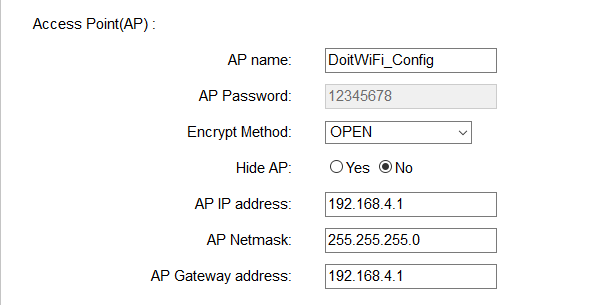
1) Turn on the power of the module and use another laptop or smart phone to connect wifi ssid “DoitWiFi_Config”。wifi password is:“12345678”(you can even use empty password to connect this ssid)
2) Open your laptop brower and access http://192.168.4.1, you will see following page:
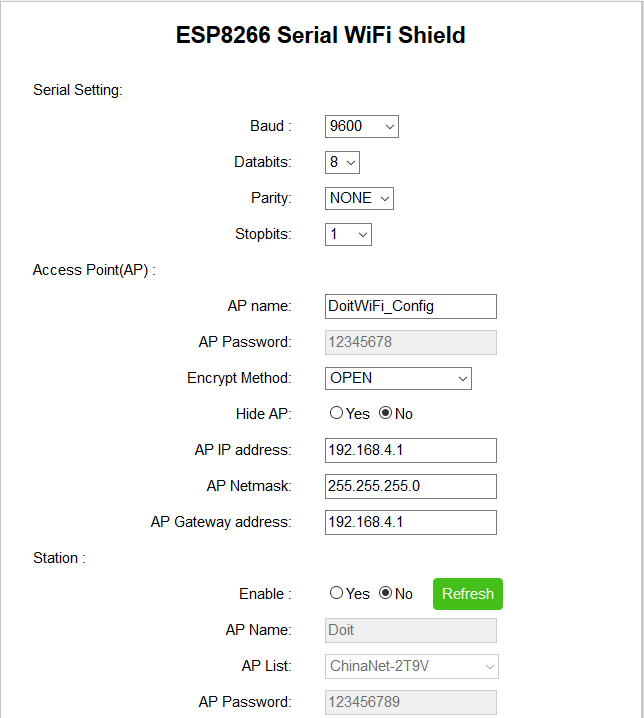
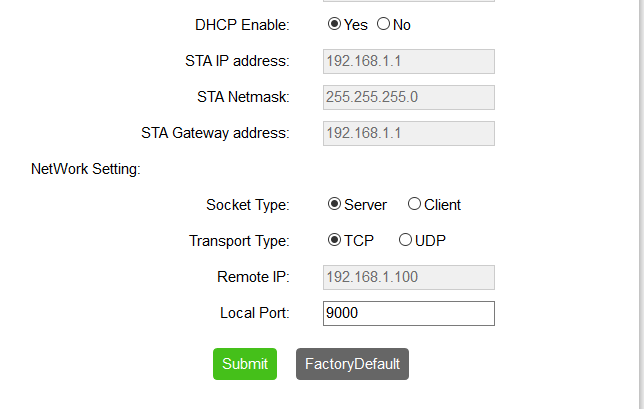
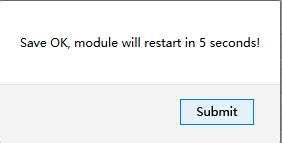
3) Do configuration as per above picture and click submit.
4) After submitting, the module will reboot and then enter into AP mode. Please set serial port parameters as 9600,n,8,1。
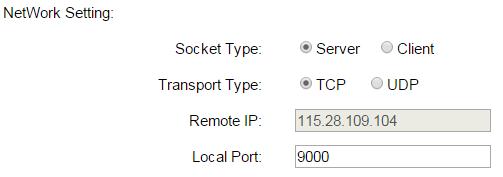
WiFi working mode hotspot(AP),ssid is “DoitWiFi_Config”,password: “12345678”. TCP Server listening port 9000. these configuration is Factory Default setting.
Arduino data send to WiFi through serial port :
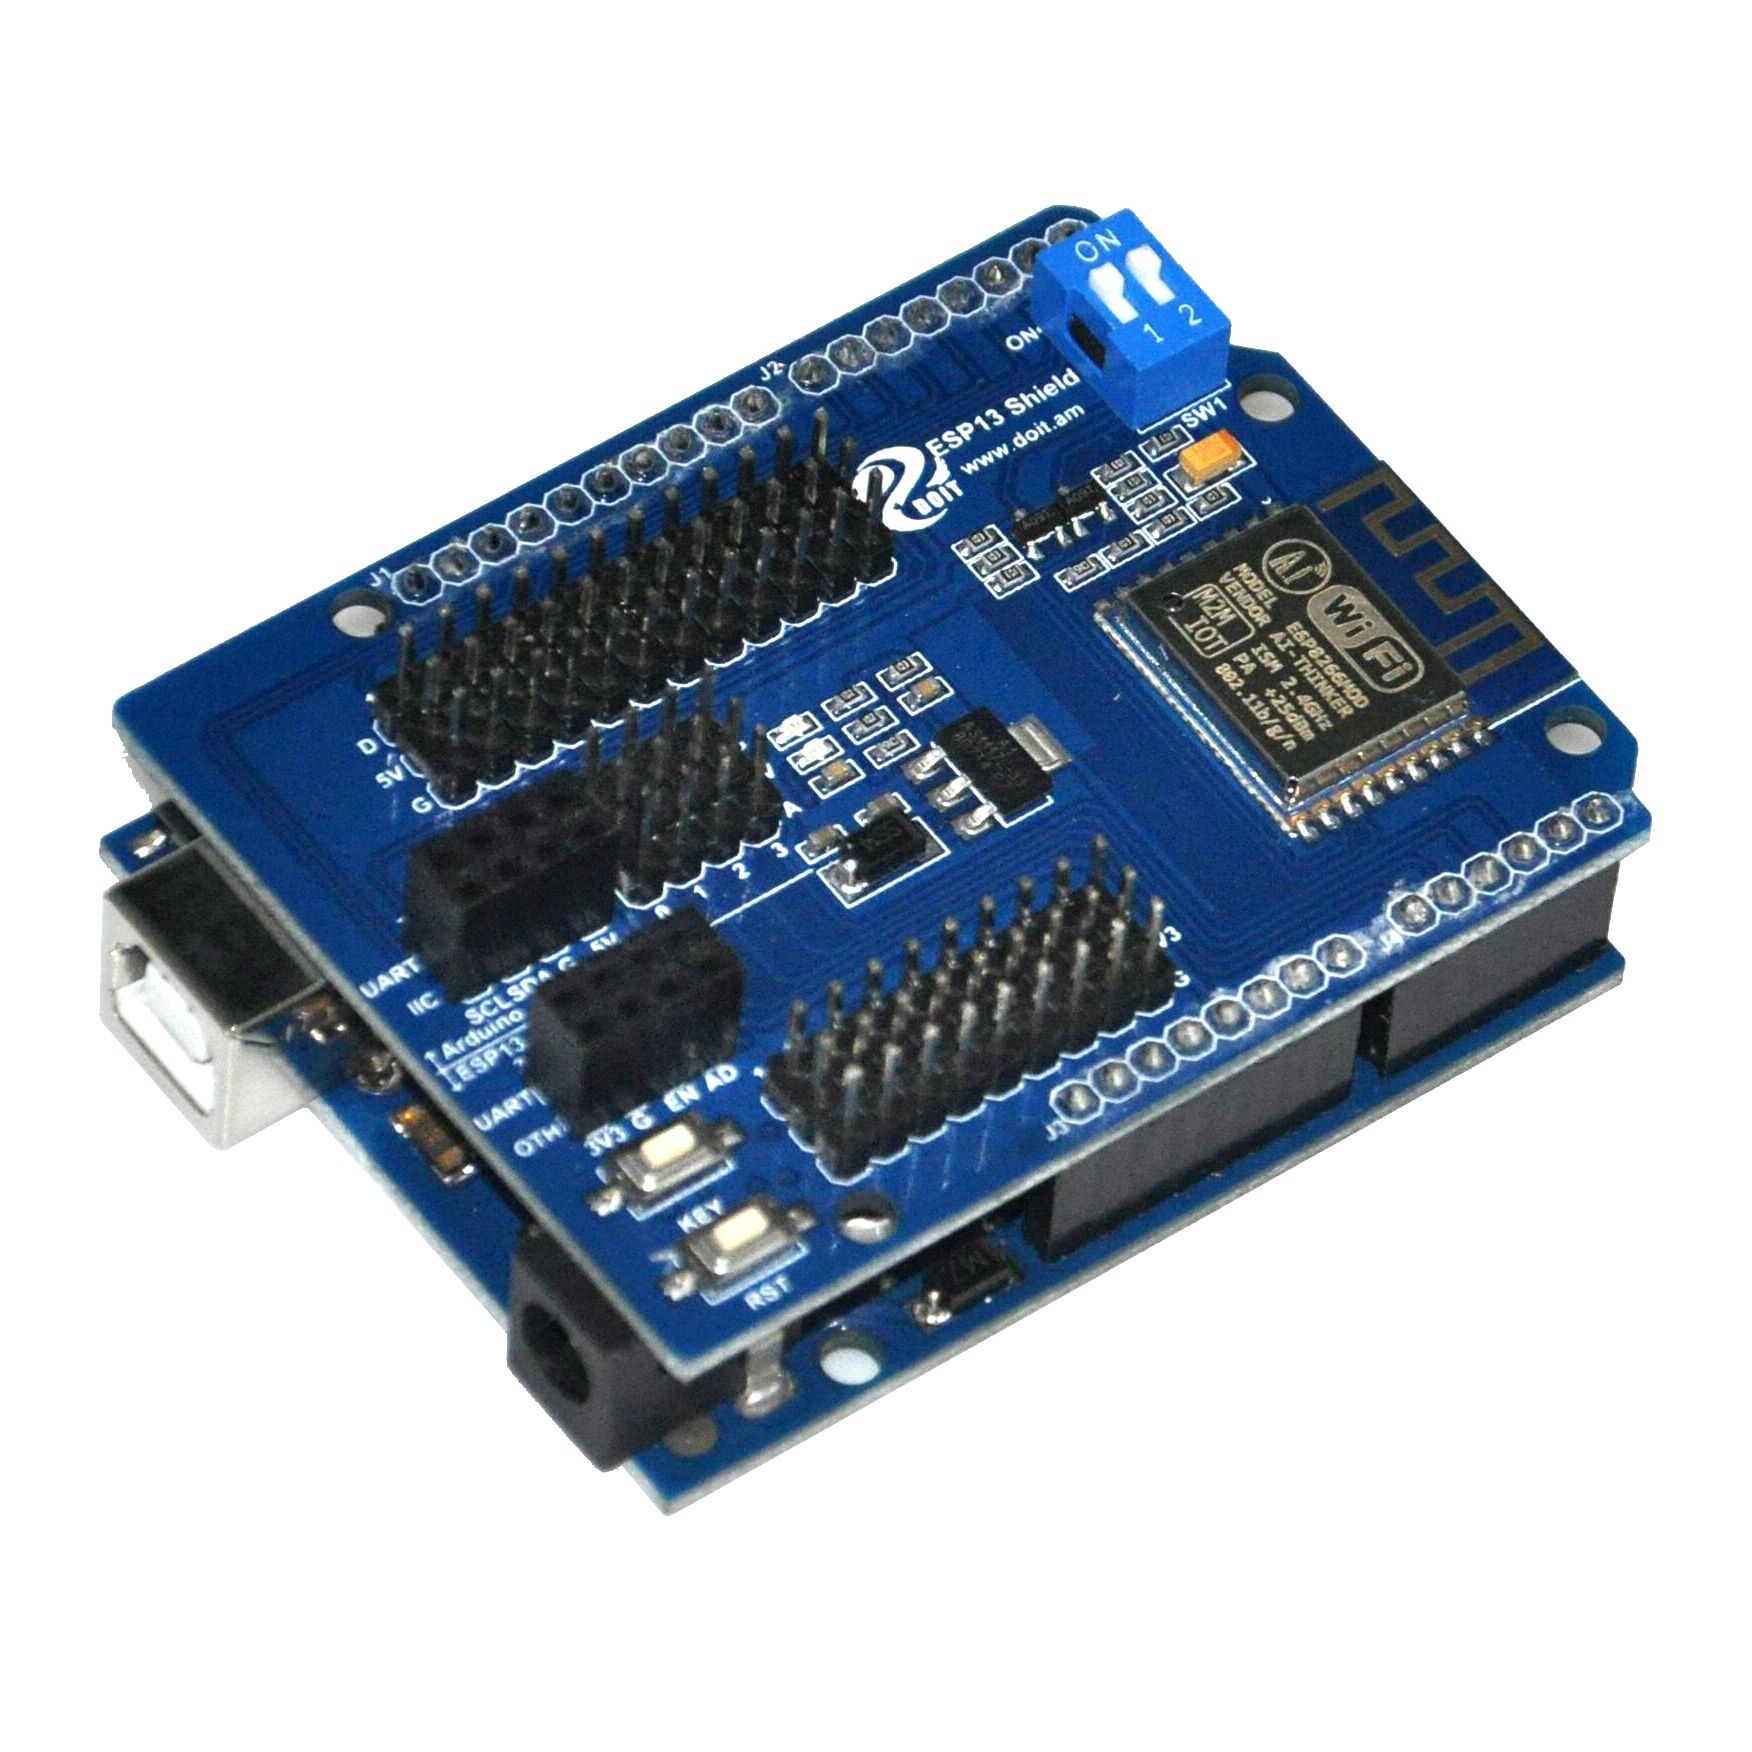
Step 1) connect Arduino UNO to wifi module as per following picture
Step 2) set the two switch positions to OFF, this will disconnect wifi module from Arduino serial port.
Step 3) Load following code into Arduino IDE
void setup()
{
Serial.begin(9600);
}
void loop()
{
delay(1000);
Serial.println(“hello ESP8266 WiFi”);
}
Step 4) Set Wifi modue two switches to ON position which will connect wifi module to Arduino serial port.
Step 5) Use your laptop to search wifi hotspot ssid:“DoitWiFi_Config”,password “12345678”。
Step 6) run tcp udp testing/debug software in laptop.
We suggest you use tcp udp debugger which can be downloaded from:http://kookye.com/download/car/TCPUDPDbg.rar
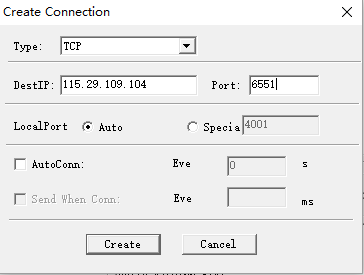
Run tcp udp debugger ,create a tcp client mode connection,DestIP :192.168.4.1,Port:9000。LocalPort:Auto。

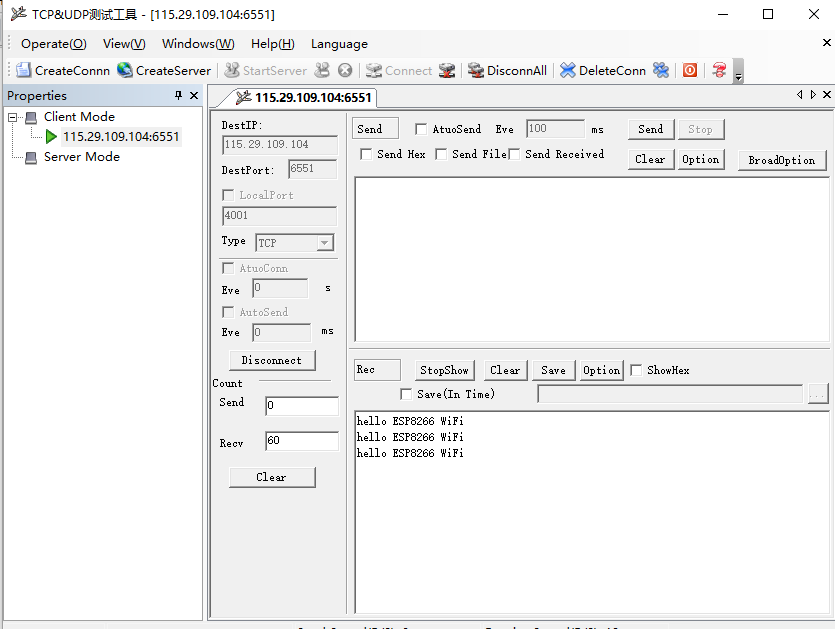
click Connect,you will see Arduino send data “hello ESP8266 WiFi” very second

Example B: Connect remote server:
we will use Doit.am WAN TCP tool to test communication between wifi module and remote server.。
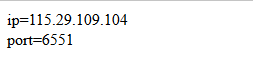
Step 1) In your laptop, type http://tcp.doit.am ,get a temperate IP and port from DOIT TCP server. In this example, suppose we get IP 115.29.109.104 port number 6551
Step 2)Push and hold KEY button in wifi mode and enter into configuration mode.
Step 3) Use your laptop to search wifi hotspot ssid:“DoitWiFi_Config”,password “12345678”
Step 4)in laptop browser, enter http://192.168.4.1
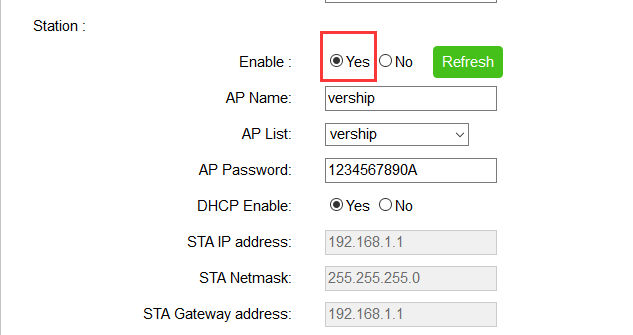
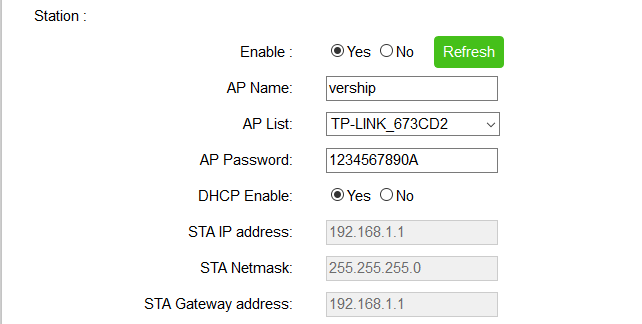
check Yes box beside Enable option.
Click refresh button, it will automatically add all local wifi in to AP list.
set AP Name and AP List to the SSID of your router (Our router ssid is vership, so we set ‘vership’ here), set AP password same as your wifi password
Step 5) config wifi network parameters
Socket Type:Client
Transport Type:TCP
Remote IP: 115.28.109.104 (this IP is from step 1)
Remote Port:6551 (this port number is from step 1)
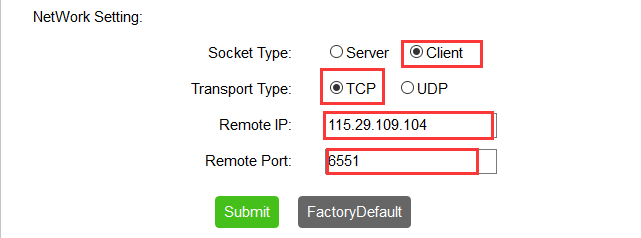
5, click “Submit”
6)Run tcp udp debugger ,create a tcp client mode connection,DestIP :115.29.109.104 (from step 1),Port:6551 (from step 1)。LocalPort:Auto。
7, click Create, you will see Arduino serial data is sent to remote server every one second.
Switch between different work mode:
ESP8266 work mode relation graph:

ESP8266 wifi module serial port parameter setting options:

WiFi working mode setting
ESP8266 module wifi module can config into AP or STA working mode
If you configure the module through web page, the default mode is AP
in station section, if you check the Yes box beside Enable, the mode will change to STA. Refresh button and “AP List” drop down menu will be enabled. Click refresh , all available wifi hotspot ssid will be added into AP list
Network configuration
Wifi module can be configured in Server mode or client mode. WiFi module only support one Socket
When working in “Server” mode,“Remote IP” is disabled。“Local Port” fieldshould have a listening port number.
When working in client mode,“Remote IP” input field will become enabled
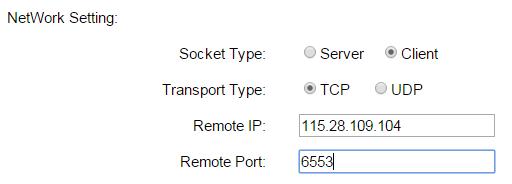
Transport type can be set to TCP or UDP。
Factory default reset
You can click “FactoryDefault” to restore factory default setting as following:
default SSID: DoitWifi_Ser2Net
default wifi password: 12345678
default web config url: http://192.168.4.1
default client mode: TCP server.
default listening port : 9000
default serial port parameter: 9600,n,8,1
amber administrator
You must be logged in to post a comment
About the Author