Rasberry Pi Tank Robot Car Starter Kit Lesson 7: Obstacle Avoidance Auto-driving

Authorized Online Retailers
Robot Tank Car Chassis
| Buy from US | Buy from CA | Buy from UK | Buy from DE | Buy from IT | Buy from FR | Buy from ES |
 Objective
In this lesson we will use 3 Ultrasonic sensors to detect front obstacles and guide robot car to drive automatically.
Hardware Installation
Video intutorial for Hardware Installation
Circuit Connection:
Before starting this project, you need complete hardware installation in Lesson 4 . Make sure the Lesson 2 software test is ok which means your motor installation and wiring to Raspberry Pi are all correct.
Now we can add 3 ultrasonic sensors(distance sensor) in front side. The center sensor should face straight ahead, right sensor face a 30 to 45 degree right of straight ahead direction , left sensor should face 30 to 40 degree left of straight ahead direction. Wiring connection should be as per following graph:
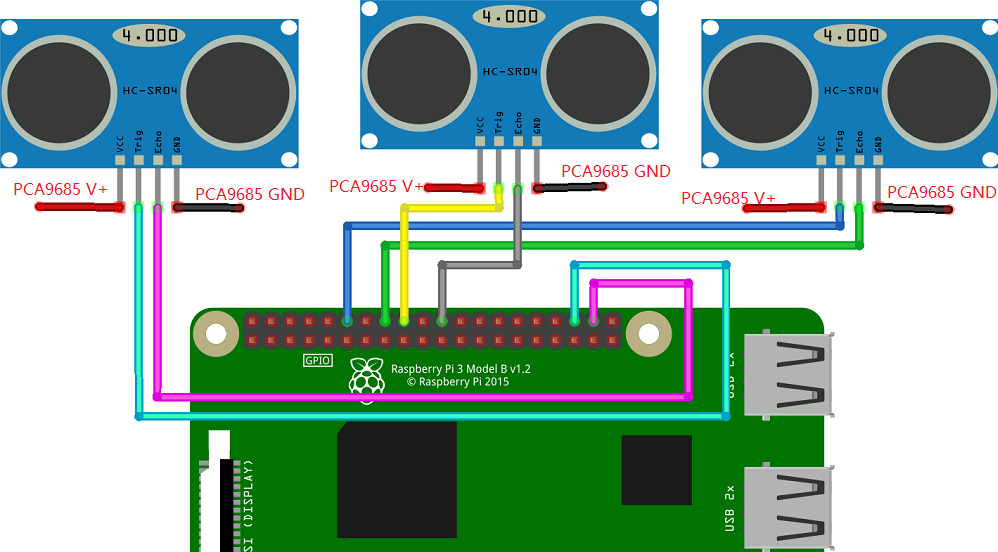
| Sensor Pin | Pi GPIO(BCM) |
| Right Sensor TRIG | 18 |
| Right Sensor ECHO | 23 |
| Center Sensor TRIG | 24 |
| Center Sensor ECHO | 25 |
| Left Sensor TRIG | 16 |
| Left Sensor ECHO | 20 |
Software Installation:
1)Use putty (or ssh in Linux/iOS terminal) to connect your Raspberry Pi and then type following command:
wget –no-check-certificate http://osoyoo.com/driver/obstacle.tar.gz
tar -zxvf obstacle.tar.gz
2)Put your robot car onto ground, turn on the car again, now use putty or ssh to connect to Raspberry Pi again. Then type following command in terminal:
cd obstacle
python autodrive.py
You will see your car is automatically moving and avoiding front obstacles. You will see obstacle situation and car action from your Raspberry Pi terminal . The obstacle status is a string. For example 001 means right.
amber administrator
You must be logged in to post a comment
About the Author