{:en}Desgin a temperature detector through raspberry pi and DS18B20 Temperature Sensor{:}{:ja}ラズパイでDS18B20温度センサーを作動する{:}{:zh}树莓派读取DS18B20温度值{:}
{:en}
Overview
DS18B20 is a 1-wire temperature sensor,Since the Raspberry Pi has no ADC (Analog to Digital Converter), it cannot directly use an analog temperature sensor like the TMP36, making the DS18B20 a good choice for temperature sensing. In this tutorial, you will learn how to use a DS18B20 with the Raspberry Pi to take temperature readings.
Parts
The parts list for program as followed:
 |
Pi3 x1
|
 |
DS18B20 x1
|
 |
Jumer wires x3
|
Connecting the DS18B20 sensor
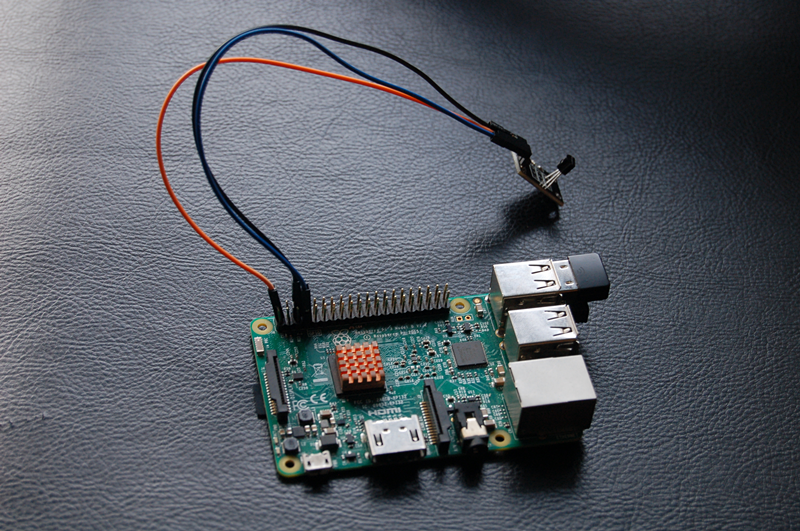
Make sure the connecting as followed, if you put it wrong way around, it will got hot and break.
| DS18B20 | Raspberry Pi |
| Right leg(S) | GPIO4 |
| Left leg(-) | GND |
| Middle leg(VCC) | 5V |

Add OneWire support
Raspbian support single-bus protocal, so it can connect with 1-wire device such as DS18B20. Open terminal and input following command to add onewire suppot:
sudo nano /boot/config.txt
Then scrolling to the bottom and typing the followed command:
dtoverlay=w1-gpio
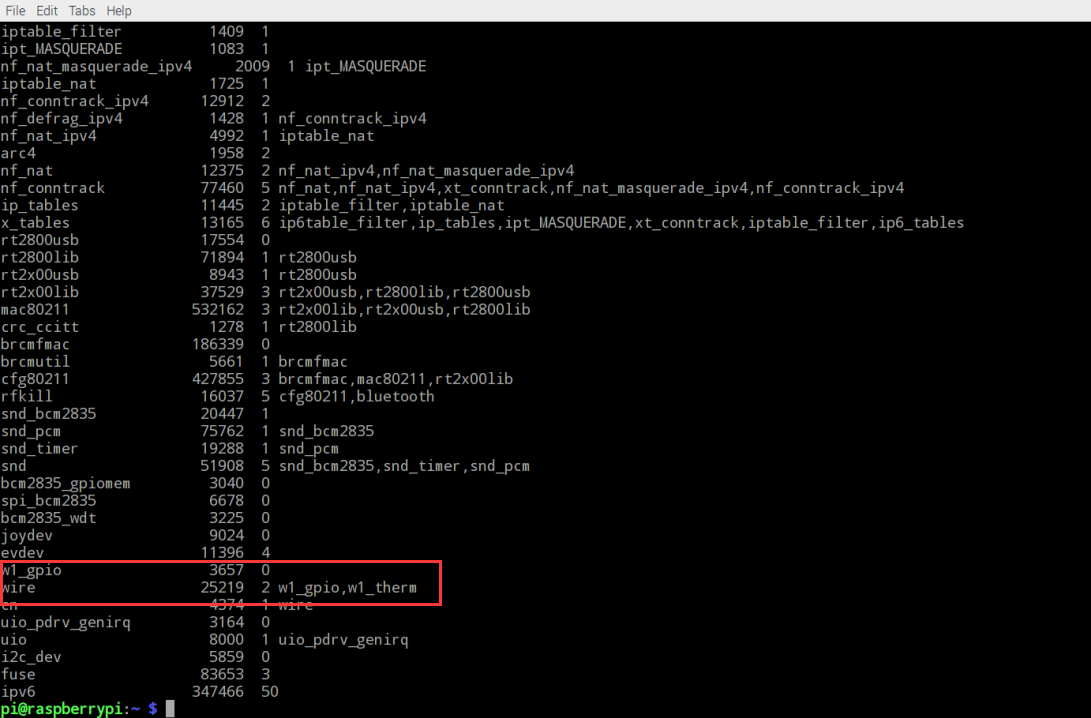
Press Ctrl + X key, then press Y to save file. Then reboot with sudo reboot. when the Pi is back up and you are logged in again, type the command: lsmod to check if the temperature sensor is valid to read. if there are two line as shown below, it means the there is a valid temperature to read.
Otherwise you need to type the commands as followed:
sudo modprobe w1-gpio
sudo modprobe w1-therm
If the temperature sensor is connected to Raspberry pi, the sensor will appear with an address in the format: 28-XXXX in the dirctory /sys/bus/w1/devices. Each DS18B20 temperature sensor has a unique hard-coded address so that you can connect up multiple temperature sensors when required and still read them individually. using “cd”to go to the directory and view the temperature reading by typing following commands:
cd /sys/bus/w1/devices
cd /28-xxxxxx
cat w1_slave
Software
Eenter below command to creat a file named tem.py
sudo nano temp.py
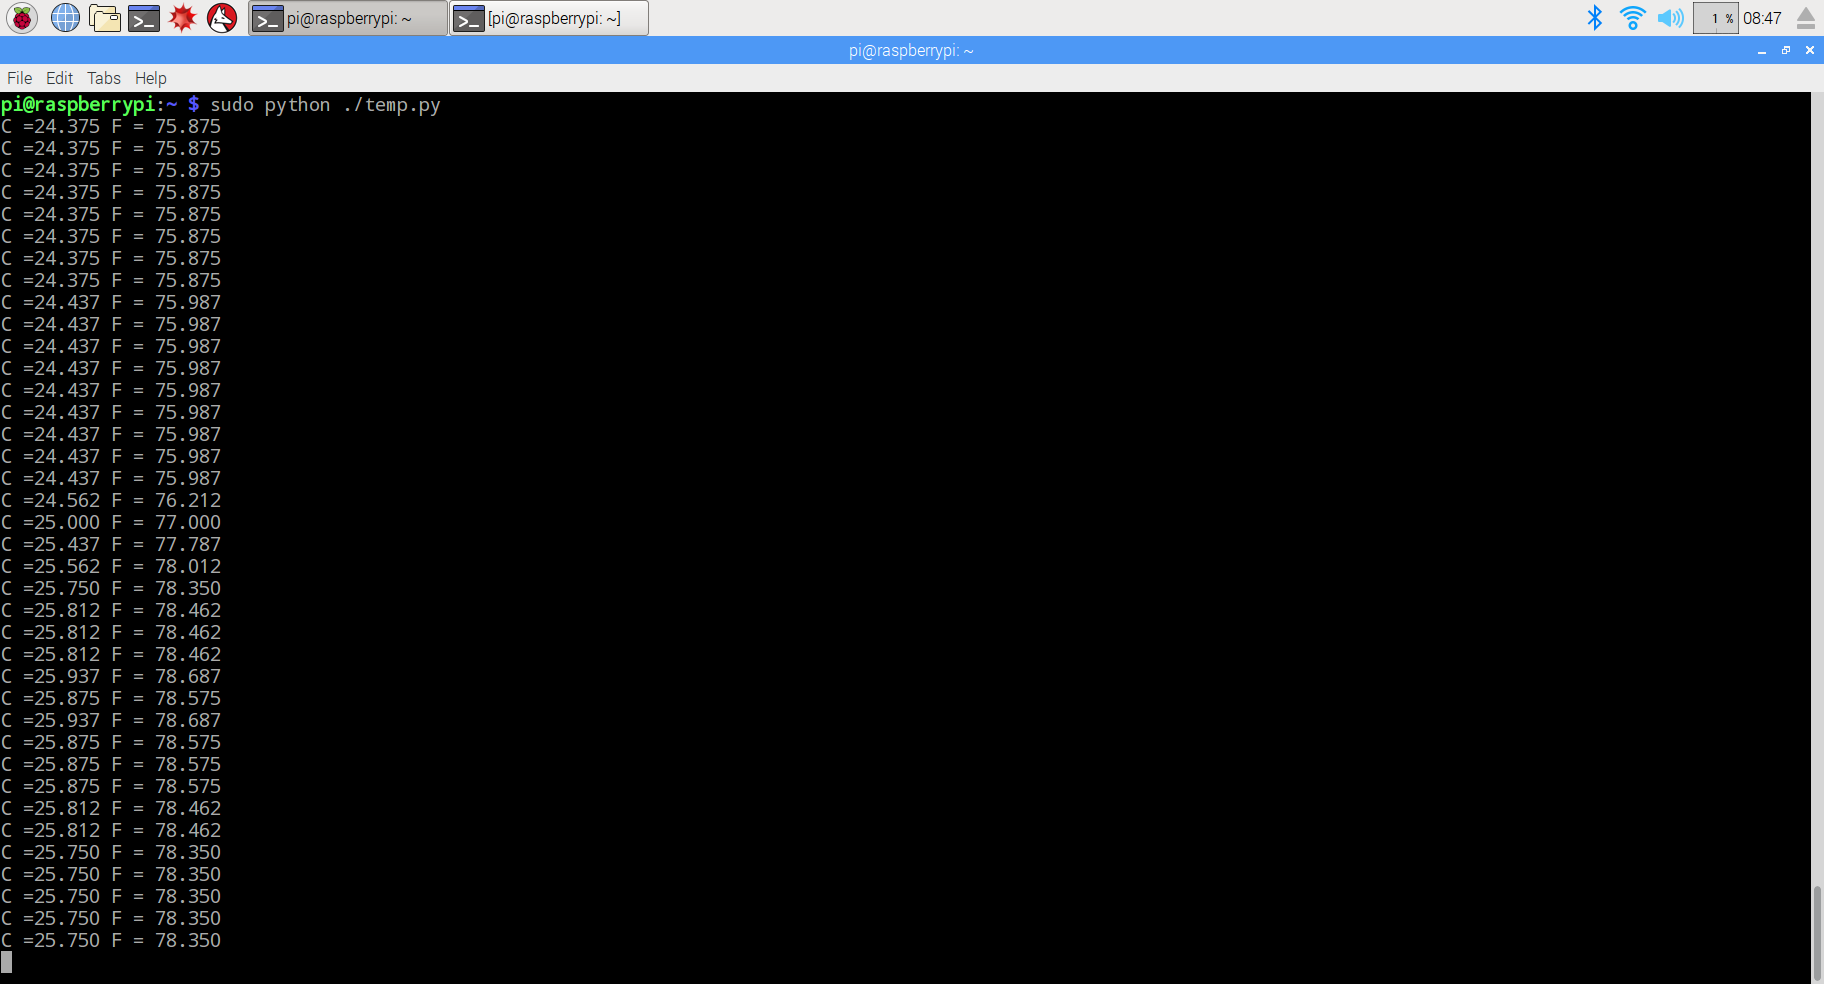
The Python program deals with any failed messages and reports the temperature in degrees C and F every second. here is a example code in Python:
import os
import glob
import time

os.system('modprobe w1-gpio')
os.system('modprobe w1-therm')

base_dir = '/sys/bus/w1/devices/'
device_folder = glob.glob(base_dir + '28*')[0]
device_file = device_folder + '/w1_slave'

def read_temp_raw():
    f = open(device_file, 'r')
    lines = f.readlines()
    f.close()
    return lines

def read_temp():
    lines = read_temp_raw()
    while lines[0].strip()[-3:] != 'YES':
        time.sleep(0.2)
        lines = read_temp_raw()
    equals_pos = lines[1].find('t=')
    if equals_pos != -1:
        temp_string = lines[1][equals_pos+2:]
        temp_c = float(temp_string) / 1000.0
        temp_f = temp_c * 9.0 / 5.0 + 32.0
        return temp_c, temp_f

while True:
  print('C =%3.3f F = %3.3f'% read_temp())
  time.sleep(1)
Comments
1)os.system(‘modprobe w1-gpio’) and os.system(‘modprobe w1-therm’)
–include modprobe w1-gpio and modprobe w1-therm library
2)base_dir = ‘/sys/bus/w1/devices/’ and device_folder = glob.glob(base_dir + ’28*’)[0]
— define base(root) directory to location 28-xxxxx device file
3)device_file = device_folder + ‘/w1_slave’
–define device data file location(temperature sensor data stream is read like a file stream)
4)while lines[0].strip()[–3:] != ‘YES’:
— Keep reading the temperature sensor data(from device_file) until last 3 characters are ‘YES’
5)equals_pos = lines[1].find(‘t=’)
–read the data line ,find the string ‘t=’ which is the sign of temperature data
{:}{:ja}
説明
DS18B20デジタルサーモメータのDS18B20は、9ビット~12ビットの摂氏温度測定値を提供し、不揮発性のユーザー設定可能な上限/下限トリガポイントを備えたアラーム機能を内蔵しています。DS18B20は1-Wire®バス上で通信を行います。名称通りに、このバスは中央のマイクロプロセッサとの通信に1つのデータライン(およびグランド)のみを必要とします。このデバイスは-55℃~+125℃の温度範囲で動作し、精度は-10℃~+85℃の範囲で±0.5℃です。さらに、DS18B20はデータラインから直接給電することが可能なため(「寄生電源」)、外部電源は不要です。
各DS18B20は固有の64ビットシリアルコードを備えているため、複数のDS18B20が同一の1-Wireバス上で機能することができます。そのため、1つのマイクロプロセッサを使用して広範囲に分散した多数のDS18B20を制御することが容易です。この機能が役立つアプリケーションとして、HVAC環境制御、ビル/機器/機械内の温度監視システム、およびプロセス監視/制御システムなどがあります。
必要なパーツ
|
|
Pi3ボード x1
|
|
|
DS18B20 x1
|
|
|
ジャンプワイヤー x3
|
ハードウェア
DS18B20モジュールの”S”PINとラズパイのGPIO4(BCM)と接続して、”-“とラズパイの”GND”、真ん中の”+”とラズパイの5Vを接続してくださいませ。配線図をご確認くださいませ:
Raspberry Pi3の GPIO端子の 1-Wire®機能を有効化
コマンド欄に下記のコマンドを入力、動作して、configファイルを編集します。
sudo nano /boot/config.txt
カーソルをconfigファイルの一番下に移動して、下記の内容をファイルにコーピーして下さい。
dtoverlay=w1-gpio
キーボードのCtrlとXキーを押して、Yを入力したら、ファイルを保存します。
コマンド欄に下記のコマンドを動作したら、ラズパイを再起動して、配置を有効にする
sudo reboot
再起動したら、下記のコマンドを動作して、 1-Wire®が起動していたと確認できます。詳しく画像をご確認:
lsmod
上記の画像のように、w1_gpio wire などの内容が有ったら、1-Wire®が正常起動していたと判明できます。もし、無ければ、下記のコマンドを動作して、1-Wire®を有効します。
sudo modprobe w1-gpio
sudo modprobe w1-therm
下記の各コマンドを作動したら、今現在の温度をリターンします。
sudo modprobe w1-gpio Enterキー
sudo modprobe w1-therm Enterキー
cd /sys/bus/w1/devices Enterキー
cd /28-xxxxxx Enterキー
cat w1_slave Enterキー
ソフトウエア
下記のコマンドを動作したら、temp.pyファイルを新規作成します。
sudo nano temp.py
下記の内容をtemp.pyファイルにコーピーして下さい。
import os
import glob
import time

os.system('modprobe w1-gpio')
os.system('modprobe w1-therm')

base_dir = '/sys/bus/w1/devices/'
device_folder = glob.glob(base_dir + '28*')[0]
device_file = device_folder + '/w1_slave'

def read_temp_raw():
    f = open(device_file, 'r')
    lines = f.readlines()
    f.close()
    return lines

def read_temp():
    lines = read_temp_raw()
    while lines[0].strip()[-3:] != 'YES':
        time.sleep(0.2)
        lines = read_temp_raw()
    equals_pos = lines[1].find('t=')
    if equals_pos != -1:
        temp_string = lines[1][equals_pos+2:]
        temp_c = float(temp_string) / 1000.0
        temp_f = temp_c * 9.0 / 5.0 + 32.0
        return temp_c, temp_f

while True:
  print('C =%3.3f F = %3.3f'% read_temp())
  time.sleep(1)
キーボードのCtrlとXキーを押して、Yを入力したら、ファイルを保存します。
ファイルが保存したら、下記のコマンドを動作して、結果を確認します。
sudo python ./temp.py
説明:
1)os.system(‘modprobe w1-gpio’)とos.system(‘modprobe w1-therm’)はプログラムの最初にmodprobeコマンドを作動します。
2)base_dir = ‘/sys/bus/w1/devices/’とdevice_folder = glob.glob(base_dir + ’28*’)[0]は/sys/bus/w1/devices/の28からのファイルを獲得します。
3)device_file = device_folder + ‘/w1_slave’はファイルを開けて、データを獲得します。
4)while lines[0].strip()[–3:] != ‘YES’: 読み取れたファイル第1行最後の文字はYESかどうか判明します。
5)equals_pos = lines[1].find(‘t=’) :読み取れたファイル第2行(t=)を検索します。もし、見つからない場合、1をリターンします。
{:}{:zh}
Overview
DS18B20是一个比较常用的温度传感器,采用单总线控制,以前用单片机编程控制时严格按照单总线的时序控制,今天来看看在树莓派Raspbian系统下如何控制DS18B20,体验一下在linux世界,一切都是文件。读取DS18B20温度也是对文件的操作。
Parts
为了完成本项目需要用到如下器件
|
|
Pi3 x1
|
|
|
DS18B20 x1
|
|
|
杜邦线 x3
|
Hardware
将DS18B20温度传感器模块的”S”引脚接到树莓派的4脚(BCM编码方式);”-“接到树莓派的GND引脚;DS18B20中间应交接到树莓派5V电源处。如图
加载内核单总线模块
Raspbian支持单总线协议,能挂接如DS18B20之类的单总线设备,并读取其数据。但是需要加载这个模块
在命令行输入如下命令
sudo nano /boot/config.txt
将光标移动到最后添加下面一句话
dtoverlay=w1-gpio
按下键盘上的Ctrl X后按照提示保存退出
查看模块是否启动
重启树莓派是上面的配置生效
sudo reboot
待树莓派启动起来后,命令行输入
lsmod
如果如发现红色方框所示说明模块已启动。
如果没有发现,也可以运行如下命令加载模块
sudo modprobe w1-gpio
sudo modprobe w1-therm
读取温度
如果一切顺利,在/sys/bus/w1/devices中发现一个28-XXXX开头的文件夹,这个就是DS18B20的ROM,每个DS18B20都一样,在这个文件夹中读取w1_slave文件则会返回当前温度值。
sudo modprobe w1-gpio
sudo modprobe w1-therm
cd /sys/bus/w1/devices
cd /28-xxxxxx
cat w1_slave
Software
用nano编辑器新建一个temp.py文件,并输入如下代码
sudo nano temp.py
import os
import glob
import time

os.system('modprobe w1-gpio')
os.system('modprobe w1-therm')

base_dir = '/sys/bus/w1/devices/'
device_folder = glob.glob(base_dir + '28*')[0]
device_file = device_folder + '/w1_slave'

def read_temp_raw():
    f = open(device_file, 'r')
    lines = f.readlines()
    f.close()
    return lines

def read_temp():
    lines = read_temp_raw()
    while lines[0].strip()[-3:] != 'YES':
        time.sleep(0.2)
        lines = read_temp_raw()
    equals_pos = lines[1].find('t=')
    if equals_pos != -1:
        temp_string = lines[1][equals_pos+2:]
        temp_c = float(temp_string) / 1000.0
        temp_f = temp_c * 9.0 / 5.0 + 32.0
        return temp_c, temp_f

while True:
  print('C =%3.3f F = %3.3f'% read_temp())
  time.sleep(1)
上面的代码将每隔1秒钟以摄氏温度和华氏温度的格式打印一次温度值。
注解:1)os.system(‘modprobe w1-gpio’)和os.system(‘modprobe w1-therm’)两句在程序的开头运行了一下modprobe命令
2)base_dir = ‘/sys/bus/w1/devices/’和device_folder = glob.glob(base_dir + ’28*’)[0] 是获取/sys/bus/w1/devices/下面所有以28开头的目录文件
3)device_file = device_folder + ‘/w1_slave’ 打开文件并读取数据
4)while lines[0].strip()[–3:] != ‘YES’: 判断所读取文件的第一行的末尾三个字符是否等于YES
5)equals_pos = lines[1].find(‘t=’) 查找所读取文件中第二行中t=开始的位置,如果查找失败返回-1
{:}
amber administrator
You must be logged in to post a comment
About the Author