{:en}How to set up temperature and humidity sensor (DHT11) on raspberry Pi{:}{:ja}ラズパイでDHT11温湿度センサーを作動する{:}{:zh}树莓派读取DHT11{:}
{:en}
Overview
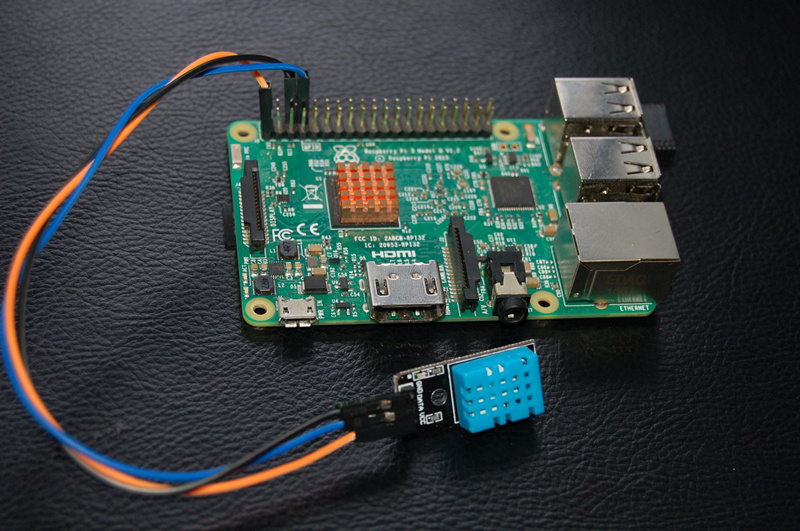
The DHT11 temperature and humidity sensor is a nice module that provides digital temperature and humidity readings. It’s really easy to set up. The module is actually a PCB that has a 4-pin DHT11 sensor soldered with a few components, and it is a 3-wire module: VCC, GND and DATA.
Communication Process:
1)Overall Communication Process
Single bus data format is used for the communication and synchronization between MCU and the DHT11 sensor. Each communication process will last about 4ms.
The data is transmitted in this format:
- 8bit integral RH data +
- 8bit decimal RH data +
- 8bit integral T data +
- 8bit decimal T data +
- 8bit check sum.
If the data transmission is correct, the check sum should equals to the lower 8bit of the result of “8bit integral RH data + 8bit decimal RH data + 8bit integral T data + 8bit decimal T data”.
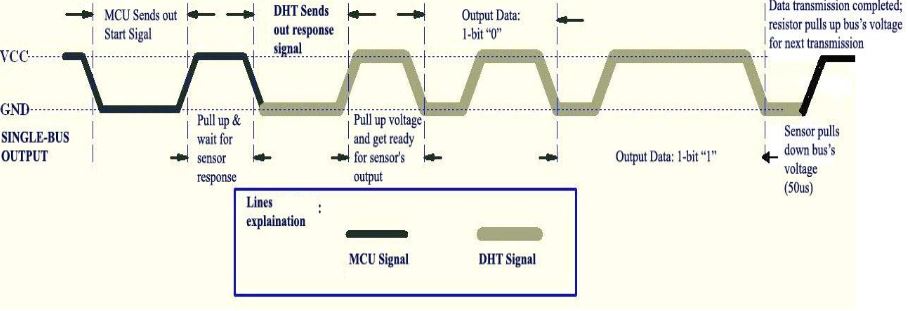
2) MCU sends out start signal to DHT/ DHT responses to MCU
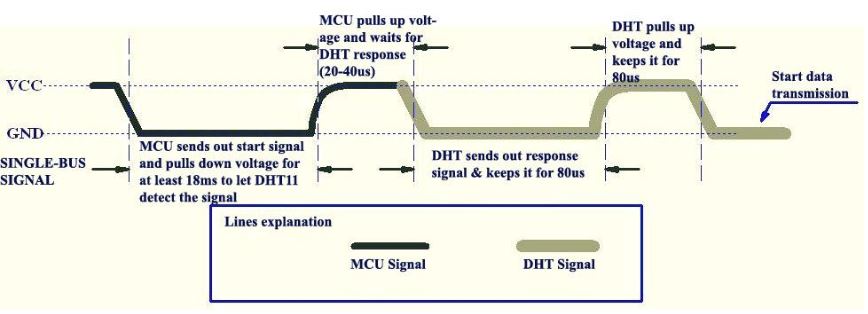
Once DHT11 detects the start signal, it will pull down the DATA pin as “Response Signal”, which will last 80us. Then DHT11 will pull up the DATA pin for 80us, and prepare for data sending.
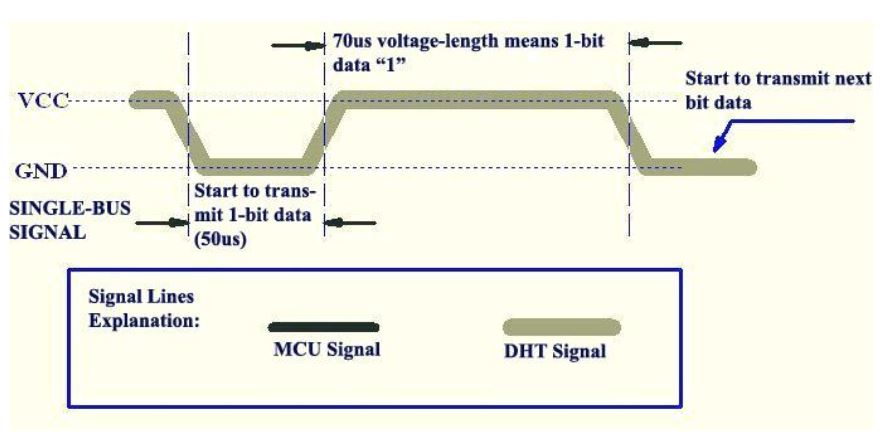
3)During the data transition
During the data transition, every bit of data begins with the 50us low-voltage-level and ends with a high-voltage-level signal. The length of the high-voltage-level signal decides whether the bit is “0” or “1”.
Data bit “0” has 26-28us high-voltage length:

While data bit “1” has 70us high-voltage length:
Hardware Parts
the parts list for the program shown below
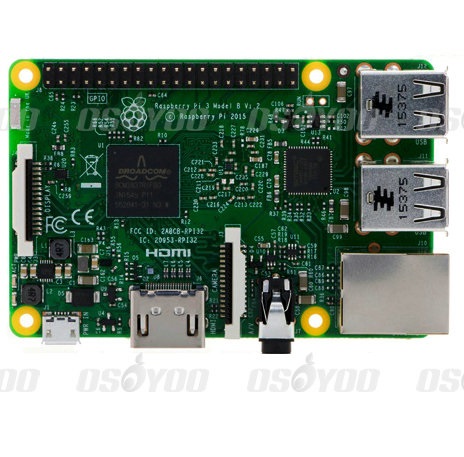 |
Pi3 x1
|
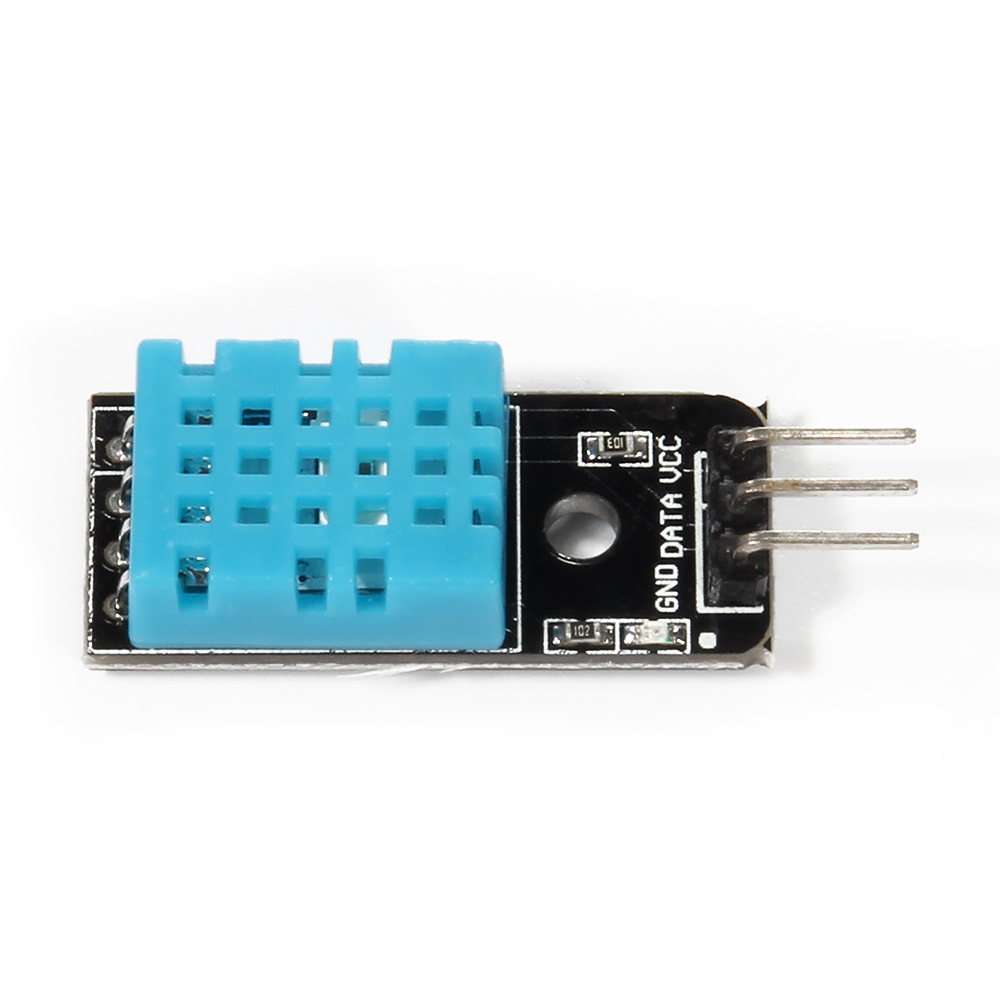 |
DHT11 x1
|
 |
several jumper wires
|
Raspberry pi DHT11
3.3V ———–VCC
GND ———–GND
GPIO14———-DATA,
Regarding GPIO layout, please check our tutorial: How to read Raspberry Pi i/o pin diagram (GPIO pin graph)

Software
1)Code examples written in Python
Creat a new file “dht11-test.py” in any directory, for example: home/pi
sudo nano dht11-test.py
Copy the below code to dht11-test.py file:
sudo wget --no-check-certificate http://osoyoo.com/driver/dht11-test.py
Before running python code, we need to download a dht11.py file, input below command to download, make sure dht11.py and dht11-test.py file in the same directory.
sudo wget --no-check-certificate http://osoyoo.com/driver/dht11.py
Run Python code
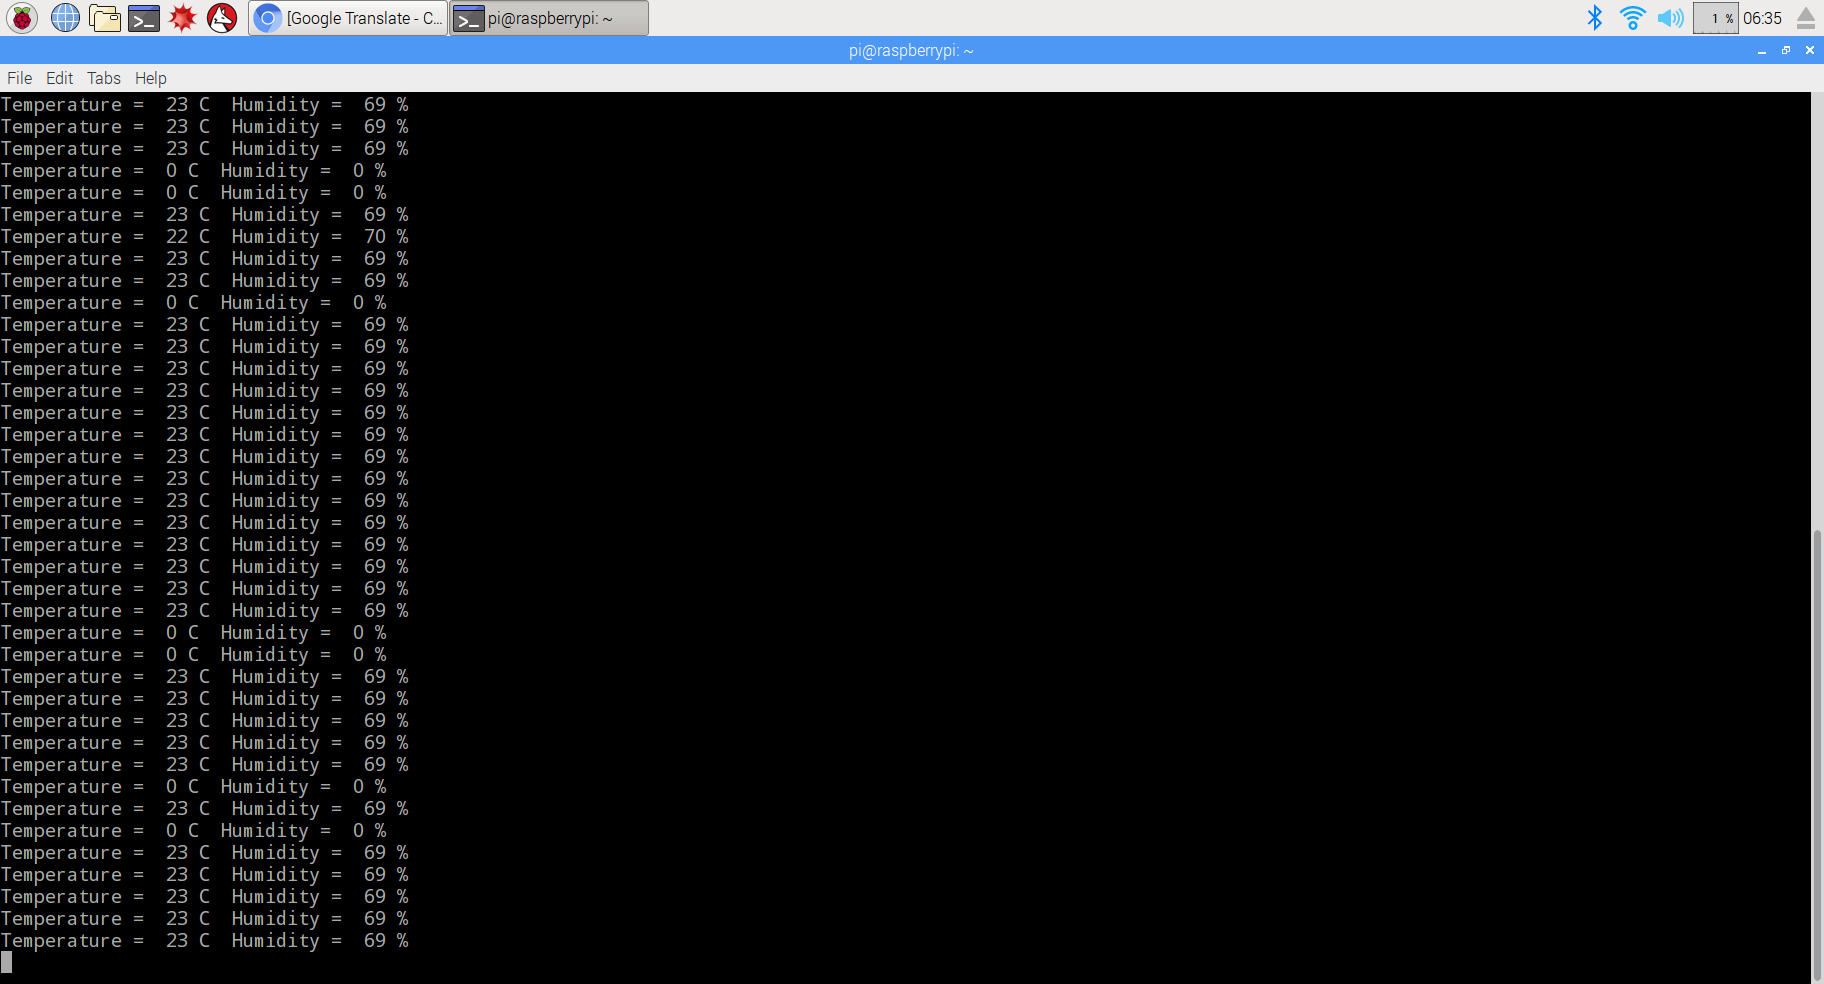
sudo python ./dht11-test.py
2)Code examples written in C
A. Before we running C code, the GPIO library needs to be installed by inputting below command(if you have done, please skip)
sudo git clone git://git.drogon.net/wiringPi
sudo cd wiringPi
sudo ./build
B. Creat a new file: dht11-test.py in any directroy of Raspberry pi, for example:/home/pi
sudo nano dht11-test.c
Copy the below code to dht11-test.c file.
/*
 *  dht11.c:
 *  Simple test program to test the wiringPi functions
 *  DHT11 test
 */

#include <wiringPi.h>
#include <stdio.h>
#include <stdlib.h>
#include <stdint.h>
#define MAXTIMINGS  85
#define DHTPIN    15
int dht11_dat[5] = { 0, 0, 0, 0, 0 };

void read_dht11_dat()
{
  uint8_t laststate = HIGH;
  uint8_t counter   = 0;
  uint8_t j   = 0, i;
  float f; /* fahrenheit */

  dht11_dat[0] = dht11_dat[1] = dht11_dat[2] = dht11_dat[3] = dht11_dat[4] = 0;

  /* pull pin down for 18 milliseconds */
  pinMode( DHTPIN, OUTPUT );
  digitalWrite( DHTPIN, LOW );
  delay( 18 );
  /* then pull it up for 40 microseconds */
  digitalWrite( DHTPIN, HIGH );
  delayMicroseconds( 40 );
  /* prepare to read the pin */
  pinMode( DHTPIN, INPUT );

  /* detect change and read data */
  for ( i = 0; i < MAXTIMINGS; i++ )
  {
    counter = 0;
    while ( digitalRead( DHTPIN ) == laststate )
    {
      counter++;
      delayMicroseconds( 1 );
      if ( counter == 255 )
      {
        break;
      }
    }
    laststate = digitalRead( DHTPIN );

    if ( counter == 255 )
      break;

    /* ignore first 3 transitions */
    if ( (i >= 4) && (i % 2 == 0) )
    {
      /* shove each bit into the storage bytes */
      dht11_dat[j / 8] <<= 1;
      if ( counter > 16 )
        dht11_dat[j / 8] |= 1;
      j++;
    }
  }

  /*
   * check we read 40 bits (8bit x 5 ) + verify checksum in the last byte
   * print it out if data is good
   */
  if ( (j >= 40) &&
       (dht11_dat[4] == ( (dht11_dat[0] + dht11_dat[1] + dht11_dat[2] + dht11_dat[3]) & 0xFF) ) )
  {
    f = dht11_dat[2] * 9. / 5. + 32;
    printf( "Humidity = %d.%d %% Temperature = %d.%d *C (%.1f *F)\n",
      dht11_dat[0], dht11_dat[1], dht11_dat[2], dht11_dat[3], f );
  }else  {
    printf( "Data not good, skip\n" );
  }
}

int main( void )
{
  printf( "Raspberry Pi wiringPi DHT11 Temperature test program\n" );

  if ( wiringPiSetup() == -1 )
    exit( 1 );

  while ( 1 )
  {
    read_dht11_dat();
    delay( 1000 ); /* wait 1sec to refresh */
  }

  return(0);
}
C. Run the code.
sudo gcc -o dht11-test dht11-test.c -lwiringPi
sudo ./dht11-test
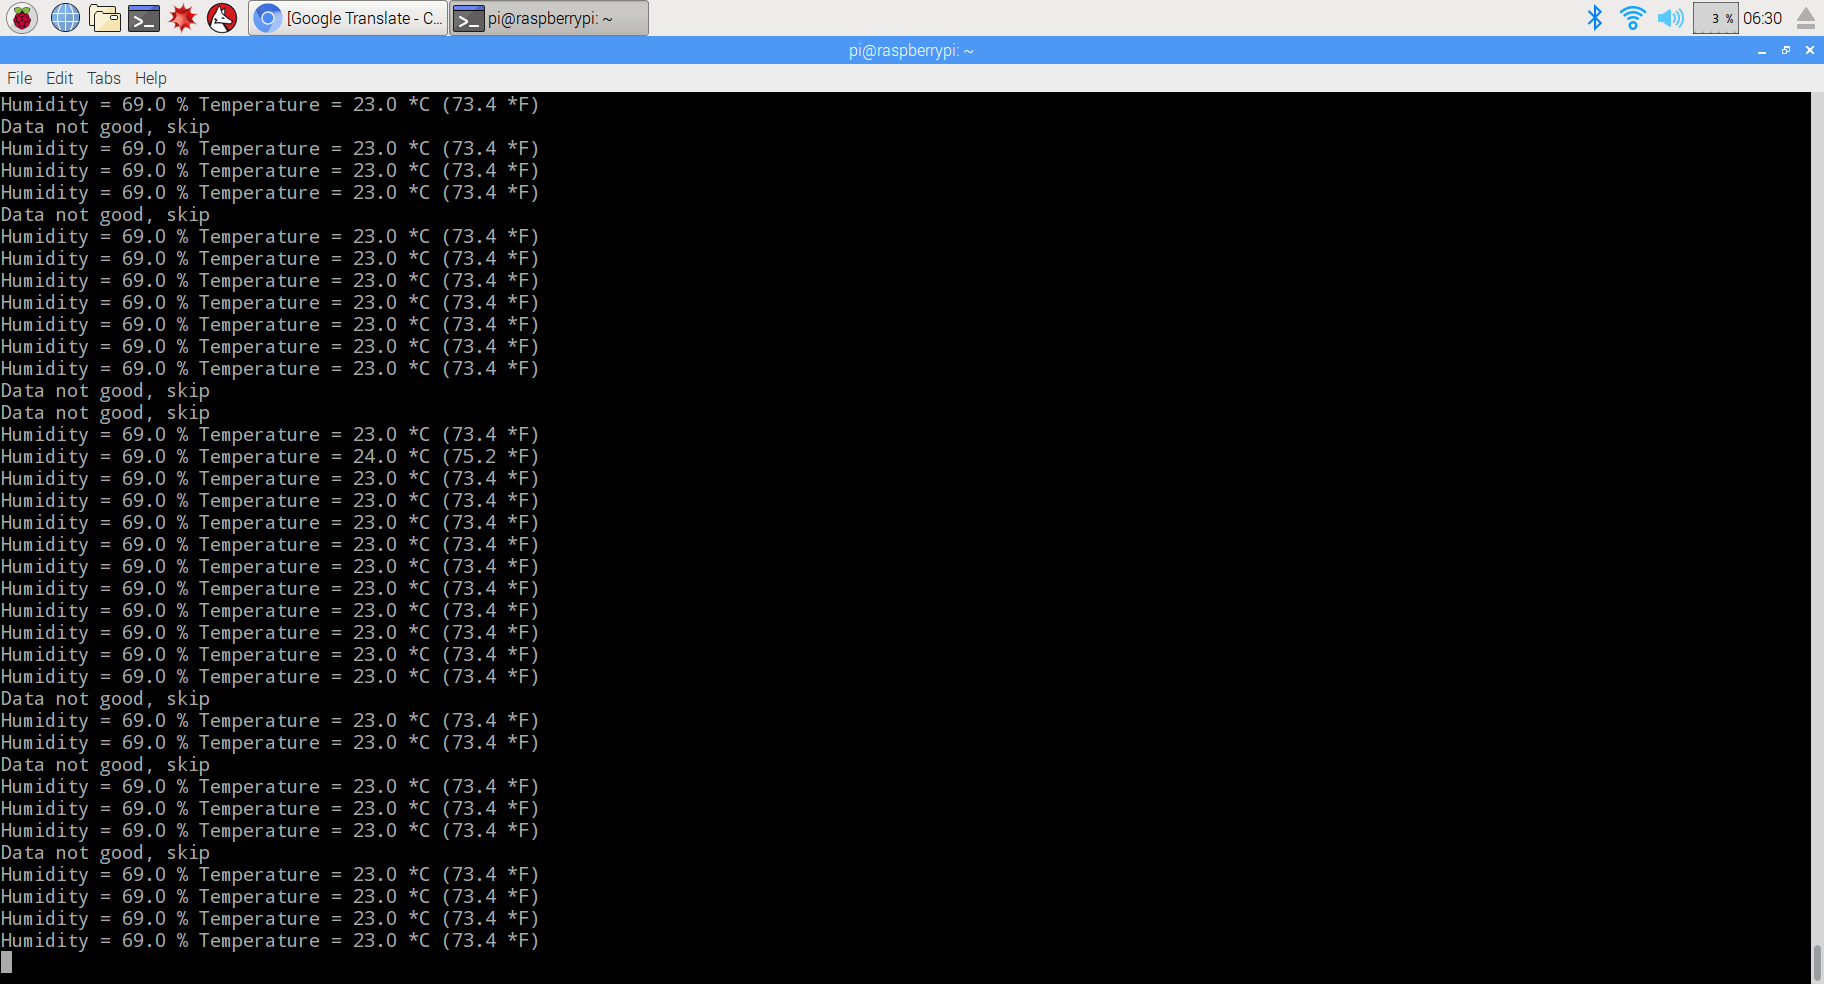
As we can see that both examples has a chance to lost data. this is because Raspberry pi is not running at a real-time system, the delay in the program is not accurate enough, and sometimes that leads to a failure of transmission. Because C is a lower level language, it controls the GPIO pin in a more direct way, so the example in C has less chance to fail.
You can download all the code for this program by inputting the command as followed:
sudo wget --no-check-certificate http://osoyoo.com/wp-content/uploads/2017/03/dht11_code.rar
{:}{:ja}
説明
本文では、ラズパイとDHT11温湿度センサーを使って、周囲環境の温湿度データを獲得します。DHT11は湿度測定、温度測定、通信機能を搭載した温度湿度センサです。 また、出力値は校正済みで無調整で使用することが可能です。センサの構成は温度測定にはNTCサーミスタ、湿度測定に高分子膜湿度センサが使用さ れております。このセンサは相対湿度の変化に応じて高分子膜に含まれる水分の量が変化 し、これにより誘電率が変化することから相対湿度を測定します。DHT11はこれらのセン サを専用ASICにてデジタル変換を行い1線式シリアル信号を出力します。ユーザーはマイ コンなどで、出力データを読み取るだけで簡単に湿度と温度の測定が可能です。従来の高分子膜湿度センサと違い、駆動に必要な外部回路の設計及び回路実装、校正か ら開放されます。測定に必要な回路が全て内蔵され、小スペース実装する事が可能です。 データ出力はオープンドレイン出力のため、20メートルまで伸ばす事が可能です。
DHT11タイミング ダイヤグラム
1)DATAフレーム
DTH11はスタート信号を出力し続いて40ビット(5バイト)構成の同期クロックが含まれたシリアルデータを出力します。データ出力時間は、おお よそ4m/Sです。サンプリング周期は1秒以上で、それより短い間隔でデータ要求しても、 データが出ない場合があります
。第1、2バイトは温度値として、第3、4バイトは湿度値として、表示します。最後の1バイトはチェックサムとして、使用しますので、データが問題ない場合、第1、2バイトと第3、4バイトの合計は第5バイトになります。
2)ハンドシェイク
測定を開始するには、マイコン側から、データ線を 18m秒以上「L」にし、その後「H」にします。
センサは、データ転送の準備ができると、データ線を 80μ秒の間「L」にし、続いて80μ秒の間「H」にします。 この後、センサは40ビットのデータを送ってきます。
3)データビットの転送
センサは、データ転送開始の合図のあと、40ビット (8ビット×5バイト)のデータを送ってきます。データは、上位ビットを先に送信します。各データ ビットは、データビットの開始を示す50μ秒の「L」の あと、「0」のデータなら26~28μ秒の「H」、「1」の データなら70μ秒の「H」が送信されます。
40ビットのデータを送り終わると、センサはデータ 転送完了の合図として、50μ秒の「L」を送ってきます。
データ ‘0’:
データ ‘1’:
必要なパーツ
|
|
Pi3ボード x1
|
|
|
DS18B20 x1
|
|
|
ジャンプワイヤー x3
|
ハードウェア
DHT11のVCCとラズパイの3.3V、DHT11のGNDとラズパイのGND、DHT11のDATAとラズパイのGPIO14(BCM)を接続して下さい。 Raspberry PiのGPIOピンの基礎知識はこちら~
ソフトウエア
Python言語とC言語2種の言語のプログラム編集方法を紹介します。
1)Python言語
nanoエディターを使って、dht11-test.pyと言うファイルを新規作成します。
sudo nano dht11-test.py
dht11-test.pyファイルに下記の内容をコーピーして下さい:
# _____ _____ _____ __ __ _____ _____
#|     |   __|     |  |  |     |     |
#|  |  |__   |  |  |_   _|  |  |  |  |
#|_____|_____|_____| |_| |_____|_____|
#
# Use Raspberry Pi to get temperature/humidity from DHT11 sensor
#
import time
import dht11
import RPi.GPIO as GPIO

#define GPIO 14 as DHT11 data pin
Temp_sensor=14
def main():
  # Main program block
  GPIO.setwarnings(False)
  GPIO.setmode(GPIO.BCM)       # Use BCM GPIO numbers
  # Initialise display
#  lcd_init()
  instance = dht11.DHT11(pin = Temp_sensor)

  while True:
        #get DHT11 sensor value
        result = instance.read()
  print"Temperature = ",result.temperature,"C"," Humidity = ",result.humidity,"%"
  time.sleep(1)

if __name__ == '__main__':

  try:
    main()
  except KeyboardInterrupt:
    pass
#  finally:
#    lcd_byte(0x01, LCD_CMD)
Pythonコードを作動のため、dht11.pyと言うファイルも必要です。下記のコマンドを動作して、dht11.pyファイルをダウンロードして下さい。必ずdht11-test.pyとdht11.pyを同じパスに置いて下さい。
sudo sudo wget --no-check-certificate http://osoyoo.com/driver/dht11.py
下記のコマンドを動作して、Pythonプログラムを作動する
sudo python ./dht11-test.p
上記のコマンドを実行したら、温湿度データがターミナルに表示します。時々0と出ったん、何故?ラズパイはDHT11の信号を読み取れる時、マイクロ秒のリアルタイム・タイミングが必要ですが、ラズパイでのOS、Raspbianはリアルタイムシステムではないので、正しくチェックできない時は、データが紛失しました。
2)C言語
A.ラズパイでC言語を使用の場合、GPIOライブラリのインストールが必要です,下記のコマンドを動作して、インストールできます:
sudo git clone git://git.drogon.net/wiringPi
sudo cd wiringPi
sudo ./build
B.下記のコマンドを動作して、nanoエディターを使用して、dht11-test.cファイルを新規作成します。
sudo nano dht11-test.c
dht11-test.cファイルに下記の内容をコーピーして下さい。
/*
 *  dht11.c:
 *  Simple test program to test the wiringPi functions
 *  DHT11 test
 */

#include <wiringPi.h>
#include <stdio.h>
#include <stdlib.h>
#include <stdint.h>
#define MAXTIMINGS  85
#define DHTPIN    15
int dht11_dat[5] = { 0, 0, 0, 0, 0 };

void read_dht11_dat()
{
  uint8_t laststate = HIGH;
  uint8_t counter   = 0;
  uint8_t j   = 0, i;
  float f; /* fahrenheit */

  dht11_dat[0] = dht11_dat[1] = dht11_dat[2] = dht11_dat[3] = dht11_dat[4] = 0;

  /* pull pin down for 18 milliseconds */
  pinMode( DHTPIN, OUTPUT );
  digitalWrite( DHTPIN, LOW );
  delay( 18 );
  /* then pull it up for 40 microseconds */
  digitalWrite( DHTPIN, HIGH );
  delayMicroseconds( 40 );
  /* prepare to read the pin */
  pinMode( DHTPIN, INPUT );

  /* detect change and read data */
  for ( i = 0; i < MAXTIMINGS; i++ )
  {
    counter = 0;
    while ( digitalRead( DHTPIN ) == laststate )
    {
      counter++;
      delayMicroseconds( 1 );
      if ( counter == 255 )
      {
        break;
      }
    }
    laststate = digitalRead( DHTPIN );

    if ( counter == 255 )
      break;

    /* ignore first 3 transitions */
    if ( (i >= 4) && (i % 2 == 0) )
    {
      /* shove each bit into the storage bytes */
      dht11_dat[j / 8] <<= 1;
      if ( counter > 16 )
        dht11_dat[j / 8] |= 1;
      j++;
    }
  }

  /*
   * check we read 40 bits (8bit x 5 ) + verify checksum in the last byte
   * print it out if data is good
   */
  if ( (j >= 40) &&
       (dht11_dat[4] == ( (dht11_dat[0] + dht11_dat[1] + dht11_dat[2] + dht11_dat[3]) & 0xFF) ) )
  {
    f = dht11_dat[2] * 9. / 5. + 32;
    printf( "Humidity = %d.%d %% Temperature = %d.%d *C (%.1f *F)\n",
      dht11_dat[0], dht11_dat[1], dht11_dat[2], dht11_dat[3], f );
  }else  {
    printf( "Data not good, skip\n" );
  }
}

int main( void )
{
  printf( "Raspberry Pi wiringPi DHT11 Temperature test program\n" );

  if ( wiringPiSetup() == -1 )
    exit( 1 );

  while ( 1 )
  {
    read_dht11_dat();
    delay( 1000 ); /* wait 1sec to refresh */
  }

  return(0);
}
C.下記のコマンドを作動して、プログラムをコンパイルして、プログラムを動作して下さい。
sudo gcc -o dht11-test dht11-test.c -lwiringPi
sudo ./dht11-test
下記のコマンドを作動したら、上記のすべてのコードをダウンロードできます:
sudo wget --no-check-certificate http://osoyoo.com/wp-content/uploads/2017/03/dht11_code.rar
C言語は高級プログラム言語のため、直接にラズパイのGPIOを制御しますので、データ紛失のことは少ないと発見できます。{:}{:zh}
Overview
在本文中将介绍如何用树莓派读取温湿度传感器DHT11 温湿度数据。温度湿度模块看起来简单,只有三个引脚(实际4个接口,有一个脚悬空),但仔细一想,3个引脚分别作为VCC、GND、DATA用,因为传给树莓派GPIO的只有高电平、低电平,那么怎么来读取温度数字和湿度数字呢?这么一想,并不简单!因为引脚少,它需要高低变化的时序信号来表达数值,还有一些其它信号如开始信号等等。所以得先深入了解一下DHT11模块了。
DHT11时序介绍
1)数据帧格式
DHT11会向主机发送40位(5子节)数据,第一二个子节数据表示温度值;第三四个子节数据代表湿度值;最后一个子节是校验码。如果数据无误的情况下,前4个子节的和等于校验码。
2)握手阶段
一旦DHT11收到开始信号,DHT11将向主机发送响应信号,同时将DATA脚拉低80us作为响应,然后DHT11拉高DATA脚80us,握手完毕。
3)数据发送阶段
一次的湿度和温度数据,DHT11需要发送40bits数据,每一位数据之前都以50us低电平开始,随后的高电平时序信号,持续26us-28us的表示这一位是0,持续70us表示这一位是1,然后继续50us低电平,紧接着下一位的高电平开始。
数据 ‘0’:
数据 ‘1’:
Parts
为了完成本项目需要用到如下器件
|
|
Pi3 x1
|
|
|
DS18B20 x1
|
|
|
杜邦线 x3
|
Hardware
硬件连接很简单,将DHT11的VCC接到Pi的3.3V;DHT11的GND接到Pi的GND;DHT11的DATA接到Pi的GPIO14(BCM编码方式),关于GPIO的识别请参考: How to read Raspberry Pi i/o pin diagram (GPIO pin graph)
Software
本文将介绍2中方式读取DHT11数据,一种是Python方式读取,一种是C语言方式读取。
1)Python方式
在任一路径下(如/home/pi)用nano新建一个dht11-test.py文件
sudo nano dht11-test.py
往dht11-test.py文件写入如下代码:
# _____ _____ _____ __ __ _____ _____
#|     |   __|     |  |  |     |     |
#|  |  |__   |  |  |_   _|  |  |  |  |
#|_____|_____|_____| |_| |_____|_____|
#
# Use Raspberry Pi to get temperature/humidity from DHT11 sensor
#
import time
import dht11
import RPi.GPIO as GPIO

#define GPIO 14 as DHT11 data pin
Temp_sensor=14
def main():
  # Main program block
  GPIO.setwarnings(False)
  GPIO.setmode(GPIO.BCM)       # Use BCM GPIO numbers
  # Initialise display
#  lcd_init()
  instance = dht11.DHT11(pin = Temp_sensor)

  while True:
        #get DHT11 sensor value
        result = instance.read()
  print"Temperature = ",result.temperature,"C"," Humidity = ",result.humidity,"%"
  time.sleep(1)

if __name__ == '__main__':

  try:
    main()
  except KeyboardInterrupt:
    pass
#  finally:
#    lcd_byte(0x01, LCD_CMD)
运行Python代码需要依赖一个dht11.py文件,用下面的命令下载,需要保证dht11.py文件与dht11-test.py在同一路径下。
sudo sudo wget --no-check-certificate http://osoyoo.com/driver/dht11.py
运行Python程序
sudo python ./dht11-test.p
执行完上面的命令后会在屏幕上打印出温湿度值,但是很多时候会出现温湿度都等于0的情况,这是为什么?原因在于树莓派读取DHT11的输出信号,需要微秒级的定时,否则在数据传输阶段,很难准确的识别出每一位是“0”还是“1”,树莓派运行的Raspbian系统是一个非实时系统,很难实现准确的微秒级定时,会导致数据丢失,使DHT11在数据校验时候不正确。
2)C语言方式
A.在树莓派下用C语言操作GPIO需要首先安装GPIO库,运行下面命令(如果已经安装请跳过)
sudo git clone git://git.drogon.net/wiringPi
sudo cd wiringPi
sudo ./build
B.在任一路径下(如/home/pi)用nano新建一个dht11-test.py文件
sudo nano dht11-test.c
往dht11-test.c里面写入如下代码
/*
 *  dht11.c:
 *  Simple test program to test the wiringPi functions
 *  DHT11 test
 */

#include <wiringPi.h>
#include <stdio.h>
#include <stdlib.h>
#include <stdint.h>
#define MAXTIMINGS  85
#define DHTPIN    15
int dht11_dat[5] = { 0, 0, 0, 0, 0 };

void read_dht11_dat()
{
  uint8_t laststate = HIGH;
  uint8_t counter   = 0;
  uint8_t j   = 0, i;
  float f; /* fahrenheit */

  dht11_dat[0] = dht11_dat[1] = dht11_dat[2] = dht11_dat[3] = dht11_dat[4] = 0;

  /* pull pin down for 18 milliseconds */
  pinMode( DHTPIN, OUTPUT );
  digitalWrite( DHTPIN, LOW );
  delay( 18 );
  /* then pull it up for 40 microseconds */
  digitalWrite( DHTPIN, HIGH );
  delayMicroseconds( 40 );
  /* prepare to read the pin */
  pinMode( DHTPIN, INPUT );

  /* detect change and read data */
  for ( i = 0; i < MAXTIMINGS; i++ )
  {
    counter = 0;
    while ( digitalRead( DHTPIN ) == laststate )
    {
      counter++;
      delayMicroseconds( 1 );
      if ( counter == 255 )
      {
        break;
      }
    }
    laststate = digitalRead( DHTPIN );

    if ( counter == 255 )
      break;

    /* ignore first 3 transitions */
    if ( (i >= 4) && (i % 2 == 0) )
    {
      /* shove each bit into the storage bytes */
      dht11_dat[j / 8] <<= 1;
      if ( counter > 16 )
        dht11_dat[j / 8] |= 1;
      j++;
    }
  }

  /*
   * check we read 40 bits (8bit x 5 ) + verify checksum in the last byte
   * print it out if data is good
   */
  if ( (j >= 40) &&
       (dht11_dat[4] == ( (dht11_dat[0] + dht11_dat[1] + dht11_dat[2] + dht11_dat[3]) & 0xFF) ) )
  {
    f = dht11_dat[2] * 9. / 5. + 32;
    printf( "Humidity = %d.%d %% Temperature = %d.%d *C (%.1f *F)\n",
      dht11_dat[0], dht11_dat[1], dht11_dat[2], dht11_dat[3], f );
  }else  {
    printf( "Data not good, skip\n" );
  }
}

int main( void )
{
  printf( "Raspberry Pi wiringPi DHT11 Temperature test program\n" );

  if ( wiringPiSetup() == -1 )
    exit( 1 );

  while ( 1 )
  {
    read_dht11_dat();
    delay( 1000 ); /* wait 1sec to refresh */
  }

  return(0);
}
C.编译、执行程序
sudo gcc -o dht11-test dht11-test.c -lwiringPi
sudo ./dht11-test
本文中所有用到的代码可以通过下面的命令获取到
sudo wget --no-check-certificate http://osoyoo.com/wp-content/uploads/2017/03/dht11_code.rar
对比发现,C语言方式虽然也有数据丢失的情况,但是总体来说比Python少一些,,这是因为C语言是高级语言,直接对树莓派GPIO进行操作。{:}
amber administrator
You must be logged in to post a comment
About the Author