Arduino lesson – Vibration Sensor Module
Introduction
Many Applications can created by measuring Vibration level, but sensing vibration accurately is a difficult job. This article describes about vibration sensor SW-420 and Arduino interface then it may help you to design effort less vibration measurement.
Preparations
HARDWARE
- Osoyoo UNO Board (Fully compatible with Arduino UNO rev.3) x 1
- Breadboard x 1
- Vibration Sensor Module x 1
- Jumpers
- USB Cable x 1
- PC x 1
SOFTWARE
Arduino IDE (version 1.6.4+)
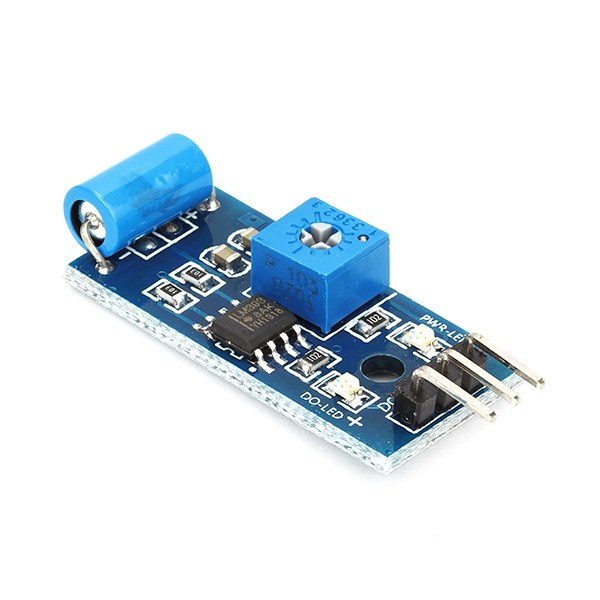
About Vibration Sensor Module
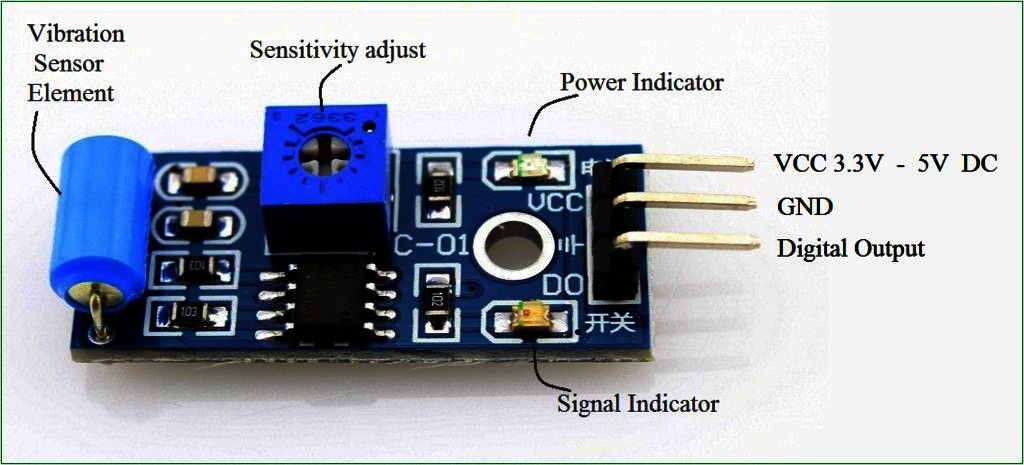
Vibration Sensor Module comes with SW-420 vibration sensor, integrated with adjustable sensitivity via on board potentiometer. There are also LED indicators for power and the digital output status on board. It has a simple and straight forward 3-pin interface, VCC, GND and the DO (digital output). It supports 3.3V or 5V power.
This vibration sensor module is compatible with any microcontroller that has a digital input, so of course any popular microcontroller such and PIC, Arduino and Raspberry Pi are compatible. A direct interface is essential to using this sensor.
The DO pin will be LOW when there is no vibration, and indicator LED will lit up.
Module Features:
- SW-420 using the company’s production of normally closed type vibration sensor.
- The comparator output, the signal is clean, the waveform, the driving ability to exceed 15mA
- Operating voltage 3.3V-5V
- The output in the form: Digital switching outputs (0 and 1)
- A fixed bolt hole for easy installation
- Small board PCB size: 3.2cm x 1.4cm
- Wide voltage LM393 comparator
Uses:
This Vibration Sensor can be used to detect vibration from any angle. There is an on-board potentiometer to adjust the threshold of vibration. It outputs logic HIGH when this module not triggered while logic Low when triggered.
Application Idea
•Automobie alarm.
•Movement detection.
•Vibration detecting Applications Features
Examples
Connection
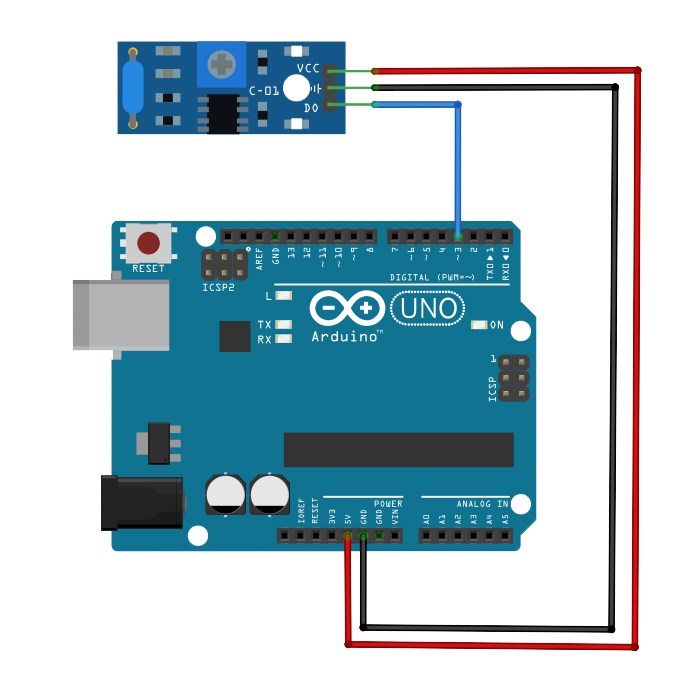
Connect Vcc pin of sensor board to 5V pin of Arduino board, connect Gnd pin to Gnd pin of Arduino, Connect DO output signal pin of sensor board to Arduino digital pin D3. Do some calibration and adjust the sensitivity threshold, then upload the following sketch to Arduino board.
| Vibration Sensor Module | OSOYOO UNO |
| VCC | 5V |
| GND | GND |
| DO | PIN 3 |
Arduino Code for Logic State Output
In this project, we will connect Arduino with Vibration sensor and LED. When no vibration is detected, Vibration sensor output is 0 (low voltage),otherwise its output is 1(high voltage)。 If Arduino get 0 (no vibration) from vibration sensor it will turn on green LED and turn off Red LED. If Arduino get 1 from vibration sensor, it will turn on Red LED and turn off green LED.(Please choose the correct board type and correct port com for your Arduino IDE)
int vib_pin=3;
int led_pin=13;
void setup() {
  pinMode(vib_pin,INPUT);
  pinMode(led_pin,OUTPUT);
}

void loop() {
  int val;
  val=digitalRead(vib_pin);
  if(val==1)
  {
    digitalWrite(led_pin,HIGH);
    delay(1000);
    digitalWrite(led_pin,LOW);
    delay(1000);
   }
   else
   digitalWrite(led_pin,LOW);
}
Arduino Code for Value Reading
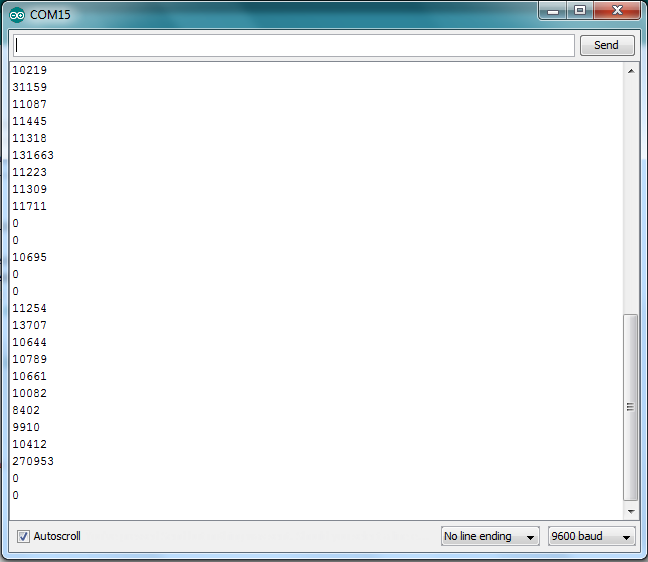
Arduino Code for Value Reading and serial printing Vibration value, this code turns ON the onboard LED when measurement goes greater than 1000, you can adjust this threshold to your need.
int LED_Pin = 13;
int vibr_Pin =3;

void setup(){
  pinMode(LED_Pin, OUTPUT);
  pinMode(vibr_Pin, INPUT); //set vibr_Pin input for measurment
  Serial.begin(9600); //init serial 9600
 // Serial.println("----------------------Vibration demo------------------------");
}
void loop(){
  long measurement =TP_init();
  delay(50);
 // Serial.print("measurment = ");
  Serial.println(measurement);
  if (measurement > 1000){
    digitalWrite(LED_Pin, HIGH);
  }
  else{
    digitalWrite(LED_Pin, LOW);
  }
}

long TP_init(){
  delay(10);
  long measurement=pulseIn (vibr_Pin, HIGH);  //wait for the pin to get HIGH and returns measurement
  return measurement;
}
Finally, you should open the Arduino IDE serial monitor at a 9600 baud rate and you’ll see:
amber administrator
You must be logged in to post a comment
About the Author