Android App communicate with Arduino through HM10 Bluetooth 4.0 module
objective
In this project , we will connect Arduino to HM-10 module and send/receive message to/from Android app through Bluetooth 4.0 protocol.
Parts and devices
1 x Bluetooth 4.0 HM-10 Master Slave Module
1 x Arduino UNO R3 (or MEGA2560)
1 x Android cell phone which supports Bluetooth 4.0
Introduction
Bluetooth 4.0 HM-10 Master Slave Module use TI CC2541, Master and slave roles in one, transmission version and remote control version and PIO state acquisition functions in one, Support the AT command modify module parameters, Convenient and flexible.Transmission version can be used to transmit data between two Bluetooth devices.Remote Control version can be used to Control PIO ports output high or low level without any other MCU.PIO state acquisition version can be used to acquisition PIO ports state without any other MUC. (Only support Bluetooth V2.1)
Parameter
Bluetooth Protocol: Bluetooth Specification V4.0 BLE
USB Protocol: USB V2.0
Operating Frequency: 2.4GHz ISM band
Modulation Mode: GFSK (Gaussian Frequency Shift Keying)
Transmitting Power: ≤4dBm
Sensitivity: ≤-84dBm at 0.1% BER
Transmission Rate: Asynchronous: 6 kbps
Synchronous: 6 kbps
Security Feature: Authentication and encryption
Support Service: Central & Peripheral UUID FFE0, FFE1
Power Supply: +5VDC 50mA
Operating Temperature: -5 ~ +65 Centigrade
Physical Dimension: 27mm x 13mm x 2.2 mm.
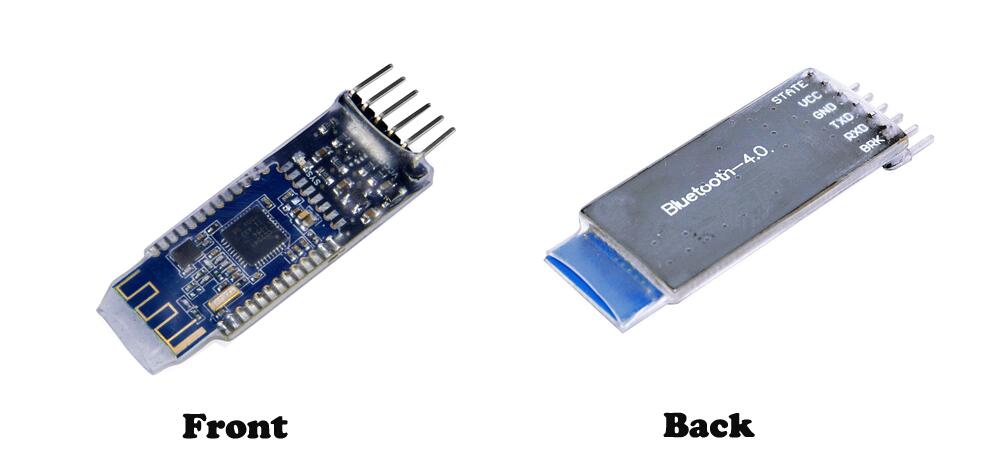
Pin Description
Pin |
Description
|
|---|---|
| STATE | state test pins, connected to internal LED, generally keep it unconnected. |
| VCC | positive pole of the power source. |
| GND | Ground. |
| TXD | serial interface, transmitting terminal. |
| RXD | serial interface, receiving terminal. |
| BRK | break connect, it means breaking Bluetooth connection, generally keep it unconnected. |
Using Arduino UNO R3 Board
Step 1: You should compile and upload the code before building the circuit
Download the loop.ino sketch file, then load it into Arduino UNO.
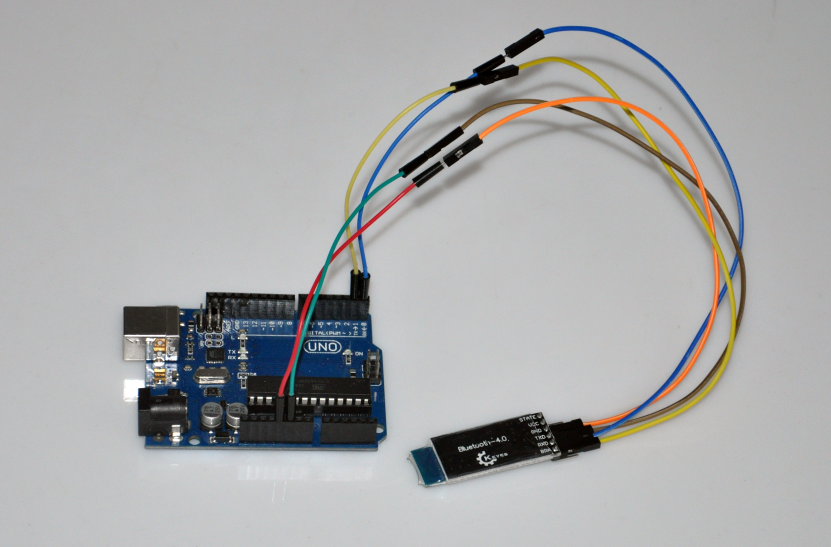
Step2: Connecting circuit
| Bluetooth 4.0 | Arduino UNO R3 |
|---|---|
| VCC | 5V |
| GND | GND |
| TXD | RX0(pin0) |
| RXD | TX0(pin1) |
Step 3: You need to download a Bluetooth 4.0 debugging assistant for mobile phone to connect your phone with the Bluetooth4.0 module. We’ve provided the tool in Android. Just download BleSerialPort.zip on your smart phone and decompress. Then you can see a file BleSerialPort. Enable Bluetooth on your phone and install the BleSerialPort.

Open the installed app, as shown in Fig 1. Click icon at the top right corner. Then click the connect (Fig 2). Find HMSoft and click.

After connecting mobile phone or other Bluetooth device and Bluetooth-4.0 module successfully (Fig 4), the LED indicator on the Bluetooth module will be steady on (stop blinking). Otherwise, the LED indicator will keep blinking.
Now you can send commands. Send a character A to the Bluetooth-4.0 module. If the communication works normally, on the surface you can see A sent out and Rebecca returned. Then the LED on the SunFounder UNO board will blink once.

Communication
If you want to receive date sent from the arduino to your phone, and also receive data from your phone to your arduino. you should upload the follow code first,then open the IDE serial monitor and Android app BleSerialPort,now you can send the data to each other.
For Arduino Uno R3
Download the loop.ino sketch file, then load it into Arduino UNO.
Please be noted that Arduino UNO R3 has only one serial pin pairs(D0/D1) which is occupied by serial printing terminal window. If you want to use D0/D1 to send data to HM-10, you will have no serial pins to display data to serial terminal window.
To solve the confliction, in loop.ino sketch file, we use D7/D8 to imitate serial pins so that we can display data(from HM-10) to serial window which is connected to D0/D1.
Connection map and picture:
| Bluetooth 4.0 | Arduino UNO |
|---|---|
| VCC | 5V |
| GND | GND |
| TXD | pin 7 |
| RXD | pin 8 |

Arduino Mega2560,
As Mega2560 board has two pairs of serial port pins, we no need to use D7/D8 to imitate serial port. The code will be simpler than UNO, you can download the code for Mega2560 board from
http://osoyoo.com/wp-content/uploads/2016/10/for_mega2560.txt, then load it into Arduino IDE(don’t forget to set Arduino IDE board to Mega2560 in Tools menu).
Mega2560 and HM-10 connection map and graph:
| HM-10 Bluetooth 4.0 module | MEGA2560 |
|---|---|
| VCC | 5V |
| GND | GND |
| TXD |
RXD1 |
| RXD |
TXD1 |

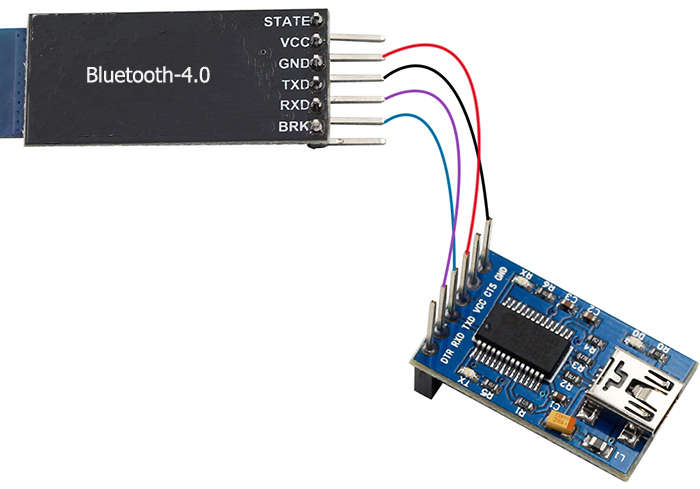
Reference: Using AT Commands to configure HM-10 Bluetooth module
Additional Parts and Devices: 1 x USB to TTL Module and a PC computer
Step 1: wire.
Connect TXD of Bluetooth 4.0 Module to RXD of PL2303, RXD to TXD, GND to GND, and VCC to VCC. PL2303 is a USB to Serial Bridge Controller. You can also use other components, such as FT232.
| Bluetooth 4.0 | FT232 |
|---|---|
| VCC | VCC |
| GND | GND |
| TXD | RX |
| RXD | TX |
Step 2:set parameters
After wiring, open the serial port debug tool sscom32. Set parameters at first.
1) Open the serial port, click Open Com. Select the correct port, as shown below.

2) Select the correct baud rate. Here select 9600 bps.Default: 9600, as shown below.

Step3: Now, you can start to send instructions. Enter”AT” in the text box. If Bluetooth 4.0 Module goes well, OK will be sent, as shown below:

Also you can send AT+NAME?. OK+NAME:HMSoft will be returned .

Send AT+BAUD?, OK+Get:0 will be returned. Default: 0(9600)

For more information about Bluetooth 4.0 AT Instructions. please refer to Bluetooth 4.0 BLE module datasheet.pdf
Other Resources
amber administrator
You must be logged in to post a comment
About the Author