Connecting DS18B20 Temperature Sensor to Raspberry Pi
The Parts Lists for the program shown below .
1)DS18B20 Temperature Sensor
2)Raspberry Pi
3)solderless breadboard
4)several jumper wires
5)resistor
Wiring the DS18B20 Temperature sensor to the RPi
It is important to double check that you don’t confuse Pin 1 and Pin 3 on the device otherwise the power will be applied the wrong way round!Once you have connected everything together you can power up your Raspberry Pi.

Temperature code:
Before we make the Python script we first need to setup the Pi so it can actually read data from the sensor. To do this we need to add OneWire support.
- To add support, we first need to open up the boot config file, this can be done by running the following command:
sudo nano /boot/config.txt - At the bottom of this file enter the following.
dtoverlay=w1-gpio - Once done save & exit by pressing ctrl x and then y. Now reboot the Pi by running the following command.
sudo reboot - You can skip to downloading the code onto the Pi or follow the next few steps to check that the sensor is actually working.
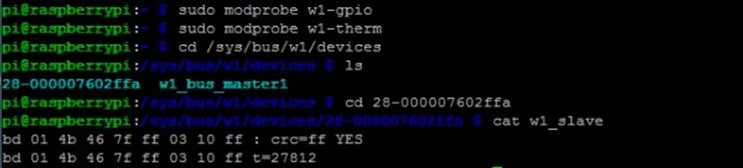
- Once the Raspberry Pi has booted back up we need to run modprobe so we can load the correct modules.
sudo modprobe w1-gpio sudo modprobe w1-therm - Now change into the devices directory and use
lsto see the folder/files in this directory.cd /sys/bus/w1/devices ls - Now run the following command, change the numbering after
cdto what has appeared in your directory by using thelscommand. (If you have multiple sensors there will be more than one directory)cd 28-000007602ffa - Now run the following command.
cat w1_slave - This should output data but as you will notice it is not very user friendly. The first line should have a YES or NO at the end of it. If it is YES, then a second line with the temperature should appear. This would look similar to something like t=12323, you will need to do a bit of math to make this a useable temperature that we can understand easily. For example, Celsius you simply divide by 1000.
Now it’s time to move onto the python script. Input following command.
git clone https://github.com/pimylifeup/temperature_sensor.gitTo begin the python script, we import 3 packages, OS, Glob and time.
Next we run the modprobe commands these are the same as what we used before.
We then declare 3 different variables that will point to the location of our sensor data. You shouldn’t have to change any of these.
import os
import glob
import time

os.system('modprobe w1-gpio')
os.system('modprobe w1-therm')

base_dir = '/sys/bus/w1/devices/'
device_folder = glob.glob(base_dir + '28*')[0]
device_file = device_folder + '/w1_slave'
In the read_temp_raw function we open up the file that contains our temperature output. We read all the lines from this and then return it so the code that has called this function can use it. In this case the read_temp function calls this function.
def read_temp_raw():
    f = open(device_file, 'r')
    lines = f.readlines()
    f.close()
    return lines
In the read_temp function we process the data from the read_temp_raw function. We first make sure that the first line contains YES. This means there will be a line with a temperature in it.
If there is a temperature we then find the line with t= by using lines[1].find('t='). Lines[1] means we’re looking at the 2nd element in the array, in this case the 2nd line. Once we have the line we simply get all the numbers that are after the t= this is done here lines[1][equals_pos+2:]. Equals_pos is the start position of the temperature (t) and we add 2 to the position so we only get the actual temperature numbers.
We then convert the number into both a Celsius and Fahrenheit temperature. We return both of these to the code that called this function. This is the print function located in the while loop.
def read_temp():
    lines = read_temp_raw()
    while lines[0].strip()[-3:] != 'YES':
        time.sleep(0.2)
        lines = read_temp_raw()
    equals_pos = lines[1].find('t=')
    if equals_pos != -1:
        temp_string = lines[1][equals_pos+2:]
        temp_c = float(temp_string) / 1000.0
        temp_f = temp_c * 9.0 / 5.0 + 32.0
        return temp_c, temp_f
The while loop is always true so it will run forever until the program is interrupted by an error or the user cancelling the script. It simply calls the read_temp within the print function. The print function allows us to see the output on our screen. The script is then put to sleep for 1 second every time it has read the sensor.
while True:
	print(read_temp())
	time.sleep(1)
Once you have either downloaded or finished writing up the code and you also have setup the circuit correctly we can now call the Python script. To call the python script simply run the following command.
sudo python thermometer_sensor.pyYou should now have an output of temperatures in both Fahrenheit and Celsius. You can alter this to just display your preferred temperature scale.
amber administrator
You must be logged in to post a comment
About the Author