Rasberry Pi Tank Robot Car Starter Kit Lesson 6: Web Control Camera
{:en}

Authorized Online Retailers
Robot Tank Car Chassis
| Buy from US | Buy from CA | Buy from UK | Buy from DE | Buy from IT | Buy from FR | Buy from ES |
 Objective
In this lesson, we will learn how to let the robot car has vision to see front environment and how to control the robot car through web browser or mobile APP.
To complete this task, we need install a web server software called “mjpg-streamer” in Raspberry Pi, this software will catch video from Robot Car camera and send the video to a web page.
We also need to install another web server software called “WebIOPi” in Raspberry Pi. This software will allow user to use browser to remotely control Raspberry Pi GPIO input/output and therefore control the movement of our robot motor.
Software Installation
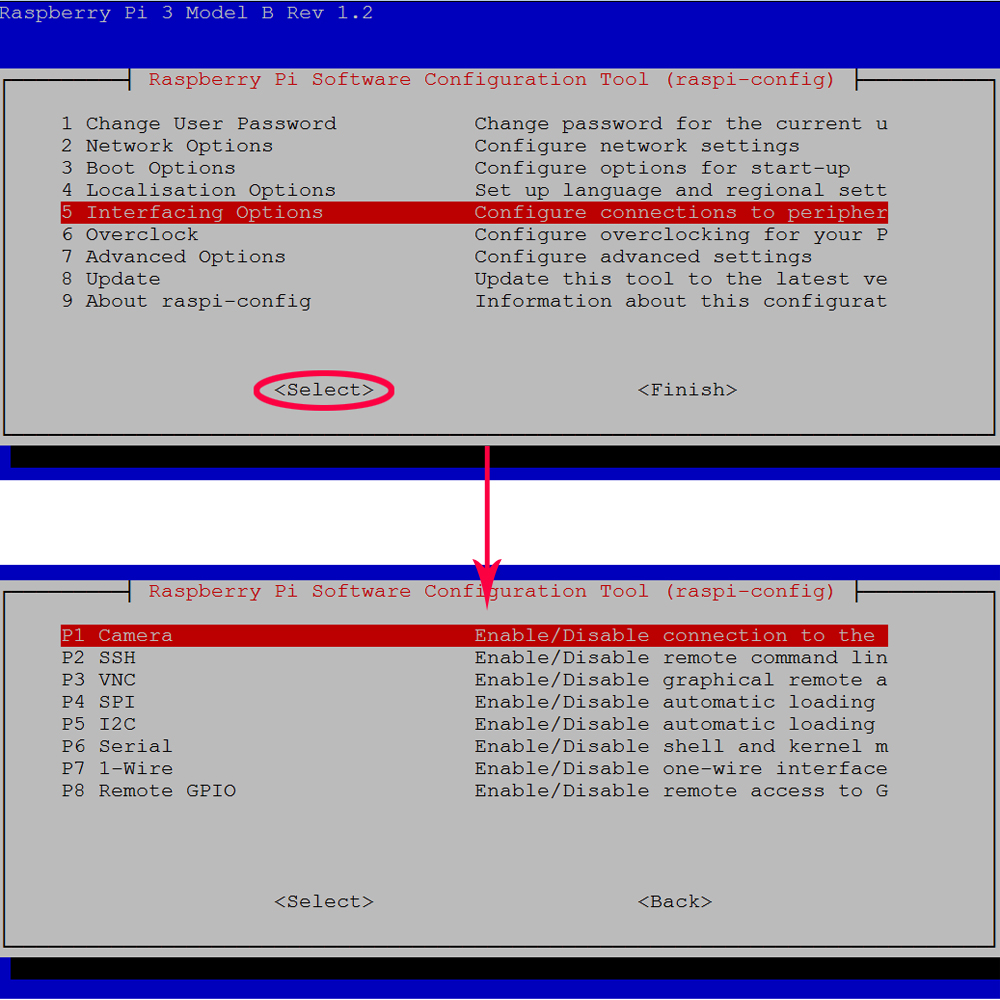
Before type the following commands, you need to open the I2C and know your raspberry pi IP address.
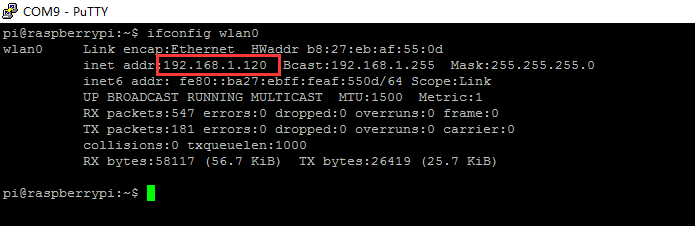
(1)If you don’t know your raspberry pi IP address, type following command in your terminal,Your raspberry Pi IP address is in the right side of the word inet addr.
ifconfig wlan0

(2)Open I2C function
In order to use I2C function, we need type following command from terminal:
sudo raspi-config
Then select Interfacing Options->I2C->Yes->Ok->Finish


If you know IP address and open I2C function, please skip the above steps.
STEP 1: Download and upzip software package by running following terminal commands
cd ~
sudo apt-get install rpi.gpio -y
mkdir -p osoyoo-robot/cam-robot
cd osoyoo-robot/cam-robot
wget \-\-no-check-certificate http://osoyoo.com/driver/WebIOPi-0.7.1.tar.gz
wget –no-check-certificate http://osoyoo.com/driver/mjpg-streamer.tar.gz
wget –no-check-certificate http://osoyoo.com/driver/robot-tank.tar.gz
tar -xzvf WebIOPi-0.7.1.tar.gz
tar -xzvf mjpg-streamer.tar.gz
tar -xzvf robot-tank.tar.gz


STEP 2:WebIOPI server Installation
(1)Download WebIOPi patch
cd ~/osoyoo-robot/cam-robot/WebIOPi-0.7.1/
wget –no-check-certificate http://osoyoo.com/driver/webiopi-pi2bplus.patch

(2)Install WebIOPi patch
patch -p1 -i webiopi-pi2bplus.patch

(3).Compile webiopi
sudo ./setup.sh


(4).You need verify the installation by typing following command
webiopi -h

If WebIOPi is installed successfully, you will see following message in terminal, otherwise you might need redo the download and installation.
 sudo webiopi [-h] [-c config] [-l log] [-s script] [-d] [port]

    Options:
      -h, --help           Display this help
      -c, --config  file   Load config from file
      -l, --log     file   Log to file
      -s, --script  file   Load script from file
      -d, --debug          Enable DEBUG

    Arguments:
      port                 Port to bind the HTTP Server
(5)Run webiopi by typing following command
sudo webiopi -d -c /etc/webiopi/config

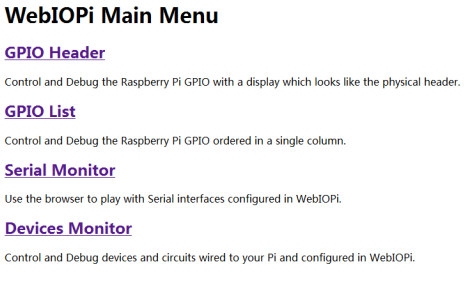
Use a browser in another computer (your computer/PAD/Phone in same LAN of your Pi) to visit your Pi’s IP address with port “8000” ( i.e http://192.168.50.7:8000, please replace 192.168.50.7 with your Pi’s local IP address), your browser will show WebIOPi login page. You need use default WebIOPi user name “webiopi” and default password “raspberry” to login to the server. Once you are logged into WebIOPi page, you will see WebIOPI Main Menu as following. If you can not see this page , you need to reinstall the WebIOPI software.
Please press “Ctrl” + “C” then “Ctrl” + “Z” in your terminal to end WebIOPi running.
STEP3: Installation mjpg-streamer server
If you are using CSI camera , please take following action as per step A and B . If you are using USB camera which comes with the car, please skip these two step
(A)Enable camera in Raspberry Pi
sudo raspi-config
(B) Edit “/etc/modules” file by typing following command(otherwise /dev has no camera device node)
sudo nano /etc/modules
Please add the following line in the bottom of the “/etc/modules” file, and then press “ctrl” + “x” and then “y” to save the file and press “enter” exist nano editor
bcm2835-v4l2 (l is lowercase letters l,not digital 1)
Step 4:download and install mjpg-streamer support library by typing following command
cd ~
sudo apt-get update
sudo apt-get install libv4l-dev libjpeg8-dev -y
sudo apt-get install subversion -y


Step 5: Compile mjpg-streamer
(1) edit the configuration file “input_uvc.c” by typing following command
cd ~/osoyoo-robot/cam-robot/mjpg-streamer
cd plugins/input_uvc
sudo nano input_uvc.c (if vim installed, you can type: sudo vim input_uvc.c)


Find following line(you can use “ctrl” + “W” to search the line when you enter nano editor)
int width=640, height=480, fps=5, format=V4L2_PIX_FMT_MJPEG
Replace the string V4L2_PIX_FMT_MJPEG with new string V4L2_PIX_FMT_YUYV

Then press “ctrl” + “x” and then “y” to save the file and press “enter” exist nano editor
(2) we need compile the source code with following commands:
cd ~/osoyoo-robot/cam-robot/mjpg-streamer
make all

(3) test camera installation: Plug your camera into Raspberry Pi, then type following command:
ls /dev/video*
You should see following result in your terminal, “/dev/video0” is the camera installed in Pi
![]()
(4) Run mjpg-streamer Server by typing following command in terminal:
sudo ./start.sh
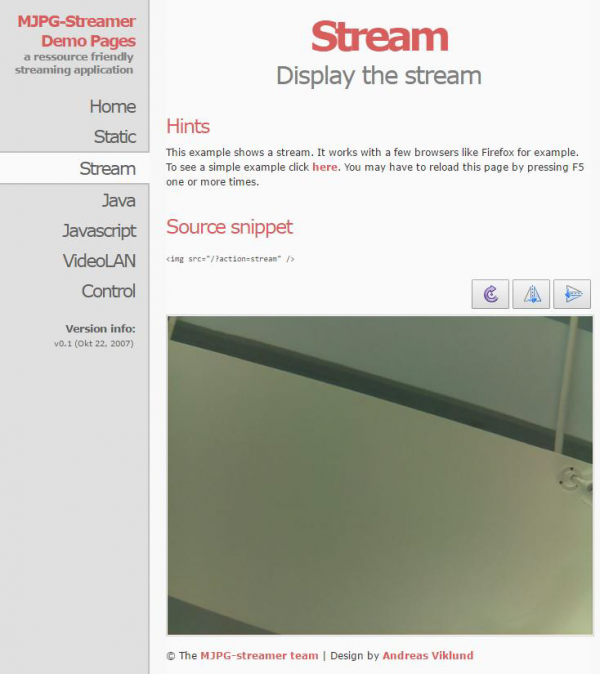
Now use browser in another computer to access your Raspberry Pi IP address with port 8899 (i.e, if your Pi IP address is 192.168.50.7, visit http://192.168.50.7:8899 in your browser), you will see following image. Click Stream button in left menu, you will see the real time video captched by the camera in your Raspberry Pi

You can use Ctrl C command in terminal to end the mjpg-streamer server
Step 6: To combine webiopi and mjpg-streamer into same webpage which allows we “see” video from camera and control Robot Car with brower, we need change some default setting of WebIOPi and MJPG-streamer. To do so, we need to edit config file by typing following command and modify this file as Modification A, Modification B, Modification C:
sudo nano /etc/webiopi/config
Modification A: replace webiopi default script python file which allow us to send control signal to Pi from Browser, please add following pink line into “/etc/webiopi/config” file
[SCRIPTS]
# Load custom scripts syntax :
# name = sourcefile
#each sourcefile may have setup, loop and destroy functions and macros
#myscript = /home/pi/WebIOPi-0.7.1/examples/scripts/macros/script.py
myscript = /home/pi/osoyoo-robot/cam-robot/robot/script.py
Modification B. change webiopi default html file path by adding following pink line:
# Use doc-root to change default HTML and resource files location
#doc-root = /home/pi/WebIOPi-0.7.1/examples/servo-control
doc-root = /home/pi/osoyoo-robot/cam-robot/robot
Modification C. Add PCA9685 address into config by addling following pink line
[DEVICES]
# Device configuration syntax:
# name = device [args...]
# name   : used in the URL mapping
#device : device name
#args   : (optional) see device driver doc
#If enabled, devices configured here are mapped on REST API /device/name
#Devices are also accessible in custom scripts using deviceInstance(name)
#See device driver doc for methods and URI scheme available

# Raspberry native UART on GPIO, uncomment to enable
# Don't forget to remove console on ttyAMA0 in /boot/cmdline.txt
# And also disable getty on ttyAMA0 in /etc/inittab
#serial0 = Serial device:ttyAMA0 baudrate:9600

# USB serial adapters
#usb0 = Serial device:ttyUSB0 baudrate:9600
#usb1 = Serial device:ttyACM0 baudrate:9600

#temp0 = TMP102
#temp1 = TMP102 slave:0x49
#temp2 = DS18B20
#temp3 = DS18B20 slave:28-0000049bc218

#bmp = BMP085

#gpio0 = PCF8574
#gpio1 = PCF8574 slave:0x21

#light0 = TSL2561T
#light1 = TSL2561T slave:0b0101001

#gpio0 = MCP23017
#gpio1 = MCP23017 slave:0x21
#gpio2 = MCP23017 slave:0x22
pwm0 = PCA9685 slave:0x40
#PWM1 =PCA9685
#pwm1 = PCA9685 slave:0x41

#adc0 = MCP3008
#adc1 = MCP3008 chip:1 vref:5
#dac1 = MCP4922 chip:1
Finally, press “ctrl” + “x” and then “y” to save the file and press “enter” exist nano editor
Testing
Step 7:Testing
Now you can put your car on the ground and turn on the power-switch in battery box. We need to use SSH to control the car. So you must enable SSH with raspi-config command before testing. If you are using windows, please use download Putty to ssh your Pi, if you are using MacBook, please directly use ssh command in terminal.
(1) To start mjpg-streamer, in ssh terminal, please type followinig command:
cd ~/osoyoo-robot/cam-robot/mjpg-streamer
sudo ./start.sh
(2) To start webiopi, please open another ssh window and type following command:
sudo webiopi -d -c /etc/webiopi/config
Now you can use your browse to acess Raspberry IP with port 8000(i.e, if your Pi IP address is 192.168.0.115, please visit http://192.168.50.7:8000, you will see following picture in your browser, click arrow buttons, you can make car moving to your desired directions.

如果报错请确认两点:
A.上面配置是否正确
B.PCA9685是否供上电了,如没有电,因为软件读取不到IIC设备,会报错。
Android App
You can also use our free Android App or Apple App instead of browser to control the car.
Download the Apple app from Apple APP store.
Download the Android app from google play or http://osoyoo.com/driver/osoyoo-robot.apk

Run the App, click set up and enter config page set the fields as following:
IP Address: 192.168.50.7
Your raspberrr pi ip Port: 8000
User Name: webiopi
Password: raspberry
Video Port:8899
Click Save button and exit config page


Now you can use the arrow buttons in App to control the car
{:}{:ja}
Authorized Online Retailers
| Buy from US | Buy from CA | Buy from UK | Buy from DE | Buy from IT | Buy from FR | Buy from ES |
目 的
このレッスンでは、ロボットカーに前方の視野を持たせる方法と、ウェブブラウザやモバイルアプリを介してロボットカーを制御する方法を学びます。
この作業を行うには、ラズベリーパイに「mjpg–ストリーマー」と呼ばれるウェブサーバーソフトをインストールする必要があり、このソフトは、ロボットカー上のカメラからビデオキャッチして、ウェブページにビデオ信号を送信します。
また、ラズベリーパイに「WebIOPi」と呼ばれる別のウェブサーバーソフトウェアをインストールする必要があります。このソフトウェアは、ユーザーがリモートでラズベリーパイのGPIO入出力を制御するためにブラウザを使用して、したがって、私たちのロボットモーターの動きを制御することができます。
また、ラズベリーパイに「WebIOPi」と呼ばれる別のウェブサーバーソフトウェアをインストールする必要があります。このソフトウェアは、ユーザーがブラウザを使いリモートでズベリーパイのGPIO入出力を制御すおことで、ロボットモーターの動きを制御することができます
ソフトウェアのインストール
次コマンドを入力する前に、I2C を開き、ラズベリーパイの IP アドレスを知る必要があります。
(1)もし IPアドレスが判らない場合は、ターミナルでifconfig wlan0 入力すると、
RASPBERY IPアドレスはinent addrの右側の文字である。
ifconfig wlan0
(2)I2C関数を開く
I2C関数を使用するためには、ターミナルあら下記コマンドを入力する。
sudo raspi-config
Interfacing Options->I2C->Yes->Okを選択して終了させる。
もしIPアドレスが判っていれば、上記の手順をスキップして、I2C関数を使います。
ステップ1、 下記ターミナルコマンドで入力して、ソフトパッケージをダウンロード、解凍して導入する。
cd ~
sudo apt-get install rpi.gpio -y
mkdir -p osoyoo-robot/cam-robot
cd osoyoo-robot/cam-robot
wget —-no-check-certificate http://osoyoo.com/driver/WebIOPi-0.7.1.tar.gz
wget —-no-check-certificate http://osoyoo.com/driver/mjpg-streamer.tar.gz
wget —-no-check-certificate http://osoyoo.com/driver/robot-tank.tar.gz
tar -xzvf WebIOPi-0.7.1.tar.gz
tar -xzvf mjpg-streamer.tar.gz
tar -xzvf robot-tank.tar.gz
ステップ2、WebIOPI serverをインストール
(1)Download WebIOPi patch
- Download WebIOPi patch
- WebIOPi patchのダウンロード
cd ~/osoyoo-robot/cam-robot/WebIOPi-0.7.1/
wget —-no-check-certificate http://osoyoo.com/driver/webiopi-pi2bplus.patch
(2)WebIOPi patchのダウンロード
patch -p1 -i webiopi-pi2bplus.patch
(3)Webiopiコンプライ
sudo ./setup.sh
(4).次のコマンドを入力してインストールを確認する。
webiopi -h
WebIOPiのインストールが成功していれば、次のメッセージが表示される、それ以外は
ダウンロードとインストールをやり直す。
 sudo webiopi [-h] [-c config] [-l log] [-s script] [-d] [port]

    Options:
      -h, --help           Display this help
      -c, --config  file   Load config from file
      -l, --log     file   Log to file
      -s, --script  file   Load script from file
      -d, --debug          Enable DEBUG

    Arguments:
      port                 Port to bind the HTTP Server
(5)次のコマンド入力でwebiopiを起動する。
sudo webiopi -d -c /etc/webiopi/config
別のコンピュータ(Piの同じLAN内のコンピュータ/PAD/電話)のブラウザを使用して、PiのIPアドレスをポート“8000”にアクセスします(つまり、http://192.168.50.7:8000、192.168.50.7をPiのローカルIPアドレスに置き換える)、ブラウザにWebIOPiログインページが表示されます。サーバーにログインするには、デフオルトの WebIOPi ユーザー名 “webiopi” とデフオルトのパスワード “raspberrs” を使用する必要があります。WebIOPi ページにログインすると、次のような WebIOPI にメイン メニューが表示されます。このページが表示されない場合は、WebIOPI ソフトウェアを再インストールする必要があります。
WebIOPi を終了するには“Ctrl” + “C”を押しから“Ctrl” + “Z”押します。
ステップ3、mjpg―streamerのインストール
CSIカメラを使用している場合は、ステップAとBに従って以下のアクションを取ってください。あなたは車に付属しているUSBカメラを使用している場合は、これらの2つのステップをスキップしてください。
(A)ラズベリーパイでカメラを有効にする
sudo raspi-config
(B) 次のコマンドを入力して「/etc/modules」ファイルを編集します(それ以外の場合/devにはカメラデバイスノードがありません)
sudo nano /etc/modules
“/etc/modules” ファイルの一番下に次の行を追加してから、“ctrl” + “x” 押してから “y” を押してファイルを保存
、“enter” を押して nano エディタを終える。。
bcm2835-v4l2 (l is lowercase letters l,not digital 1)
ステップ4、次のコマンドでmjpg-streamer support library ダウンロード、インストールする
cd ~
sudo apt-get update
sudo apt-get install libv4l-dev libjpeg8-dev -y
sudo apt-get install subversion -y
ステップ5、mjpg-streamerコンパイル
(1) 次のコマンドで “input_uvc.c” を編集する。
cd ~/osoyoo-robot/cam-robot/mjpg-streamer
cd plugins/input_uvc
sudo nano input_uvc.c (if vim installed, you can type: sudo vim input_uvc.c)
次の行を(NANOエディターで“ctrl” + “W”でサーチできる)見つけて、
 int width=640, height=480, fps=5, format=V4L2_PIX_FMT_MJPEG

V4L2_PIX_FMT_MJPEGの文字を V4L2_PIX_FMT_YUYVに替える
ctrl” + “x” 押してから “y” を押してファイルを保存、 “enter” を押して nano エディタを終える。
2)次のコマンドでソースコードをコンパイルする
cd ~/osoyoo-robot/cam-robot/mjpg-streamer
make all
(3)カメラインストールの確認:カメラをRaspberry Piに接続し、次のコマンドを入力します
ls /dev/video*
次の結果がターミナルに見られ、“/dev/video0”はPiの中にインストールされたカメラです。
![]()
(4) 次のコマンドの入力でmjpg-streamer Serverを起動させる。
sudo ./start.sh
今、別のコンピュータでブラウザを使用してPI IPポート8899(あなたのPi IPアドレスが192.168.50.7の場合は、
お使いのブラウザではhttp://192.168.50.7:8899にアクセスする)でラズベリーパイIPアドレスにアクセスするために、別のコンピュータでブラウザを使用して、次の画像が表示されます。左メニューのストリームボタンをクリックすると、あなたのラズベリーパイのカメラ映像がリアルタイムでビデオキャプチャー表示されます
You can use Ctrl C command in terminal to end the mjpg-streamer server
ステップ6、でwebiopiとmjpg
webiopiとmjpg-streamerを同じウェブページに組み合わせることで、カメラからビデオを「見る」ことが可能になり、ロボットカーをブラウザで制御するには、WebIOPiとMJPG-ストリーマーのデフォルト設定を変更する必要があります。これを行うには、次のコマンドを入力して設定ファイルを編集し、変更 A、変更 B、変更 Cを行う必要があります。
sudo nano /etc/webiopi/config
変更A:ブラウザーから Pi に制御シグナルを送信できるwebiopi のデフォルトスクリプト Pythonを次のピンクライン
を“/etc/webiopi/config”ファイルをに加えます。
[SCRIPTS]
# Load custom scripts syntax :
# name = sourcefile
#each sourcefile may have setup, loop and destroy functions and macros
#myscript = /home/pi/WebIOPi-0.7.1/examples/scripts/macros/script.py
myscript = /home/pi/osoyoo-robot/cam-robot/robot/script.py
変更B: webiopi default html file パスに次ぎのピンクラインを加える
# Use doc-root to change default HTML and resource files location
#doc-root = /home/pi/WebIOPi-0.7.1/examples/servo-control
doc-root = /home/pi/osoyoo-robot/cam-robot/robot
変更C:次のピンクラインを加えるて、PCA9685のアドレスをCONFIGに加える。
[DEVICES]
# Device configuration syntax:
# name = device [args...]
# name   : used in the URL mapping
#device : device name
#args   : (optional) see device driver doc
#If enabled, devices configured here are mapped on REST API /device/name
#Devices are also accessible in custom scripts using deviceInstance(name)
#See device driver doc for methods and URI scheme available

# Raspberry native UART on GPIO, uncomment to enable
# Don't forget to remove console on ttyAMA0 in /boot/cmdline.txt
# And also disable getty on ttyAMA0 in /etc/inittab
#serial0 = Serial device:ttyAMA0 baudrate:9600

# USB serial adapters
#usb0 = Serial device:ttyUSB0 baudrate:9600
#usb1 = Serial device:ttyACM0 baudrate:9600

#temp0 = TMP102
#temp1 = TMP102 slave:0x49
#temp2 = DS18B20
#temp3 = DS18B20 slave:28-0000049bc218

#bmp = BMP085

#gpio0 = PCF8574
#gpio1 = PCF8574 slave:0x21

#light0 = TSL2561T
#light1 = TSL2561T slave:0b0101001

#gpio0 = MCP23017
#gpio1 = MCP23017 slave:0x21
#gpio2 = MCP23017 slave:0x22
pwm0 = PCA9685 slave:0x40
#PWM1 =PCA9685
#pwm1 = PCA9685 slave:0x41

#adc0 = MCP3008
#adc1 = MCP3008 chip:1 vref:5
#dac1 = MCP4922 chip:1
ctrl” + “x” 押してから “y” を押してファイルを保存、 “enter” を押して nano エディタを終える。
テスト
ステップ7 テスト
今、地面にあなたの車を置き、バッテリーボックス内の電源スイッチをオンにすることができます。車を制御するにはSSHを使う必要があるので、、テストする前に、raspi-config コマンドで SSH を有効にする必要があります。 Windowsを使用する場合はPuttyをダウロードしてPIをsshする、、MacBookを使用している場合はPtyをダウンロードしてターミナルの上で
Sshコマンドを直接使用してください。
(1) sshターミナルで mjpg-streamerを起動するには次のコマンドを入力してください。
cd ~/osoyoo-robot/cam-robot/mjpg-streamer
sudo ./start.sh
(2) Webiopiを起動するには、別のsshターミナルを開き、次のコマンドを入力
sudo webiopi -d -c /etc/webiopi/config
今、あなたのプラウザを使いRASPBERRY IP ポート8000でアクセス出来る(例えばPI IPアドレス192.168.0.115であれば、http://192.168.50.7:8000,に行けば、次のような画像がブラウザにみられる、矢印ボタンをクリックして、
車を望む方向へ動かすことができます。
如果报错请确认两点:
A.上面配置是否正确
B.PCA9685是否供上电了,如没有电,因为软件读取不到IIC设备,会报错。
Android App
無料のAndroid用アプリ、アップル用アプリでプラウザーのかわりのこの車を制御できます。
アップル用アプリはアップルストアからダウンロード
Android用は下記URLかGoogle playよりダウンロードを
行ってください。http://osoyoo.com/driver/osoyoo-robot.apk
アプリの起動して、set up とconfigのページの各項は次の様に設定してください。
IP Address: 192.168.50.7
Your raspberrr pi ip Port: 8000
User Name: webiopi
Password: raspberry
Video Port:8899
セーブボタンをクリックしてconfigページを終了。
Now you can use the arrow buttons in App to control the car
{:}{:zh}
Rasberry Pi Tank Robot Car Starter Kit Lesson 3: Web Video Camera
视频遥控功能
该工能通过webiopi实现远程遥控,通过mjpg-streamer软件实时显示摄像头拍摄图片。部分浏览器可能不能正常显示,建议使用谷歌浏览器或火狐浏览器。在进行以下操作之前需要将raspberry
pi连接上wifi.通过putty或直接接到显示器上进行以下操作。
step 1.下载并解压软件包
cd ~
sudo apt-get install rpi.gpio -y
mkdir -p osoyoo-robot/cam-robot
cd osoyoo-robot/cam-robot
wget —-no-check-certificate http://osoyoo.com/driver/WebIOPi-0.7.1.tar.gz
wget —-no-check-certificate http://osoyoo.com/driver/mjpg-streamer.tar.gz
wget —-no-check-certificate http://osoyoo.com/driver/robot-tank.tar.gz
tar -xzvf WebIOPi-0.7.1.tar.gz
tar -xzvf mjpg-streamer.tar.gz
tar -xzvf robot-tank.tar.gz
step2.安装webiopi
webiopi是一个可控制树莓派GPIO的web框架,该框架面向物联网IoT开发,该项目托管于google,并可在sourceforge上下载到源代码。webiopi支持REST
Server,CoAP server,并提供python库和javascript库。
A.下载补丁
cd ~/osoyoo-robot/cam-robot/WebIOPi-0.7.1/
wget —-no-check-certificate http://osoyoo.com/driver/webiopi-pi2bplus.patch
B.运行补丁
patch -p1 -i webiopi-pi2bplus.patch
C.编译安装webiopi
sudo ./setup.sh
D.验证是否安装成功
webiopi -h
如果安装成功会有如下所示输出;如果不成功请重复上面步骤
 sudo webiopi [-h] [-c config] [-l log] [-s script] [-d] [port]

    Options:
      -h, --help           Display this help
      -c, --config  file   Load config from file
      -l, --log     file   Log to file
      -s, --script  file   Load script from file
      -d, --debug          Enable DEBUG

    Arguments:
      port                 Port to bind the HTTP Server
E.运行webiopi
sudo webiopi -d -c /etc/webiopi/config
然后在电脑端或者手机端打开网页浏览器,在地址栏内输入树莓派ip地址,端口号8000。例如:http://192.168.1.16:8000(根据实际情况填入)。在登录网站时,需要输入账号和密码,默认的账号和密码分别是:webiopi和raspberry。如果进入WebIOPi
Main Menu页面,说明环境配置成功了:
终端按下 Ctrl + C再按Ctrl + Z 可以结束进程。
step3.安装mjpg-streamer
MJPG-streamer是一个优秀的开源project,它可以通过HTTP的方式访问linux上面的兼容摄像头,从而做到远程视频传输的效果。在本项目中,我们用MJPG-streamer传输小车摄像头图像,根据图像控制小车运动。
如果是使用CSI接口的摄像头,需要进行如下步骤
A.打开摄像头接口
sudo raspi-config
选择Enable Camera。
B.在/etc/modules文件中添加一行bcm2835-v4l2,否则/dev下没有设备节点
sudo nano /etc/modules
加上:
bcm2835-v4l2(v4l2中的l是小写字母l,不是数字1)
保存退出,并重启Pi
如果使用USB接口摄像头可以跳过上面两步
安装依赖库
cd ~
sudo apt-get update
sudo apt-get install libv4l-dev libjpeg8-dev -y
sudo apt-get install subversion -y
编译安装mjpg-streamer
cd ~/osoyoo-robot/cam-robot/mjpg-streamer
在Pi3上要编译通过需要修改配置
cd plugins/input_uvc
sudo nano input_uvc.c (若安装了vim可以输入: sudo vim input_uvc.c)
找到
int width=640, height=480, fps=5, format=V4L2_PIX_FMT_MJPEG
将V4L2_PIX_FMT_MJPEG 改成 V4L2_PIX_FMT_YUYV,保存退出
cd ~/osoyoo-robot/cam-robot/mjpg-streamer
make all
插上摄像头测试mjpg-streamer,命令行输入: ls /dev/video* 查找设备文件,如果摄像头工作正常,会输出设备文件,如图所示。
![]()
(这里我接了一个CSI和USB摄像头,所以有两个设备文件)如果没有输出设备文件,请确认摄像头是否是好的,以及上面的配置是否正确。
开启mjpg-streamer
sudo ./start.sh
然后在浏览器地址栏内输入树莓派ip地址,端口号8899,注意这里的端口号是8899,和之前的端口号(8000)是不同的。页面会显示关于M-JPEG streamer的信息。点击Stream会实时显示摄像头拍摄的内容。
按下 Ctrl + C 可以结束进程。
获取raspberry pi IP地址
ifconfig wlan0
修改webiopi默认设置
sudo nano /etc/webiopi/config
A.修改webiopi运行时调用的脚本路径
[SCRIPTS]
# Load custom scripts syntax :
# name = sourcefile
#each sourcefile may have setup, loop and destroy functions and macros
#myscript = /home/pi/WebIOPi-0.7.1/examples/scripts/macros/script.py
myscript = /home/pi/osoyoo-robot/cam-robot/robot/script.py
B.修改服务器访问webiopi时候调用HTML文件路径
# Use doc-root to change default HTML and resource files location
#doc-root = /home/pi/WebIOPi-0.7.1/examples/servo-control
doc-root = /home/pi/osoyoo-robot/cam-robot/robot
C.添加PCA9685地址
[DEVICES]
# Device configuration syntax:
# name = device [args...]
# name   : used in the URL mapping
#device : device name
#args   : (optional) see device driver doc
#If enabled, devices configured here are mapped on REST API /device/name
#Devices are also accessible in custom scripts using deviceInstance(name)
#See device driver doc for methods and URI scheme available

# Raspberry native UART on GPIO, uncomment to enable
# Don't forget to remove console on ttyAMA0 in /boot/cmdline.txt
# And also disable getty on ttyAMA0 in /etc/inittab
#serial0 = Serial device:ttyAMA0 baudrate:9600

# USB serial adapters
#usb0 = Serial device:ttyUSB0 baudrate:9600
#usb1 = Serial device:ttyACM0 baudrate:9600

#temp0 = TMP102
#temp1 = TMP102 slave:0x49
#temp2 = DS18B20
#temp3 = DS18B20 slave:28-0000049bc218

#bmp = BMP085

#gpio0 = PCF8574
#gpio1 = PCF8574 slave:0x21

#light0 = TSL2561T
#light1 = TSL2561T slave:0b0101001

#gpio0 = MCP23017
#gpio1 = MCP23017 slave:0x21
#gpio2 = MCP23017 slave:0x22
pwm0 = PCA9685 slave:0x40
#pwm1 = PCA9685 slave:0x41

#adc0 = MCP3008
#adc1 = MCP3008 chip:1 vref:5
#dac1 = MCP4922 chip:1
打开树莓派I2C接口.
打开一个终端
cd ~/osoyoo-robot/cam-robot/mjpg-streamer
sudo ./start.sh
再打开一个终端
sudo webiopi -d -c /etc/webiopi/config
如果报错请确认两点:
A.上面配置是否正确
B.PCA9685是否供上电了,如没有电,因为软件读取不到IIC设备,会报错。
然后在安装APP ,在APP中Robot IP选项和Video URL选项填入树莓派的IP地址保存,再在主页面点击Off就可以看到图像并控制小车了。{:}
amber administrator
You must be logged in to post a comment
About the Author