Arduino Tank Car Kit Lesson 6:Obstacle Avoidance Robot Tank Car
{:en}

Authorized Amazon Seller:
Robot Tank Car Chassis
| Buy from US | Buy from CA | Buy from UK | Buy from DE | Buy from IT | Buy from FR | Buy from ES |
Robot Tank Car Electronic Parts Kit
| Buy from US | Buy from CA | Buy from UK | Buy from DE | Buy from IT | Buy from FR | Buy from ES |
- I. Objective
- II. How it work
- III. Software Installation
- IV. Understand the Code
- V. Hardware Installation
I. Objective:
In this lesson, we will use a servo motor, an ultrasonic module and a buzzer to detect the obstacle and measure the distance. If the distance is less than predefined threshold value, the buzzer will beep and the car will turn around from the obstacle automatically.
II. How it work:
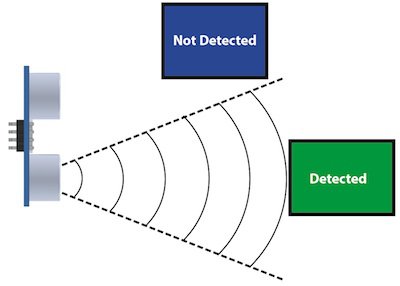
The ultrasonic sensor module have two parts of ultrasonic transmitter and receiver. It uses ultrasonic echo and reflection of the time difference to measure the distance test.
The ultrasonic sensor is to be installed on SG90 servo motor, the sensor can detect obstacles in the range of 0-180 degree. When the obstacles detected, the car will stop to alarm and the SG90 servo motor will rotate around. Then the car will run to the direction without obstacles.
III. Software Installation:
The SG90 Servo can rotate approximately 180 degrees. Firstly we make the servo motor go to 90 degree position(middle position), then manually adjust the ultasonic sensor to straight forward direction. Thus to make sure the ultrasonic module can rotate to the left 90 degrees and also can rotate to the right 90 degrees. Download the servo adjust program from link:
http://www.kookye.com/download/car/servo_adjust.zip
Download and unzip, then upload the code to Uno board using Arduino IDE, turn on the power switch on the battery box. the servo motor will go to 90 degree position(middle position), At this time, if the ultrasonic sensor is not facing front direction of the car, you need manually adjust the sensor to straight forward direction.
Step 1:Download Lesson 6 sample code from http://www.kookye.com/download/Arduino_Tank_Car_Kit/tank_robot_lesson6.zip, unzip the download zip file tank_robot_lesson6.zip, you will see a folder called tank_robot_lesson6.
Step 2: Connect UNO R3 board to PC with USB cable, Open Arduino IDE -> click file -> click Open -> choose code “tank_robot_lesson6.ino” in tank_robot_lesson6 folder, load the code into arduino.

Step 3: Choose corresponding board and port for your project,upload the sketch to the board.

IV. Understand the Code:
Step 1: Define the pinout of SG90 servo motor, IR receiver and ultrasonic sensor and buzzer.
#define SERVO     11  //servo connect to D11
#define IRPIN  13 //IR receiver Signal pin connect to Arduino pin 13
#define echo    A3 // Ultrasonic Echo pin connect to A2
#define trig    A2  // Ultrasonic Trig pin connect to A3
#define buzzer     7 //buzzer connect to D7
Step 2: Define the variable to store the value of the distance in different direction and tha maxium value of the distance between the car and the obstacle.
int leftscanval, centerscanval, rightscanval, ldiagonalscanval, rdiagonalscanval;
const int distancelimit = 30; //distance limit for obstacles in front
const int sidedistancelimit = 18; //minimum distance in cm to obstacles at both sides (the car will allow a shorter distance sideways)
Step 3: The structure to test the distance between the car and the obstacle.
/*detection of ultrasonic distance*/
int watch() {
  long howfar;
  digitalWrite(trig, LOW);
  delayMicroseconds(5);
  digitalWrite(trig, HIGH);
  delayMicroseconds(15);
  digitalWrite(trig, LOW);
  howfar = pulseIn(echo, HIGH);
  howfar = howfar * 0.01657; //how far away is the object in cm
  Serial.println((int)howfar);
  return round(howfar);
}
Step 4:Rotate the servo motor and call the structure of what() in the structure of auto_avoidance(), it can detect and test the distance between the car and the obstacle to avoid obstacles.
void auto_avoidance() {
  head.write(90);
  delay(100);
  centerscanval = watch();
  if (centerscanval >= distancelimit) {
    set_motorspeed(LSPEED, RSPEED);
    go_ahead();
  }
  else {
    go_stop();
    alarm();
    head.write(120);
    delay(150);
    ldiagonalscanval = watch();

    head.write(180);
    delay(150);
    leftscanval = watch();

    head.write(90);
    delay(150);

    head.write(60);
    delay(150);
    rdiagonalscanval = watch();

    head.write(0);
    delay(150);
    rightscanval = watch();

    head.write(90);
    if (ldiagonalscanval >= sidedistancelimit && leftscanval >= sidedistancelimit) {
      set_motorspeed(LSPEED, RSPEED);
      go_back();
      delay(200);
      turn_left();
      delay(500);
    }
    else if (rdiagonalscanval >= sidedistancelimit && rightscanval >= sidedistancelimit) {
      set_motorspeed(LSPEED, RSPEED);
      go_back();
      delay(200);
      turn_right();
      delay(500);
    }
  }
}
V. Hardware Installation:
Step 1: Install ESP8266 Expansion Board on UNO R3 board.

Step 2: Turn the switch of esp8266 to “1” and “2” position, as the following photo shows.

Step 3: Move the wire connected to pinout(GND,VCC,S) in IR recevier to the counterpart pin in ESP8266 wifi Board as the following picture.

Step 4: Put two 12865 batteries into battery box and turn the swith of box to “ON”.
(If you have finished the above steps on lesson one, please skip these step)
Step 5: Press the button of “OK” to make the car avoid obstacles and press the button of “0” to make the car stop.
Step 6: Testing.Please check the wire connection if the car can not be run as expected.
Youtube link–https://youtu.be/HkbfSEp-WhA
![]()
![]()
![]()
{:}{:zh}概述
在这一课中,将会介绍如何用超声波模块和舵机实现坦克小车避障功能。
超声波原理
坦克小车上安装有一个超声波模块,该模块由两部分组成:超声波发射器和接收器。 超声波发射器向某一方向发射超声波,在发射时刻开始计时,超声波在空气中传播,途中碰到障碍物就立即返回来,超声波接收器收到反射波就立即停止计时,通过时间差来算出超声波与障碍物之间的距离。
超声波模块是安装在SG90舵机旋转轴上的,SG90舵机可以旋转0-180,因此小车可以检测0-180范围内的障碍物,当小车检测到障碍物后,小车先停止运动并报警,舵机旋转检测左右距离,如果左边或右边无障碍物,小车将转向左边或右边,同时舵机回到90度位置(使超声波朝正前方)。
软件
下载http://www.kookye.com/download/car/tank_robot_lesson5.zip并解压文件,用arduino IDE打开tank_robot_lesson5.ino文件,下面对部分代码做简要说明。
#define SERVO     11  //servo connect to D11
#define IRPIN  13 //IR receiver Signal pin connect to Arduino pin 13
#define echo    A3 // Ultrasonic Echo pin connect to A2
#define trig    A2  // Ultrasonic Trig pin connect to A3
#define buzzer     7 //buzzer connect to D7
上面5行代码定义了舵机、红外接收器、超声波和蜂鸣器所接的GPIO口
int leftscanval, centerscanval, rightscanval, ldiagonalscanval, rdiagonalscanval;
const int distancelimit = 30; //distance limit for obstacles in front
const int sidedistancelimit = 18; //minimum distance in cm to obstacles at both sides (the car will allow a shorter distance sideways)
定义几个变量用于存储各个方向距离以及小车与障碍物的极限距离。
/*detection of ultrasonic distance*/
int watch() {
  long howfar;
  digitalWrite(trig, LOW);
  delayMicroseconds(5);
  digitalWrite(trig, HIGH);
  delayMicroseconds(15);
  digitalWrite(trig, LOW);
  howfar = pulseIn(echo, HIGH);
  howfar = howfar * 0.01657; //how far away is the object in cm
  Serial.println((int)howfar);
  return round(howfar);
}
上面的watch()函数用于测量小车与障碍物之间的距离。
void auto_avoidance() {
  head.write(90);
  delay(100);
  centerscanval = watch();
  if (centerscanval >= distancelimit) {
    set_motorspeed(LSPEED, RSPEED);
    go_ahead();
  }
  else {
    go_stop();
    alarm();
    head.write(120);
    delay(150);
    ldiagonalscanval = watch();

    head.write(180);
    delay(150);
    leftscanval = watch();

    head.write(90);
    delay(150);

    head.write(60);
    delay(150);
    rdiagonalscanval = watch();

    head.write(0);
    delay(150);
    rightscanval = watch();

    head.write(90);
    if (ldiagonalscanval >= sidedistancelimit && leftscanval >= sidedistancelimit) {
      set_motorspeed(LSPEED, RSPEED);
      go_back();
      delay(200);
      turn_left();
      delay(500);
    }
    else if (rdiagonalscanval >= sidedistancelimit && rightscanval >= sidedistancelimit) {
      set_motorspeed(LSPEED, RSPEED);
      go_back();
      delay(200);
      turn_right();
      delay(500);
    }
  }
}
在auto_avoidance()函数中,转动舵机并调用watch()函数,就能检测左右及前方障碍物距离,通过测量距离与允许距离比较选择合理路径,实现超声波避障。
测试
step 1 用usb线把坦克下车与pc连接起来,选择正确的板子型号和端口号,将程序烧录到arduino中
step 2 打开电池盒电源,将坦克小车放到地上上
step 3 遥控器对着红外接收头,按下”OK”键,小车将开始避障;按下”0″小车停止。
注意:若无法避障,请看考第一课参考第一课检查超声波及舵机安装时否正确并检查接线。{:}
amber administrator
You must be logged in to post a comment
About the Author