Arduino Tank Car Kit Lesson 7:Control Robot Tank Car through Wifi and Bluetooth
{:en}
Robot Tank Car Kit Lesson 7:Control Robot Tank Car through Wifi and Bluetooth

Authorized Amazon Seller:
Robot Tank Car Chassis
| Buy from US | Buy from CA | Buy from UK | Buy from DE | Buy from IT | Buy from FR | Buy from ES |
Robot Tank Car Electronic Parts Kit
| Buy from US | Buy from CA | Buy from UK | Buy from DE | Buy from IT | Buy from FR | Buy from ES |
- I. Objective
- II. How it work
- III. Software Installation
- IV. Understand the Code
- V. Hardware Installation
I. Objective:
In this lesson, we learn how to control the Robot car mobile APP through WiFi and Bluetooth. , we just use the ESP8266 Wifi board as expansion board and control the tank car via IR receiver in previous lessons. In this lesson, we will learn how to use the phone to connect the hot spot from esp8266 board and control the car movement via phone app. At the same time, you also can put the bluetooth into the esp8266 board and control the car movement via phone bluetooth.
II. How it Work
There is a hot spot called DoitWIFI_Config from ESP8266 board in working time and you could connect the hot spot via phone wifi without password. When turn the switch of ESP8266 board to “ON”, the message from the arduino and esp8266 can be exchanged by serial ports.The control command can be send to ESP8266 via phone app and then send to arduino via serial ports between arduino and ESP8266 board.
When turn the switch of ESP8266 board to “1” and “2” position to disconnect the serial ports between arduino and ESP8266 board. If you put the bluetooth module on esp8266 board and connect it via phone bluetooth, the message from the arduino and esp8266 can be exchanged by serial ports via bluetooth module.

Find more about the ESP8266 Wifi shiled board, please visit here: http://kookye.com/?p=5902
III. Software Installation:
Step 1: Install latest Arduino IDE (If you have Arduino IDE version after 1.1.16, please skip this step)
Download Arduino IDE from https://www.arduino.cc/en/Main/Software?setlang=en, then install the software.
Step 2:Download Lesson 7 sample code from http://www.kookye.com/download/Arduino_Tank_Car_Kit/tank_robot_lesson7.zip, unzip the download zip file tank_robot_lesson7.zip, you will see a folder called tank_robot_lesson7.
Step 3: Connect UNO R3 board to PC with USB cable, Open Arduino IDE -> click file -> click Open -> choose code “tank_robot_lesson7.ino” in tank_robot_lesson7 folder, load the code into arduino.

Step 4: Choose corresponding board and port for your project,upload the sketch to the board.
Note: Bluetooth module and Arduino board communicate with each other through UART serial port. Please remove bluetooth module before uploading sketch in Arduino board, or the sketch will be uploaded unsuccessfully.

Step 5: Download the APP and install it on you phone:
Android Phone APP: http://kookye.com/download/Arduino_Tank_Car_Kit/car.apk
iOS Phone APP: search osoyoo arduino robot car in apple app store

Note: This android app can just support Android phone and we offer the app source code(http://kookye.com/download/Arduino_Tank_Car_Kit/BTcar-master.zip). You could revise and personalize the code as per your needs.
IV. Understand the Code:
This program is used to receive the control command from phone app.
//WiFi / Bluetooth through the serial control
void do_Uart_Tick()
{

  char Uart_Date=0;
  if(Serial.available())
  {
    size_t len = Serial.available();
    uint8_t sbuf[len + 1];
    sbuf[len] = 0x00;
    Serial.readBytes(sbuf, len);
    //parseUartPackage((char*)sbuf);
    memcpy(buffUART + buffUARTIndex, sbuf, len);//ensure that the serial port can read the entire frame of data
    buffUARTIndex += len;
    preUARTTick = millis();
    if(buffUARTIndex >= MAX_PACKETSIZE - 1)
    {
      buffUARTIndex = MAX_PACKETSIZE - 2;
      preUARTTick = preUARTTick - 200;
    }
  }
  if(buffUARTIndex > 0 && (millis() - preUARTTick >= 100))//APP send flag to modify the obstacle avoidance parameters
  { //data ready
    buffUART[buffUARTIndex] = 0x00;
    if(buffUART[0]=='C')
    {
      Serial.println(buffUART);
      Serial.println("You have modified the parameters!");//indicates that the obstacle avoidance distance parameter has been modified
      sscanf(buffUART,"CMD%d,%d,%d",&distancelimit,&sidedistancelimit,&turntime);
    }
    else  Uart_Date=buffUART[0];
    buffUARTIndex = 0;
  }
  switch (Uart_Date)    //serial control instructions
  {
    case '2':
            Drive_Status=MANUAL_DRIVE; Drive_Num=GO_ADVANCE;Serial.println("forward"); break;
    case '4':
            Drive_Status=MANUAL_DRIVE; Drive_Num=GO_LEFT; Serial.println("turn left");break;
    case '6':
            Drive_Status=MANUAL_DRIVE; Drive_Num=GO_RIGHT; Serial.println("turn right");break;
    case '8':
            Drive_Status=MANUAL_DRIVE; Drive_Num=GO_BACK; Serial.println("go back");break;
    case '5':
            Drive_Status=MANUAL_DRIVE; Drive_Num=STOP_STOP;buzz_off();Serial.println("stop");break;
    case '3':
            Drive_Status=AUTO_DRIVE_UO; Serial.println("avoid obstacles...");break;
    case '1':
          Drive_Status=AUTO_DRIVE_LF; Serial.println("line follow...");break;
    default:break;
  }
}
V. Hardware Installation:
Step 1: Install ESP8266 Expansion Board on UNO R3 board.

Step 2: Bluetooth Connection
1. Put the bluetooth module into ESP8266 wifi Board as the following picture.


2. If you use bluetooth control car, put switch in “1,2” position.


3. Put two 12865 batteries into battery box and turn the swith of battery box to “ON”.
4.If you control the robot car through Bluetooth, please turn on bluetooth of your Android or iOS phone which you have installed APP and scan bluetooth(different bluetooth module will scan different bluetooth name), Click connect and enter password “1234” or “0000” if no change (You can change wifi or bluetooth settings in Android phone to switch to control car through wifi or bluetooth):

5. Open app>> select bluetooth mode>> then you can controller the robot car through bluetooth.

Step 3:Wifi Connection
1. Pull the bluetooh out of esp8266 board and turn the switch of esp8266 to “on” position.
2. If you want to control the robot car through WiFi, please scan WiFi hotspot with your Android or apple phone which you have installed APP and search for wifi named” DoitWIFI_Config”, Click connect(no password needed).

3. Open app>> select WiFi mode>> then you can controller the robot car through wifi

4.Open app>> select wifi mode>> then you can controller the robot car through phone wifi hotspot.

Note:
There are three working mode: manual control, obstacle avoidance and tracking. Users can switch freely among three working mode.
1) In manual control mode, you can click buttons (^) (V) (<) (>) to control the Robot car to move forward and backward, turn right and left. Meanwhile, the APP can observe the car real time movement.
2) Click “tracking” button of App to switch the current mode to tracking mode. The Robot car will move forward along the black line in white background. Meanwhile, the APP can observe the car real time movement. Press “||” button to stop moving and click other button to change Robot car working mode. To learn more about this mode, please review our lesson 4.
3) Click “Obstacle” button to switch the current mode to obstacle avoidance mode. The Robot car can be driven forward continuously and stopped and steered away once any obstacle in its way. Press “||” button to stop moving and then click other button to change Robot car working mode. To learn more about this mode, please review our lesson 5.
![]()
![]()
![]()
{:}{:zh}Overview
在这个例程中将介绍如何用Arduino UNO、 ESP8266串口WIFIArduino UNO扩展板、L298N电机驱动模块以及银色坦克底盘设计一辆智能坦克。同时,在坦克上挂载一些常用传感器模块,如光敏电阻、DS18B20温度传感器模块、红外避障传感器、超声波测距模块、舵机等。可以用手机APP手动控制坦克前进、后退、左转、右转以及停止;还能根据超声波模块和避障模块检测到的数据判断后自行运动;并向APP端反馈光照值、温度值。
DSC_5488
Parts
UNO R3
Arduino UNO x1
DBAD200700-2
ESP8266串口WIFI Arduino UNO扩展板 x1
L298N-0
L298N x1
EASM101700
红外避障模块 x2
9
DS18B20 x1
14
光敏电阻模块 x1
HC-SR04
超声波测距模块 x1
q
银色底盘套件 x1
SG90
舵机 x1
Hardware
1)底盘安装
坦克底盘具体安装步骤请参照
注意:在进行固定电路板,如arduino uno 、l298n电机驱动以及各传感器模块到底盘时候,要注意做绝缘处理,最好在底盘上垫一层塑料或者用垫子将电路板与底盘隔开,达到绝缘目的。
2)控制部分
坦克用Arduino UNO作为核心控制单元,同时在Arduino UNO上搭载一个 ESP8266串口WIFI Arduino UNO扩展板实现wifi控制。在使用时候需要把 ESP8266串口WIFI Arduino UNO扩展板插在Arduino UNO上去,坦克在使用时候需要把 ESP8266串口WIFI Arduino UNO扩展板上的两个拨码开关拨到”ON”的位置,表示将 ESP8266串口WIFI Arduino UNO扩展板和Arduino UNO的串口接在一起,这样Arduino UNO与手机APP就能进行数据交互了。如图
arduino+uarttowifi
3)电源及电机部分
坦克采用2节18650电池供电,如图
power
小车左右两边各一个电机,分别把左右电机接到L298N电机驱动模块的两个输出端上,如图(这个图你最好拍个照片后用ps把两个模块对应口P在一起,我没时间搞)
电机
L298N
左边电机:VM: Power for Motor OUT1
左边电机:GM:GND for Motor OUT2
右边电机:VM: Power for Motor OUT3
右边电机:GM:GND for Motor OUT4
注意:只需要将电机上VM: Power for Motor和GM:GND for Motor接到L298N电机驱动板就行了,电机上的其他线不用接。
motor
(把L298N的图片放上,标上OUT1-OUT4)
4)传感器接线
各传感器都是接到esp8266串口wifi模块上,ESP8266串口WIFI Arduino UNO扩展板引出了Arduino UNO所有的GPIO口,将传感器接到ESP8266串口WIFI Arduino UNO扩展板上Arduino UNO的GPIO口上。
A.超声波模块
超声波模块的VCC、trig、echo、GND分别接到ESP8266 串口WIFI模块的5V、D4、D8、GND上,如图
sr-hc04
B.舵机
舵机的供电不要从ESP8266 串口WIFI模块,因为在舵机转动的瞬间会把电压拉得比较,导致ESP8266 串口WIFI模块重启,为了避免这种情况,将L298N上面的5V电压输出作为舵机的供电口,如图:
servo
C.L298N
L298N是一个电机驱动模块,该模块地上有4个控制引脚,分别是IN1—IN4,将这四个脚分别接到ESP8266 串口WIFI模块的D5、D6、D3、D11上,如图
l298n
D.红外避障
红外避障模块固定底盘前端,左右各一个。左边红外避障模块接到ESP8266 串口WIFI模块A0,右边红外避障模块接到ESP8266 串口WIFI模块A1.如图
Infrared obstruction1
E.光敏电阻模块
光敏电阻模块的信号脚接到ESP8266 串口WIFI模块的A2口,如图
lightsensor
F.LED接线
在坦克底盘上两个LED灯,在光照度很暗的时候,led会自动打开
LED Light-1
LED Light Installation
LED灯有两个脚,一个脚长一些,一个脚短一些,长的是正极,短的是负极,分别将左右两个灯长的引脚接到ESP8266 串口WIFI模块的D2和D13脚上;短的引脚接到ESP8266 串口WIFI模块的GND上。 接线如图所示
led
至此,硬件部分组装完成。
DSC_5492
Software
软件分为 下位机和上位机两部分,下位机主要是Arduino UNO里面的小车控制部分;上位机即手机APP。
下位机:yinse
安卓APP:BTcar
APP使用
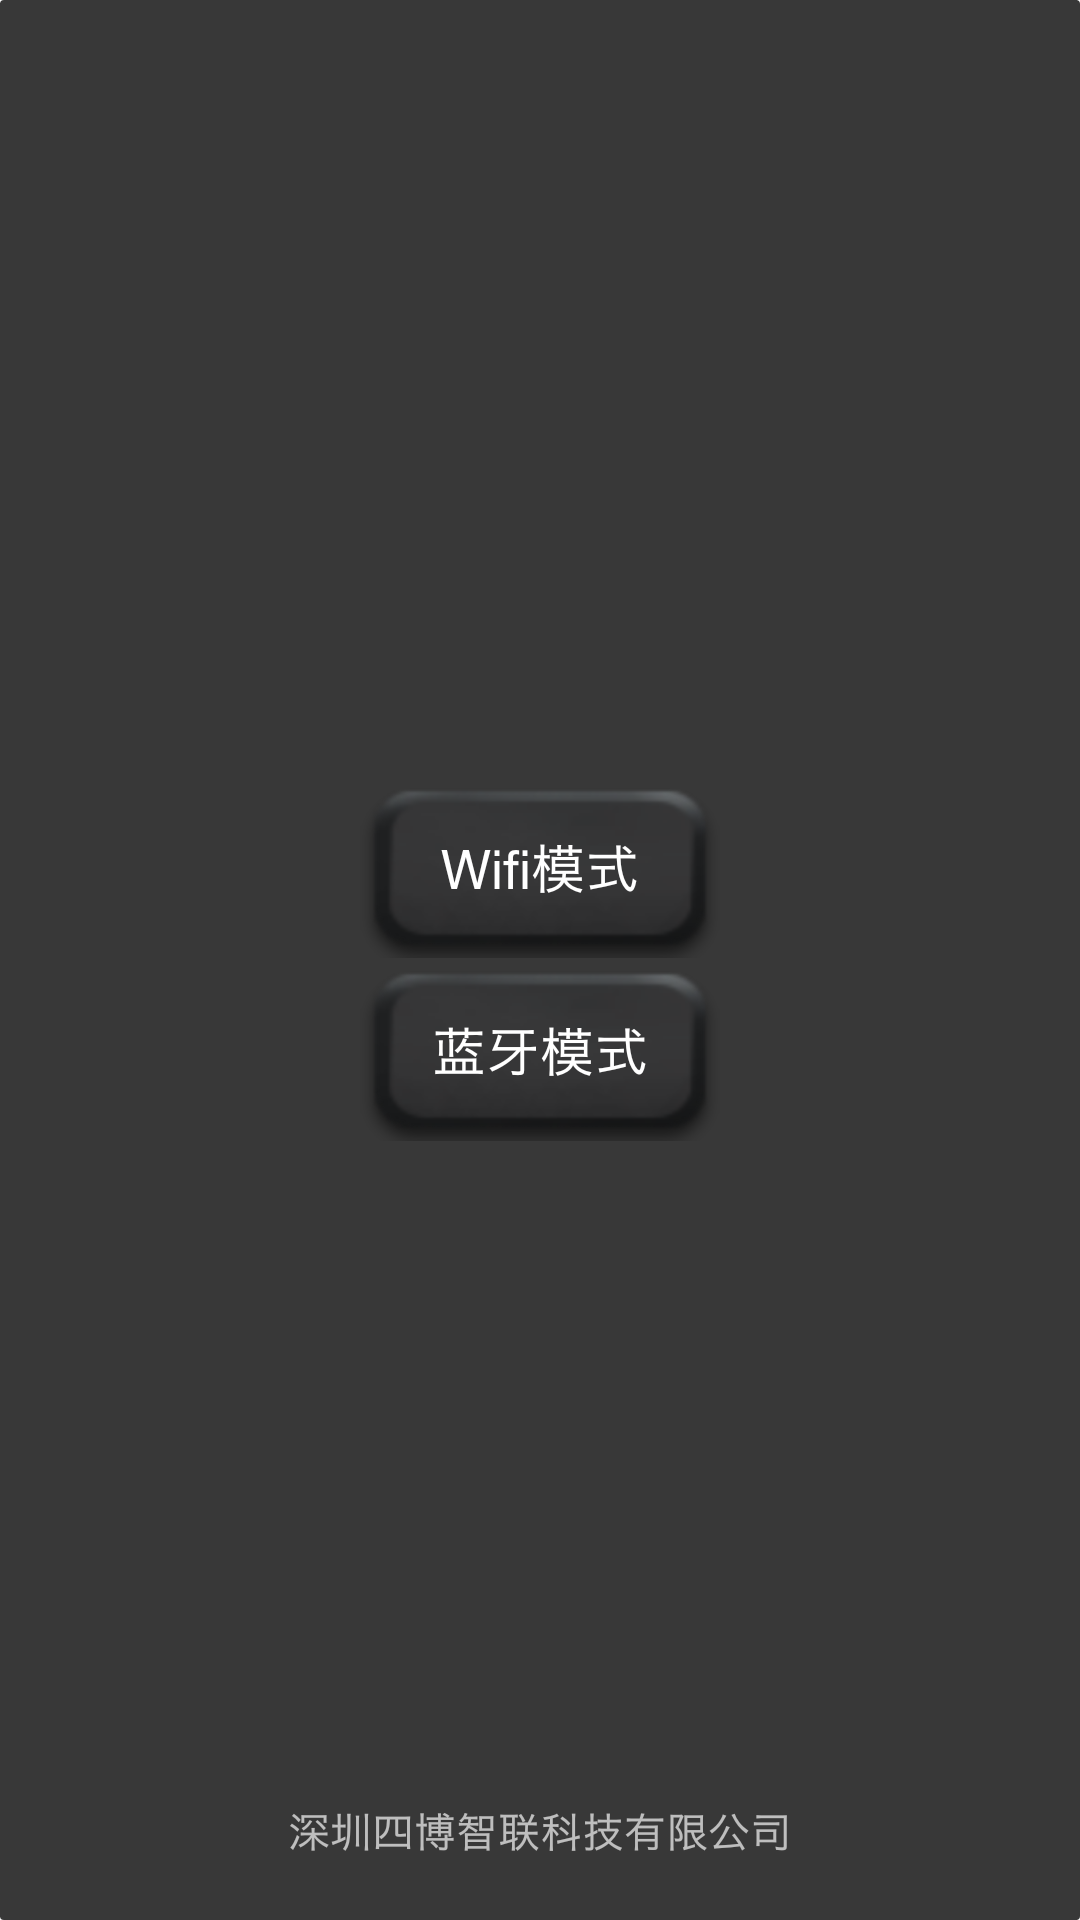
安装好,将下位机软件烧录到Arduino UNO里,给小车上电,打开手机无线网络,会看到一个”DoitWIFI_Config”的wifi热点,这是一个免密连接的热点,连接这个热点后,打开小车控制APP选择”WIFI模式”,如图
Screenshot_2017-01-20-11-01-28-572_
进入小车控制界面,如图
Screenshot_2017-01-20-11-02-02-651
按钮功能解释
连接:表示连接WIFI
修改参数:修改超声波测距的阈值
避障模式:小车会根据传感器参数自己选择路径移动
循迹模式:小车沿着黑白轨道运动
^:前进
V:后退
>:右转
<:左转 ||:停止{:}
智能坦克
{:en}
Overview
在这个例程中将介绍如何用Arduino UNO、 ESP8266串口WIFIArduino UNO扩展板、L298N电机驱动模块以及银色坦克底盘设计一辆智能坦克。同时,在坦克上挂载一些常用传感器模块,如光敏电阻、DS18B20温度传感器模块、红外避障传感器、超声波测距模块、舵机等。可以用手机APP手动控制坦克前进、后退、左转、右转以及停止;还能根据超声波模块和避障模块检测到的数据判断后自行运动;并向APP端反馈光照值、温度值。

Parts
 |
Arduino UNO x1
|
 |
ESP8266串口WIFI Arduino UNO扩展板 x1
|
 |
L298N x1
|
 |
红外避障模块 x2
|
 |
DS18B20 x1
|
 |
光敏电阻模块 x1
|
 |
超声波测距模块 x1
|
 |
银色底盘套件 x1
|
 |
舵机 x1
|
Hardware
1)底盘安装
坦克底盘具体安装步骤请参照
KOOKYE Robot Tank Car Chassis with Motor Installation Instructions
注意:在进行固定电路板,如arduino uno 、l298n电机驱动以及各传感器模块到底盘时候,要注意做绝缘处理,最好在底盘上垫一层塑料或者用垫子将电路板与底盘隔开,达到绝缘目的。
2)控制部分
坦克用Arduino UNO作为核心控制单元,同时在Arduino UNO上搭载一个 ESP8266串口WIFI Arduino UNO扩展板实现wifi控制。在使用时候需要把 ESP8266串口WIFI Arduino UNO扩展板插在Arduino UNO上去,坦克在使用时候需要把 ESP8266串口WIFI Arduino UNO扩展板上的两个拨码开关拨到”ON”的位置,表示将 ESP8266串口WIFI Arduino UNO扩展板和Arduino UNO的串口接在一起,这样Arduino UNO与手机APP就能进行数据交互了。如图

3)电源及电机部分
坦克采用2节18650电池供电,如图

小车左右两边各一个电机,分别把左右电机接到L298N电机驱动模块的两个输出端上,如图(这个图你最好拍个照片后用ps把两个模块对应口P在一起,我没时间搞)
| 电机 |
L298N
|
| 左边电机:VM: Power for Motor | OUT1 |
| 左边电机:GM:GND for Motor | OUT2 |
| 右边电机:VM: Power for Motor | OUT3 |
| 右边电机:GM:GND for Motor | OUT4 |
注意:只需要将电机上VM: Power for Motor和GM:GND for Motor接到L298N电机驱动板就行了,电机上的其他线不用接。

(把L298N的图片放上,标上OUT1-OUT4)
4)传感器接线
各传感器都是接到esp8266串口wifi模块上,ESP8266串口WIFI Arduino UNO扩展板引出了Arduino UNO所有的GPIO口,将传感器接到ESP8266串口WIFI Arduino UNO扩展板上Arduino UNO的GPIO口上。
A.超声波模块
超声波模块的VCC、trig、echo、GND分别接到ESP8266 串口WIFI模块的5V、D4、D8、GND上,如图

B.舵机
舵机的供电不要从ESP8266 串口WIFI模块,因为在舵机转动的瞬间会把电压拉得比较,导致ESP8266 串口WIFI模块重启,为了避免这种情况,将L298N上面的5V电压输出作为舵机的供电口,如图:

C.L298N
L298N是一个电机驱动模块,该模块地上有4个控制引脚,分别是IN1—IN4,将这四个脚分别接到ESP8266 串口WIFI模块的D5、D6、D3、D11上,如图

D.红外避障
红外避障模块固定底盘前端,左右各一个。左边红外避障模块接到ESP8266 串口WIFI模块A0,右边红外避障模块接到ESP8266 串口WIFI模块A1.如图

E.光敏电阻模块
光敏电阻模块的信号脚接到ESP8266 串口WIFI模块的A2口,如图

F.LED接线
在坦克底盘上两个LED灯,在光照度很暗的时候,led会自动打开


LED灯有两个脚,一个脚长一些,一个脚短一些,长的是正极,短的是负极,分别将左右两个灯长的引脚接到ESP8266 串口WIFI模块的D2和D13脚上;短的引脚接到ESP8266 串口WIFI模块的GND上。 接线如图所示

至此,硬件部分组装完成。

Software
软件分为 下位机和上位机两部分,下位机主要是Arduino UNO里面的小车控制部分;上位机即手机APP。
下位机:yinse
安卓APP:BTcar
APP使用
安装好,将下位机软件烧录到Arduino UNO里,给小车上电,打开手机无线网络,会看到一个”DoitWIFI_Config”的wifi热点,这是一个免密连接的热点,连接这个热点后,打开小车控制APP选择”WIFI模式”,如图
进入小车控制界面,如图

按钮功能解释
连接:表示连接WIFI
修改参数:修改超声波测距的阈值
避障模式:小车会根据传感器参数自己选择路径移动
循迹模式:小车沿着黑白轨道运动
^:前进
V:后退
>:右转
<:左转 ||:停止
{:}{:zh}Overview
在这个例程中将介绍如何用Arduino UNO、 ESP8266串口WIFIArduino UNO扩展板、L298N电机驱动模块以及银色坦克底盘设计一辆智能坦克。同时,在坦克上挂载一些常用传感器模块,如光敏电阻、DS18B20温度传感器模块、红外避障传感器、超声波测距模块、舵机等。可以用手机APP手动控制坦克前进、后退、左转、右转以及停止;还能根据超声波模块和避障模块检测到的数据判断后自行运动;并向APP端反馈光照值、温度值。
Parts
|
Arduino UNO x1
|
| |
ESP8266串口WIFI Arduino UNO扩展板 x1
|
| |
L298N x1
|
| |
红外避障模块 x2
|
| |
DS18B20 x1
|
| |
光敏电阻模块 x1
|
| |
超声波测距模块 x1
|
|
银色底盘套件 x1
|
| |
舵机 x1
|
Hardware
1)底盘安装
坦克底盘具体安装步骤请参照
KOOKYE Robot Tank Car Chassis with Motor Installation Instructions
注意:在进行固定电路板,如arduino uno 、l298n电机驱动以及各传感器模块到底盘时候,要注意做绝缘处理,最好在底盘上垫一层塑料或者用垫子将电路板与底盘隔开,达到绝缘目的。
2)控制部分
坦克用Arduino UNO作为核心控制单元,同时在Arduino UNO上搭载一个 ESP8266串口WIFI Arduino UNO扩展板实现wifi控制。在使用时候需要把 ESP8266串口WIFI Arduino UNO扩展板插在Arduino UNO上去,坦克在使用时候需要把 ESP8266串口WIFI Arduino UNO扩展板上的两个拨码开关拨到”ON”的位置,表示将 ESP8266串口WIFI Arduino UNO扩展板和Arduino UNO的串口接在一起,这样Arduino UNO与手机APP就能进行数据交互了。如图
3)电源及电机部分
坦克采用2节18650电池供电,如图
小车左右两边各一个电机,分别把左右电机接到L298N电机驱动模块的两个输出端上,如图(这个图你最好拍个照片后用ps把两个模块对应口P在一起,我没时间搞)
| 电机 |
L298N
|
| 左边电机:VM: Power for Motor | OUT1 |
| 左边电机:GM:GND for Motor | OUT2 |
| 右边电机:VM: Power for Motor | OUT3 |
| 右边电机:GM:GND for Motor | OUT4 |
注意:只需要将电机上VM: Power for Motor和GM:GND for Motor接到L298N电机驱动板就行了,电机上的其他线不用接。
(把L298N的图片放上,标上OUT1-OUT4)
4)传感器接线
各传感器都是接到esp8266串口wifi模块上,ESP8266串口WIFI Arduino UNO扩展板引出了Arduino UNO所有的GPIO口,将传感器接到ESP8266串口WIFI Arduino UNO扩展板上Arduino UNO的GPIO口上。
A.超声波模块
超声波模块的VCC、trig、echo、GND分别接到ESP8266 串口WIFI模块的5V、D4、D8、GND上,如图
B.舵机
舵机的供电不要从ESP8266 串口WIFI模块,因为在舵机转动的瞬间会把电压拉得比较,导致ESP8266 串口WIFI模块重启,为了避免这种情况,将L298N上面的5V电压输出作为舵机的供电口,如图:
C.L298N
L298N是一个电机驱动模块,该模块地上有4个控制引脚,分别是IN1—IN4,将这四个脚分别接到ESP8266 串口WIFI模块的D5、D6、D3、D11上,如图
D.红外避障
红外避障模块固定底盘前端,左右各一个。左边红外避障模块接到ESP8266 串口WIFI模块A0,右边红外避障模块接到ESP8266 串口WIFI模块A1.如图
E.光敏电阻模块
光敏电阻模块的信号脚接到ESP8266 串口WIFI模块的A2口,如图
F.LED接线
在坦克底盘上两个LED灯,在光照度很暗的时候,led会自动打开
LED灯有两个脚,一个脚长一些,一个脚短一些,长的是正极,短的是负极,分别将左右两个灯长的引脚接到ESP8266 串口WIFI模块的D2和D13脚上;短的引脚接到ESP8266 串口WIFI模块的GND上。 接线如图所示
至此,硬件部分组装完成。
Software
软件分为 下位机和上位机两部分,下位机主要是Arduino UNO里面的小车控制部分;上位机即手机APP。
下位机:yinse
安卓APP:BTcar
APP使用
安装好,将下位机软件烧录到Arduino UNO里,给小车上电,打开手机无线网络,会看到一个”DoitWIFI_Config”的wifi热点,这是一个免密连接的热点,连接这个热点后,打开小车控制APP选择”WIFI模式”,如图
进入小车控制界面,如图
按钮功能解释
连接:表示连接WIFI
修改参数:修改超声波测距的阈值
避障模式:小车会根据传感器参数自己选择路径移动
循迹模式:小车沿着黑白轨道运动
^:前进
V:后退
>:右转
<:左转 ||:停止{:}