{:en}
Introduction
The basic Kit for Arduino is designed to achieve the goal, a quick start for beginners and to do experiments with advance embedded system for experience professionals. Much like the Osoyoo Basic Kit before it — but better! Bridging the gap between the “real life” and your computer, the Osoyoo Advanced Kit for Arduino takes you further into the world of physical computing. The Advanced Kit has more components and sensors you need to play compared with the Basic Kit. You’ll experience what the tens of thousands of engineers, designers, artists and hobbyists already know about this awesome and educational prototyping platform.
With this kit ,we will take you from knowing to utilizing ,you are able to do more experiment , get your more idea into real action without the restriction of hardware and software.
KOOKYE Universal Starter Kits for NodeMCU IoT and Arduino Beginner
This Arduino Starter Kit is a very good do-and-learn package for starter to study MCU(microcontroller unit) programming. With this Starter Kit, you are able to do and learn many Arduino lab project such as imitating pedestrian traffic light with button and LEDs, displaying text string with Liquid Crystal Display(LCD) and using Potentiometer to control servo motor, etc.
Also you can learn the basic concepts of buttons, resistors, sensors,IR remote control and receivers, how to use sensors to detect environment(i.e light, temperature), and how to use 74HC595 Shifting Register IC to extend Arduino Digital Ports.
Every project in this starter kit has detailed circuit graph, step-by-step tutorial and fully-tested Arduino sample codes which can save lots of your research time and speed up your learning progress.
After you finishes all the projects in this kit, you are no more a beginner! You become an intermediate Arduino player!
Buy From Amazon
| Buy from US |
Buy from UK |
Buy from DE |
Buy from IT |
Buy from FR |
Buy from ES |
Buy from JP |
 |
 |
 |
 |
 |
 |
 |
Simple Tutorials:
| Porjects |
TUTORIAL |
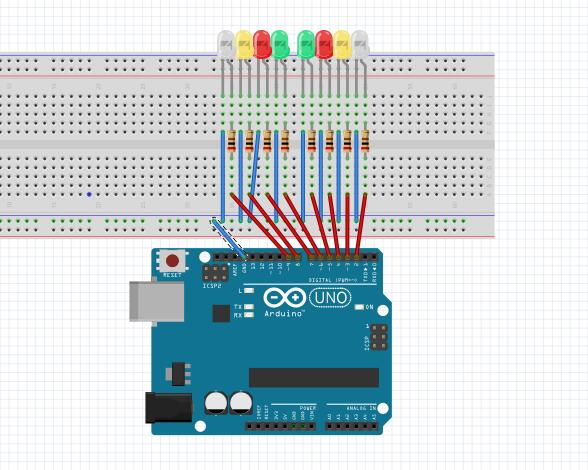
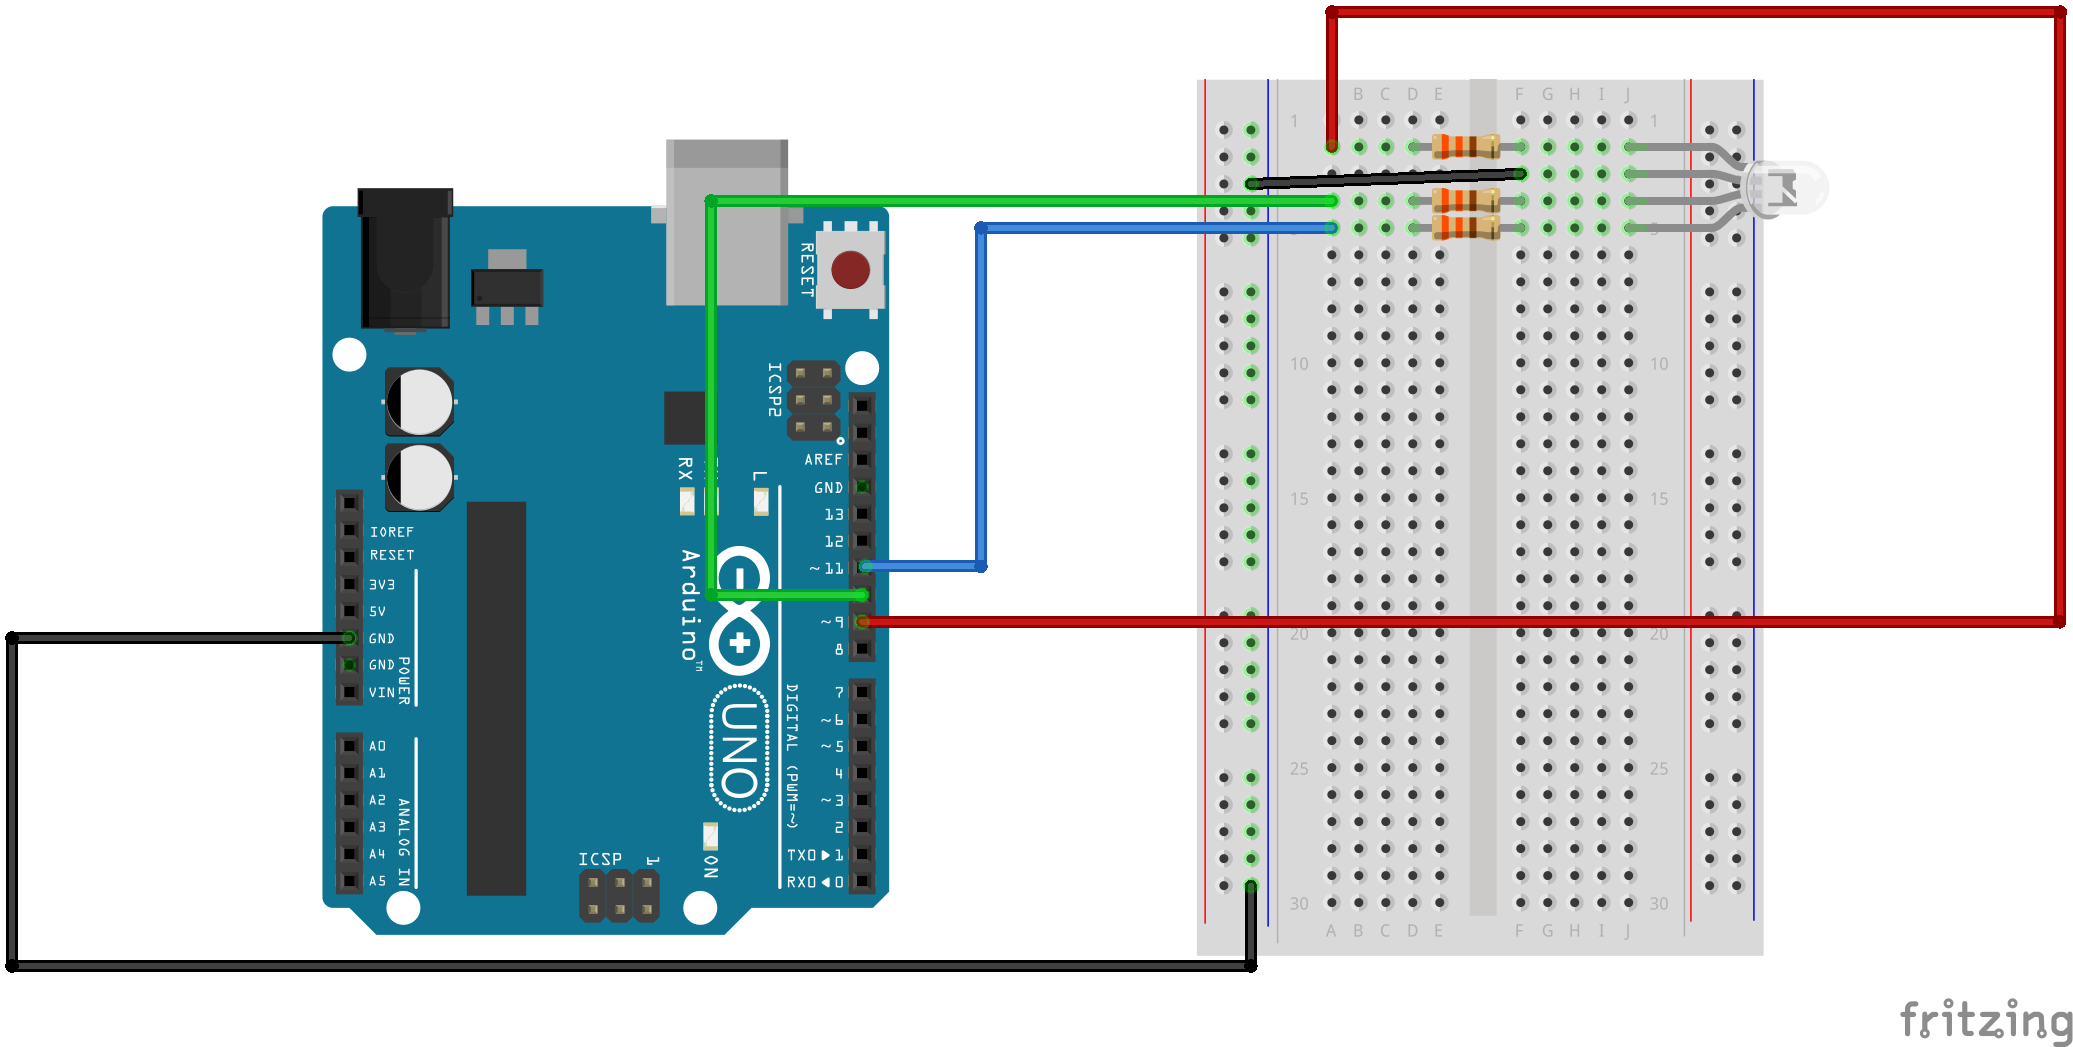
| P1: Flashing LEDs |
TUTORIAL |
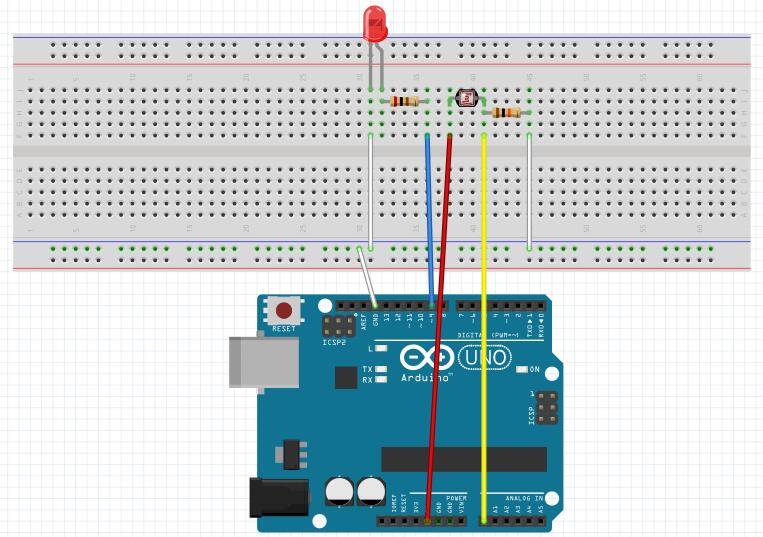
| P2: Using photoresistor to detect light |
TUTORIAL |
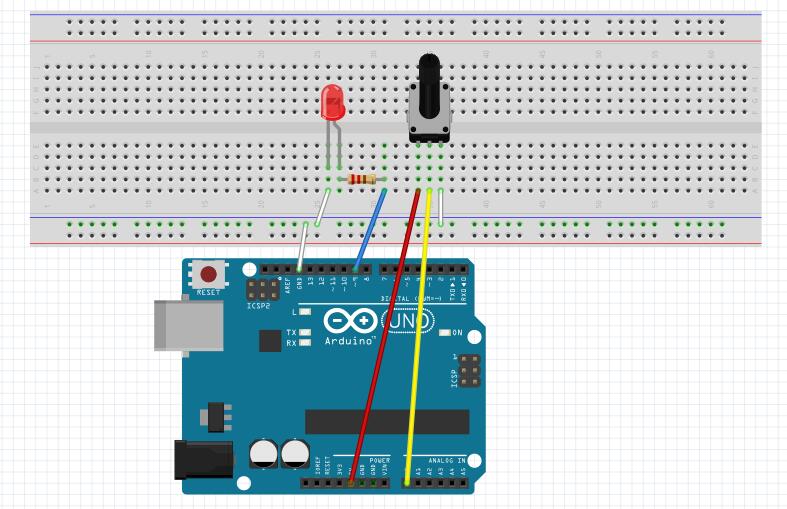
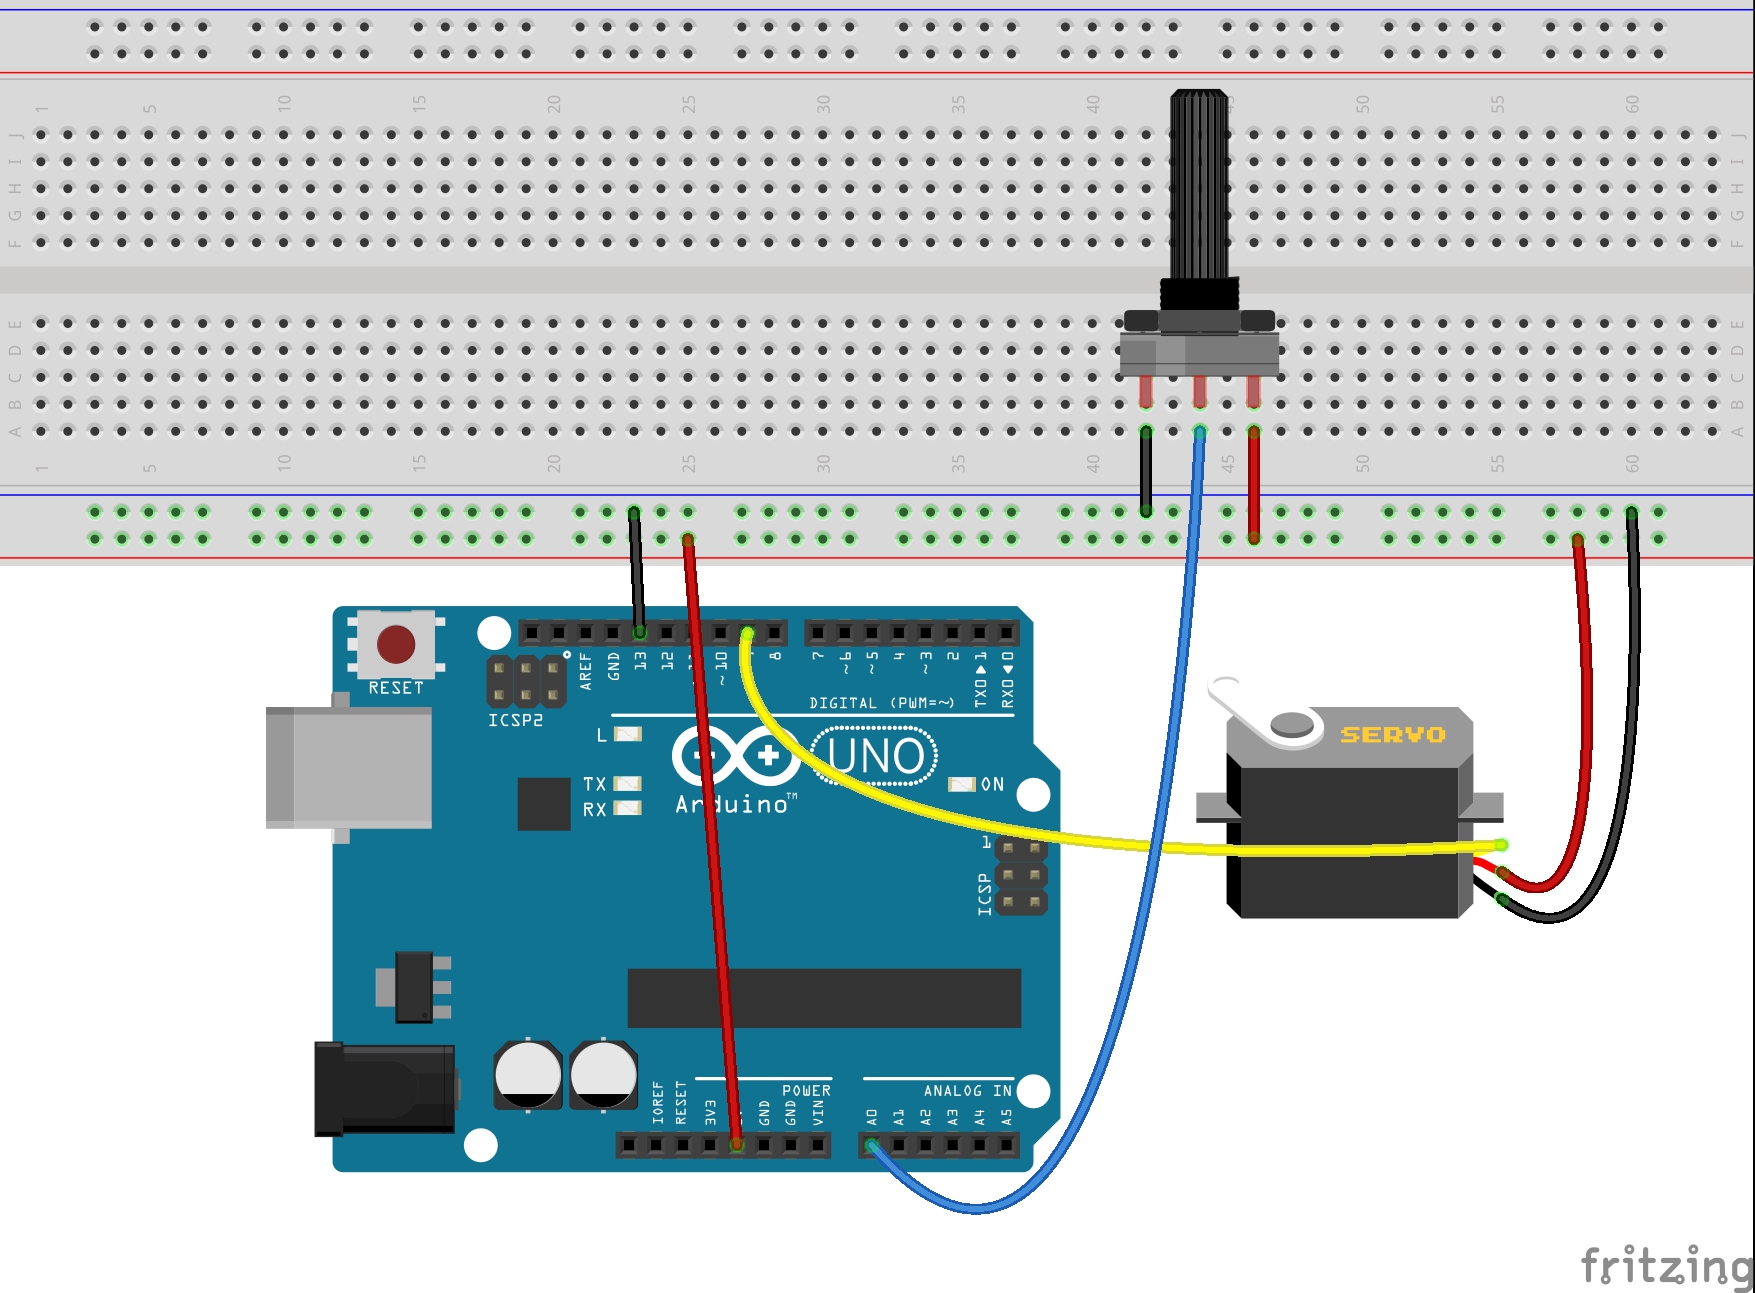
| P3: Use potentiometer to control a servo |
TUTORIAL |
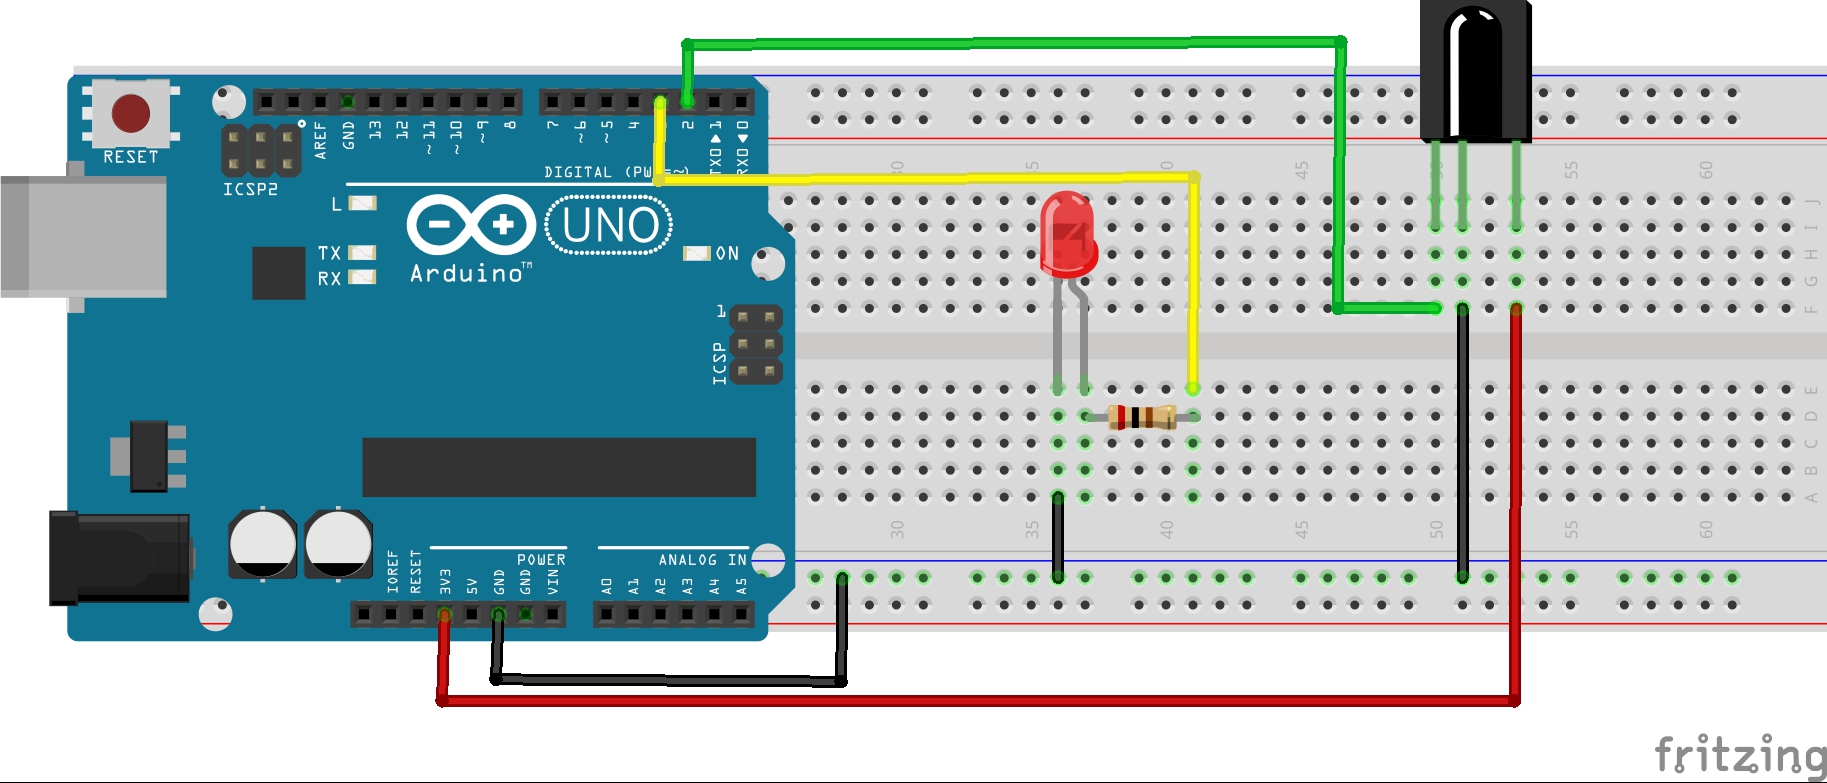
| P4: Decode IR Controller with IR Receiver |
TUTORIAL |
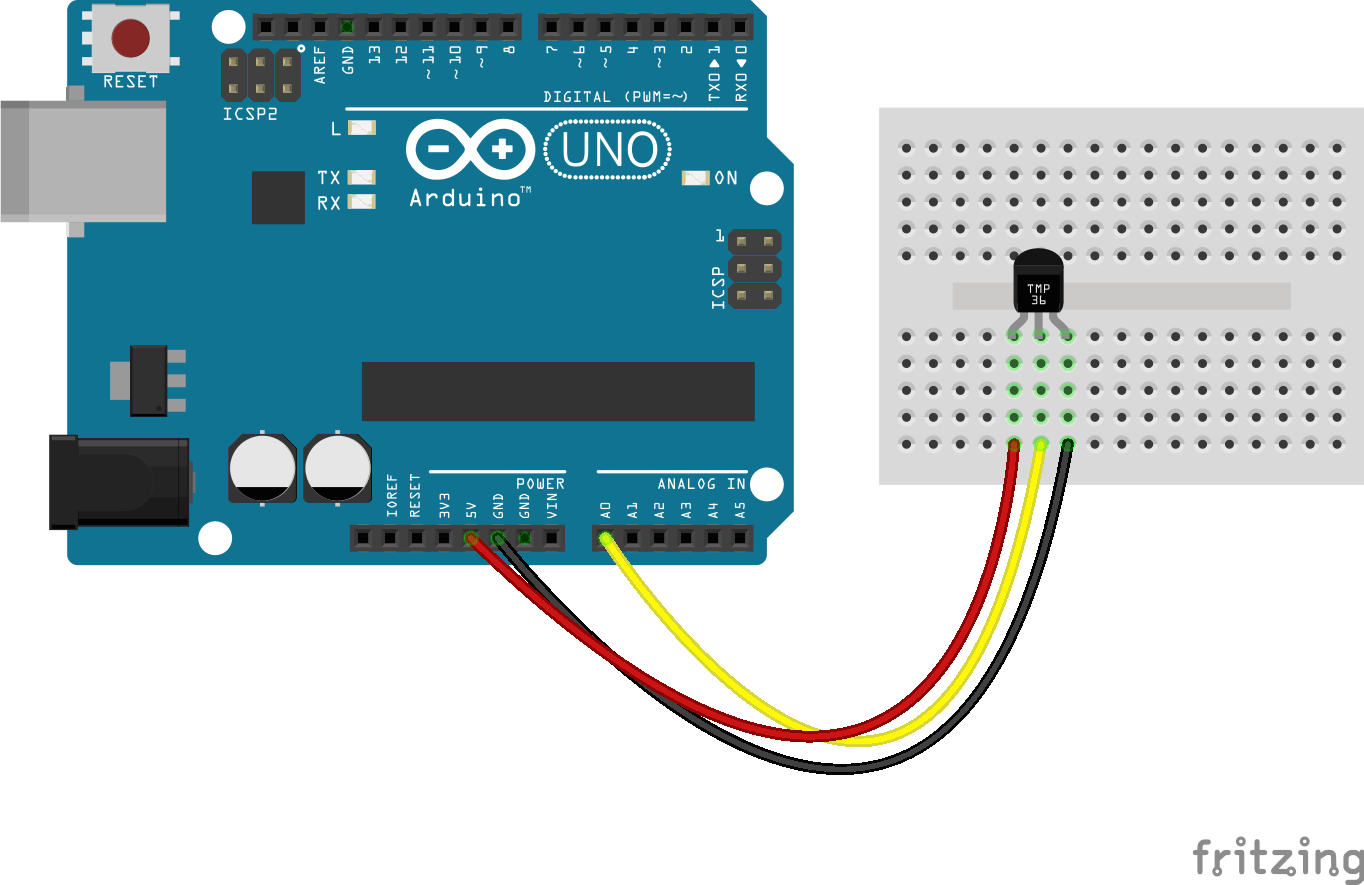
| P5: TMP36 temperature sensor project |
TUTORIAL |
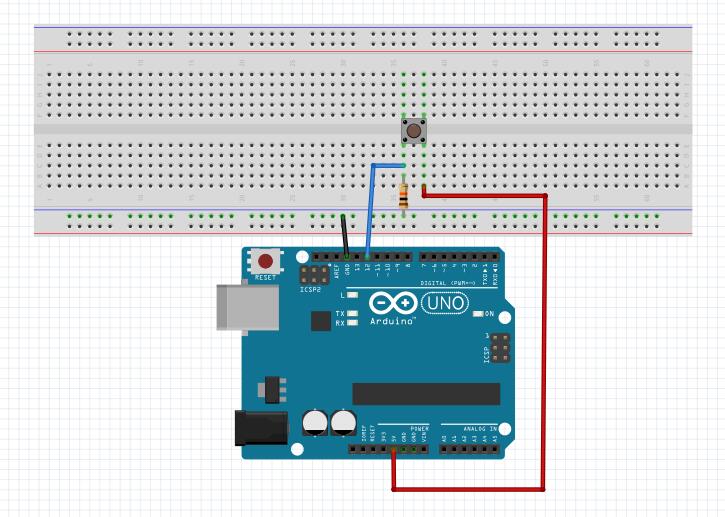
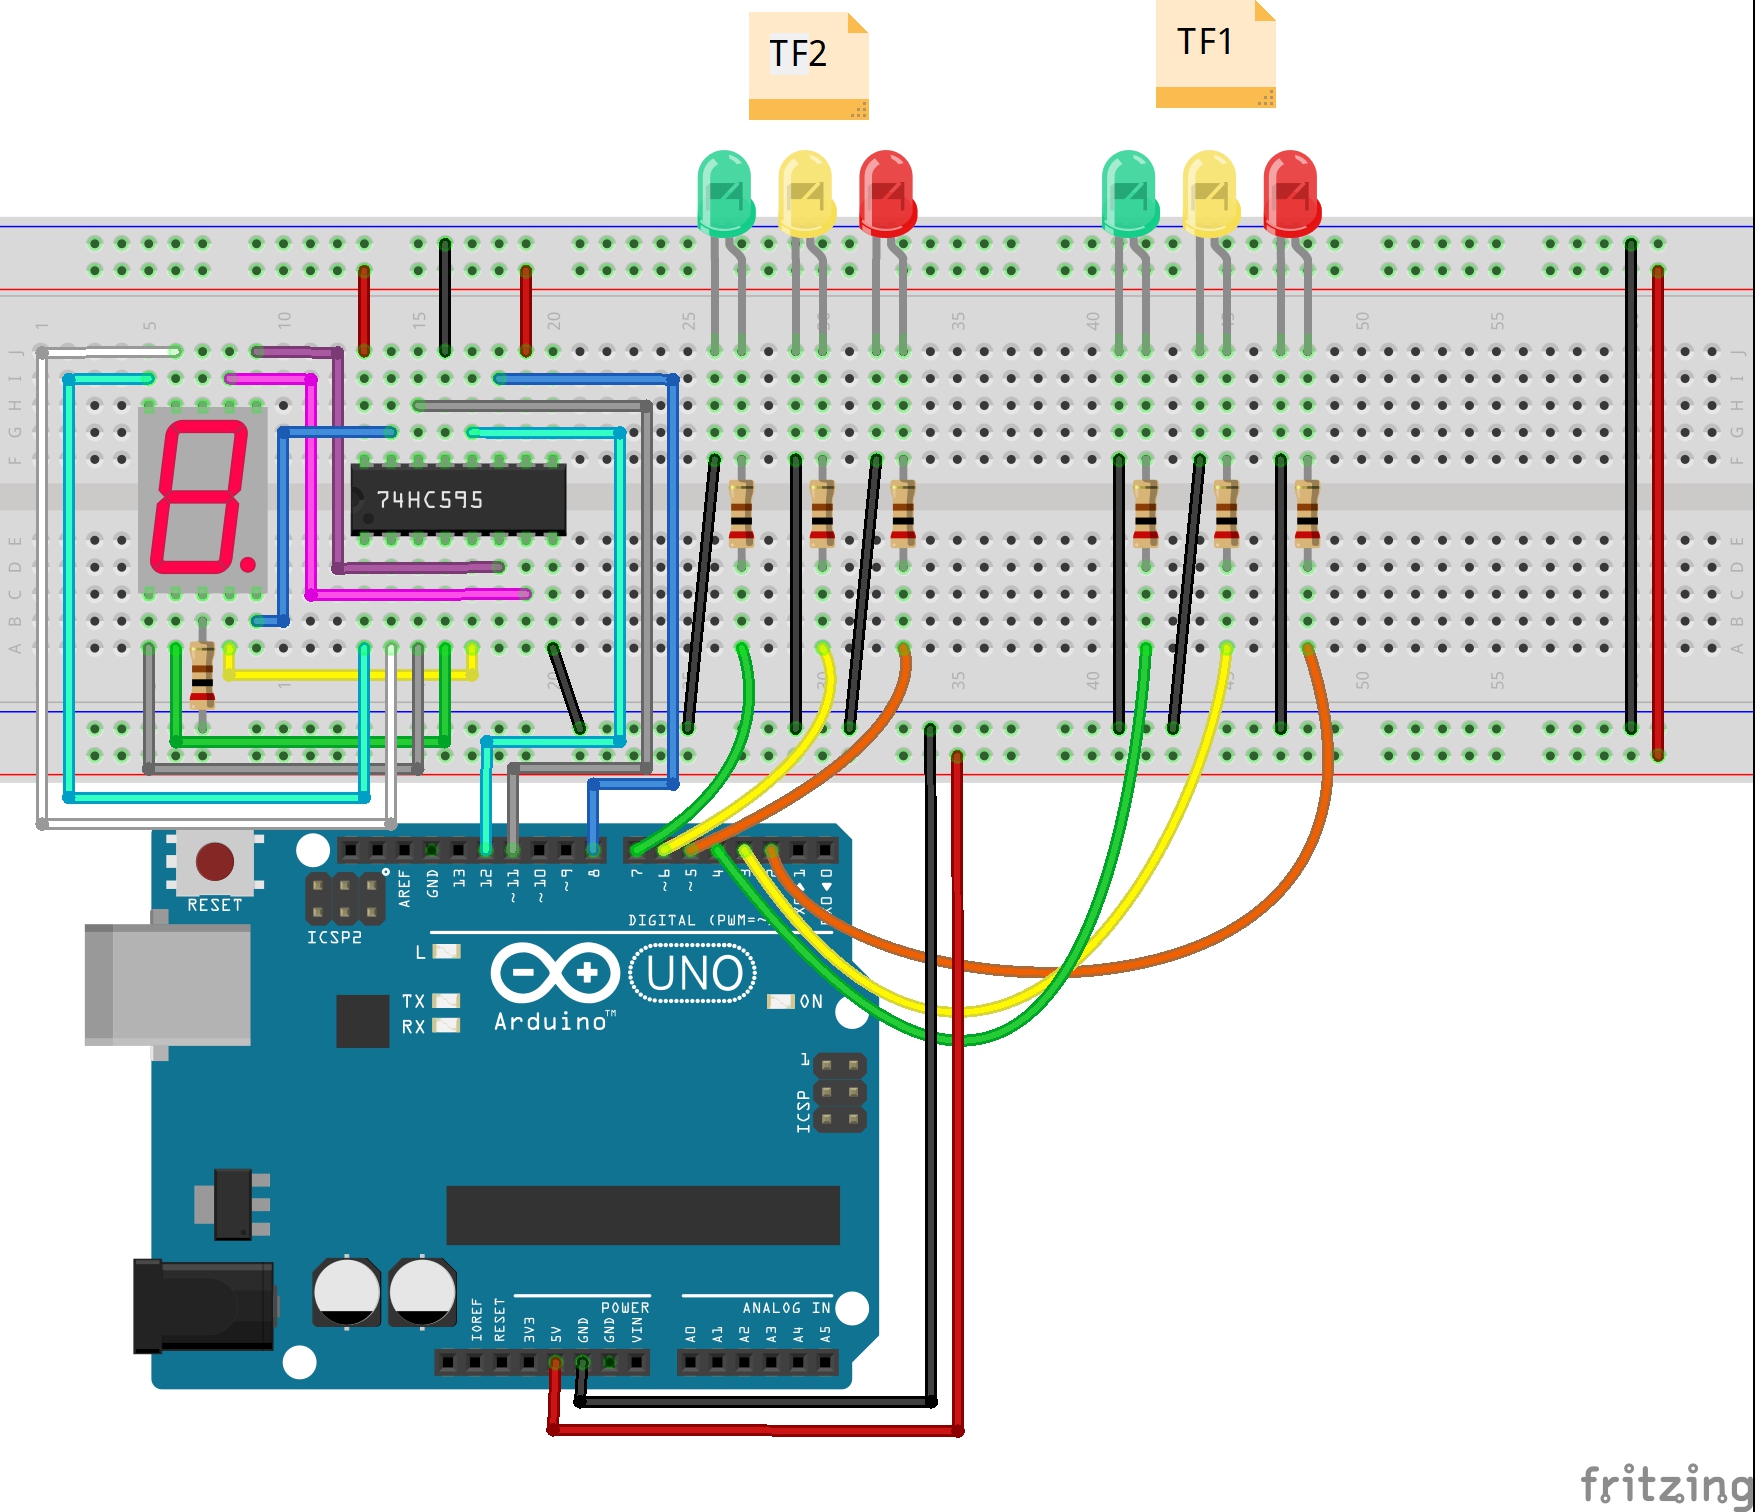
| P6: Control traffic lights with a push button |
TUTORIAL |
| P7: Tilt Sensor Test Project |
TUTORIAL |
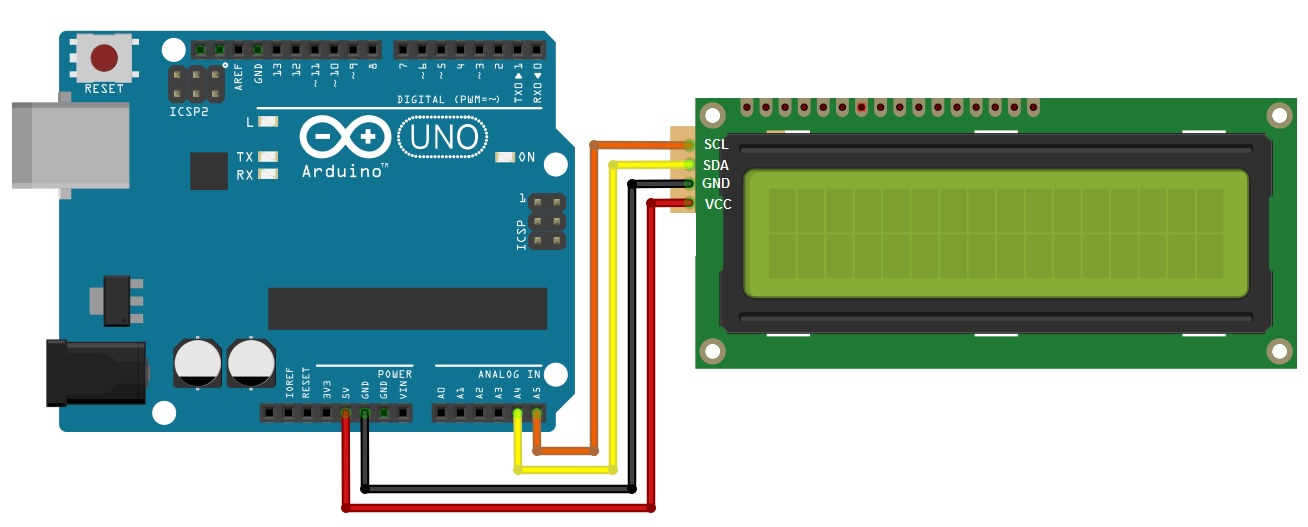
| P8: 16×2 I2C LiquidCrystal Display(LCD) |
TUTORIAL |
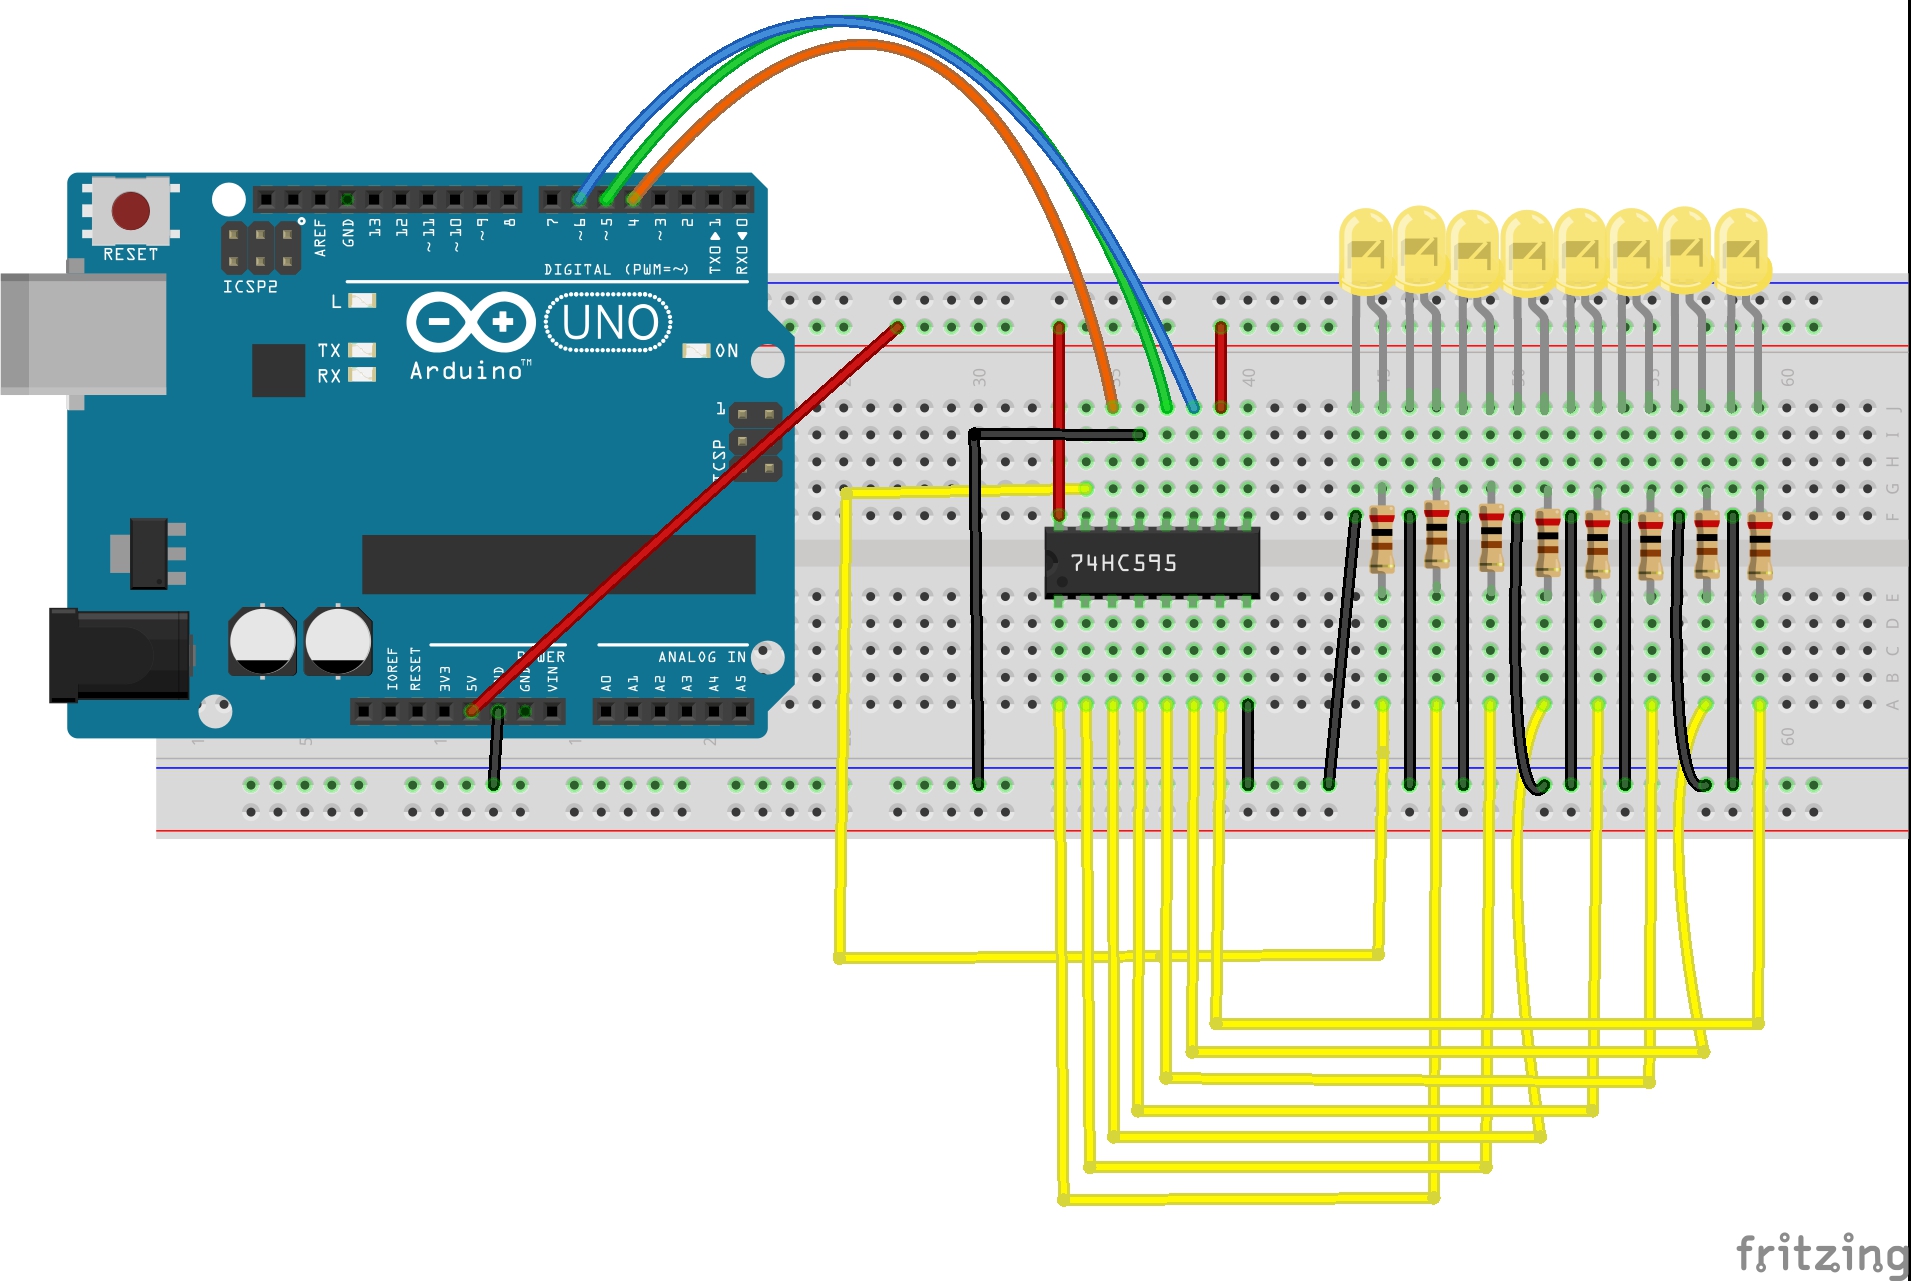
| P9: Serial to Parallel Shifting-Out with a 74HC595 |
TUTORIAL |
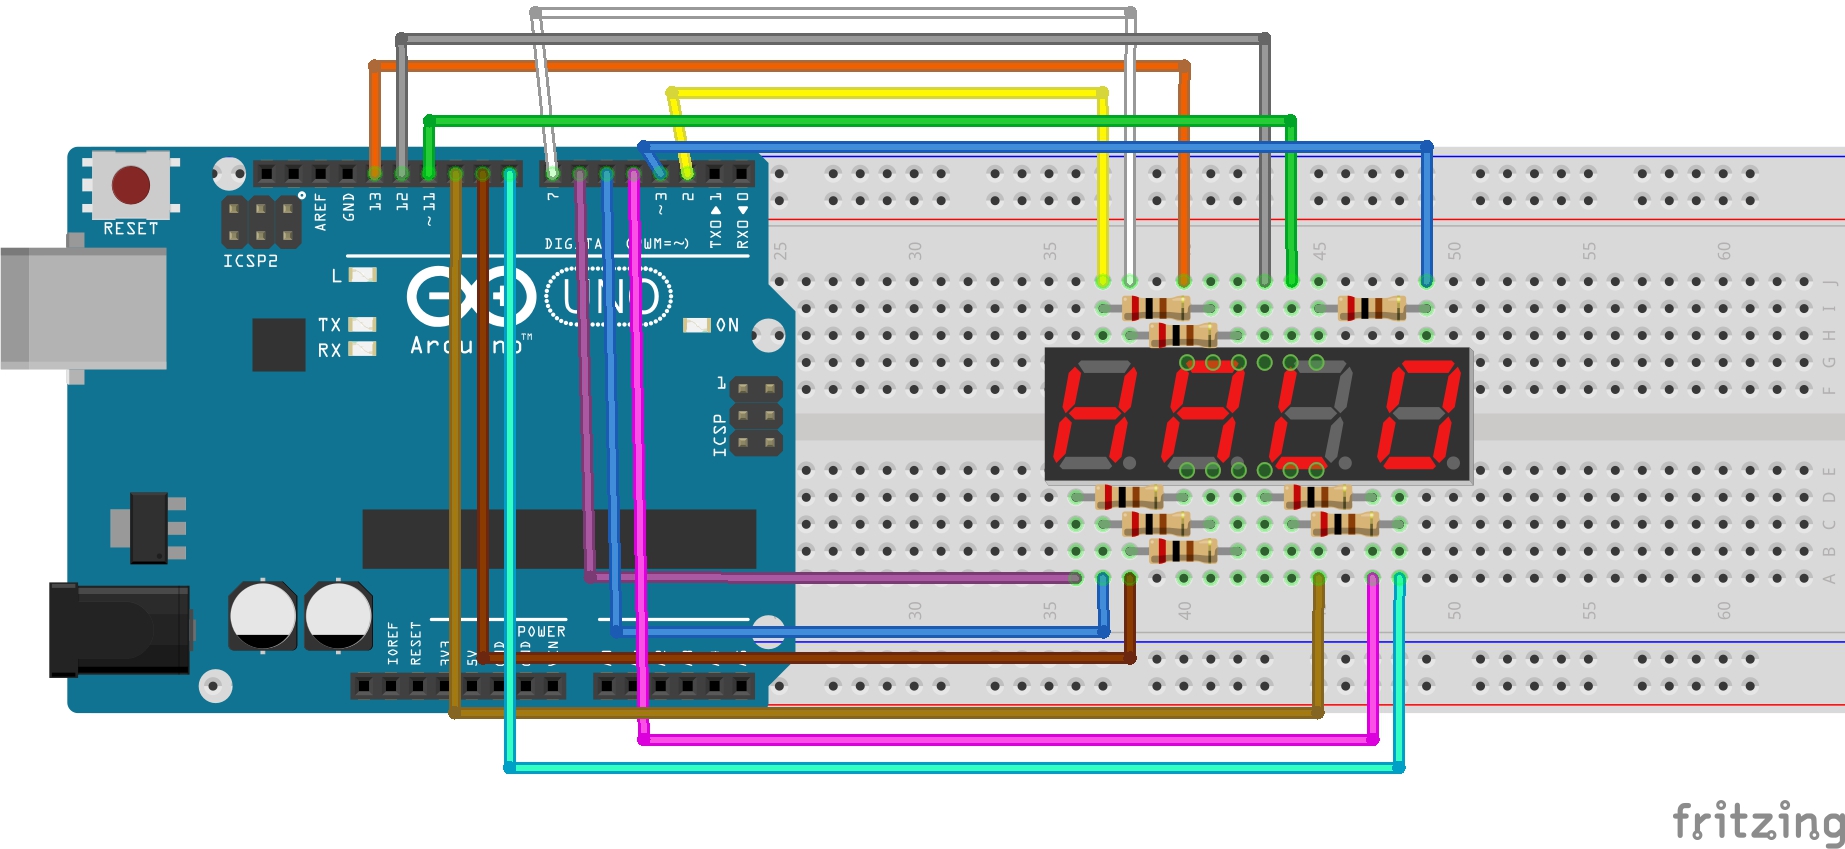
| P10:Display 4-digit numbers on a 5643 Dixie LED tube |
TUTORIAL |
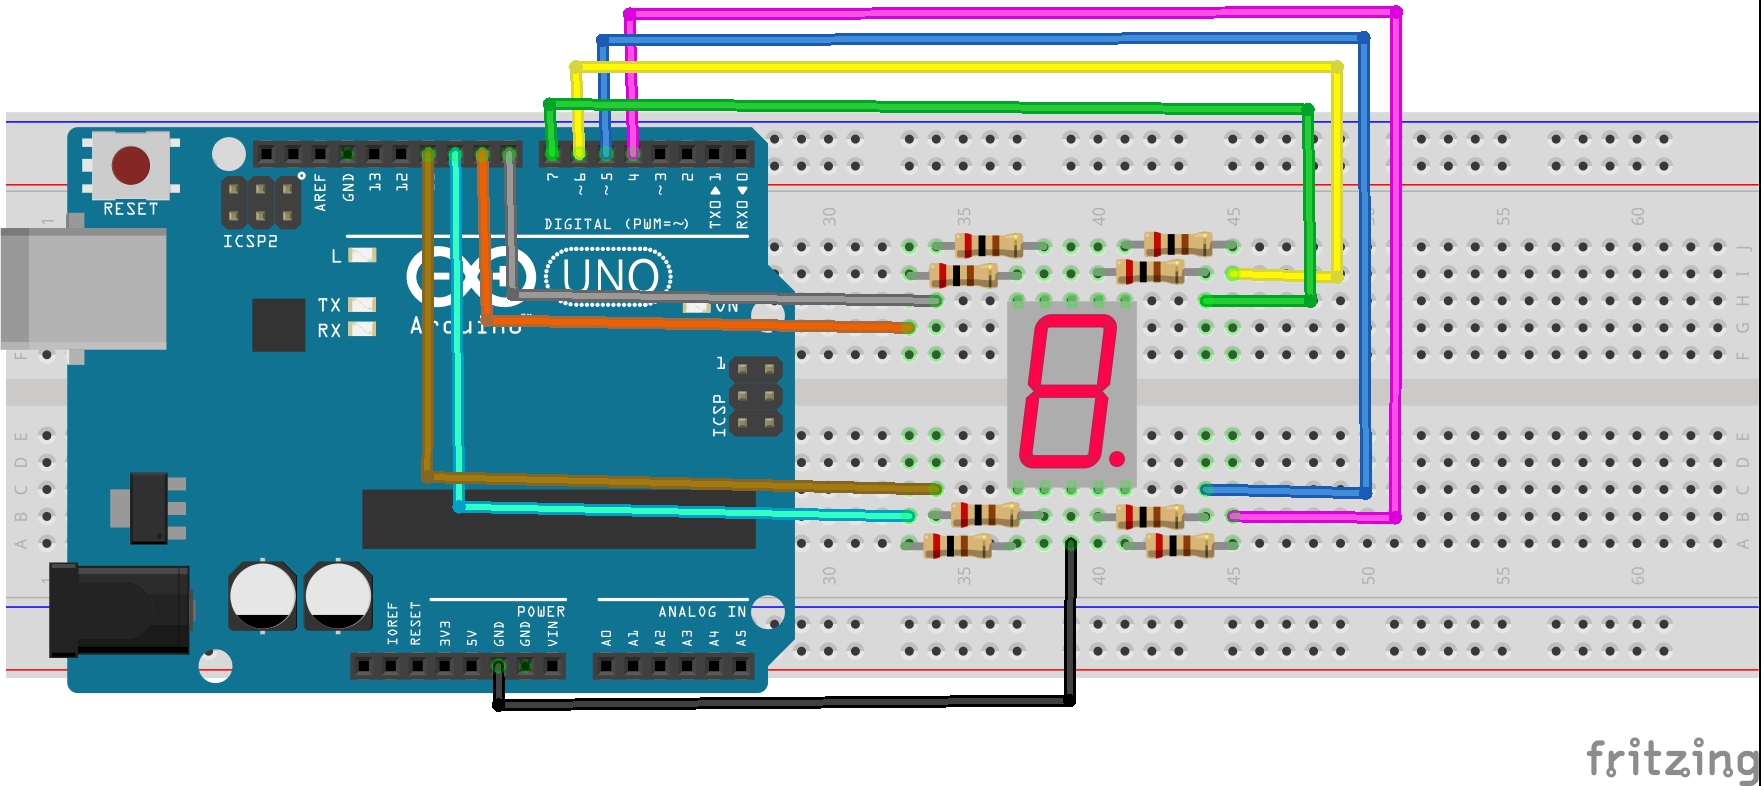
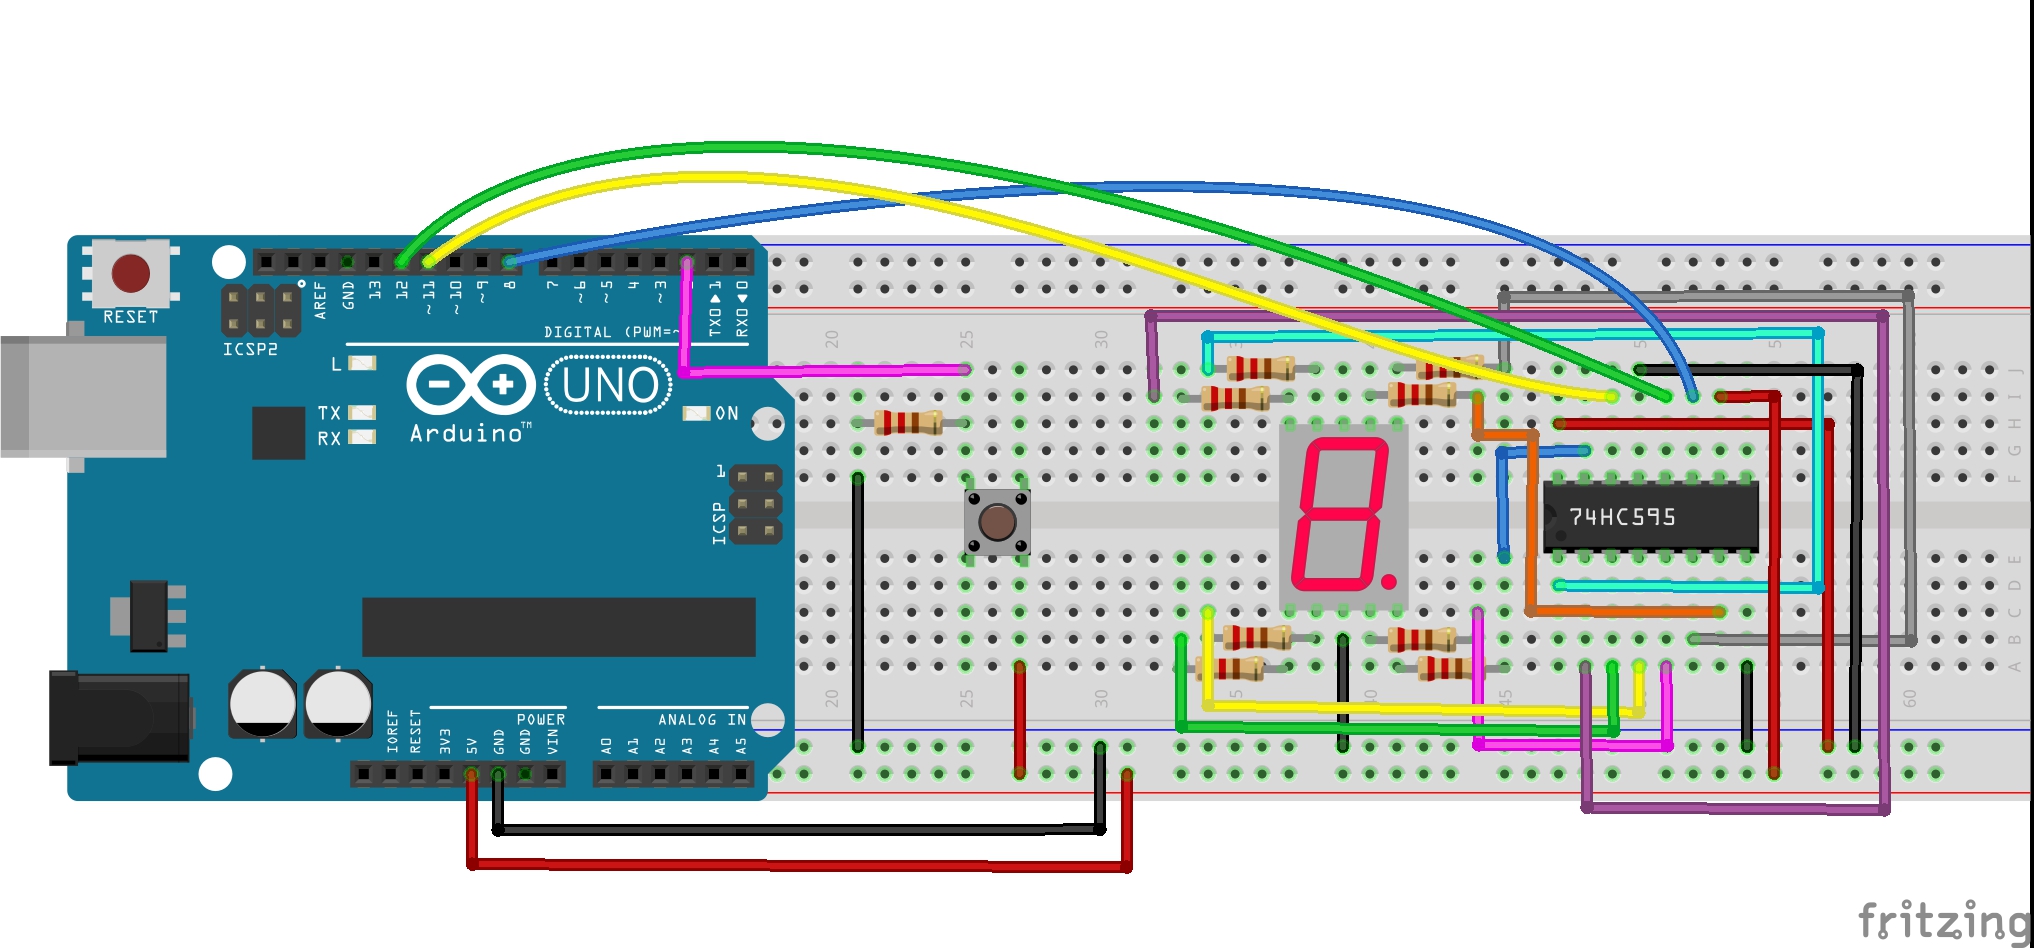
| P11:Display 1-digit 0 to 9 in 7-seg Nixie LED Tube |
TUTORIAL |
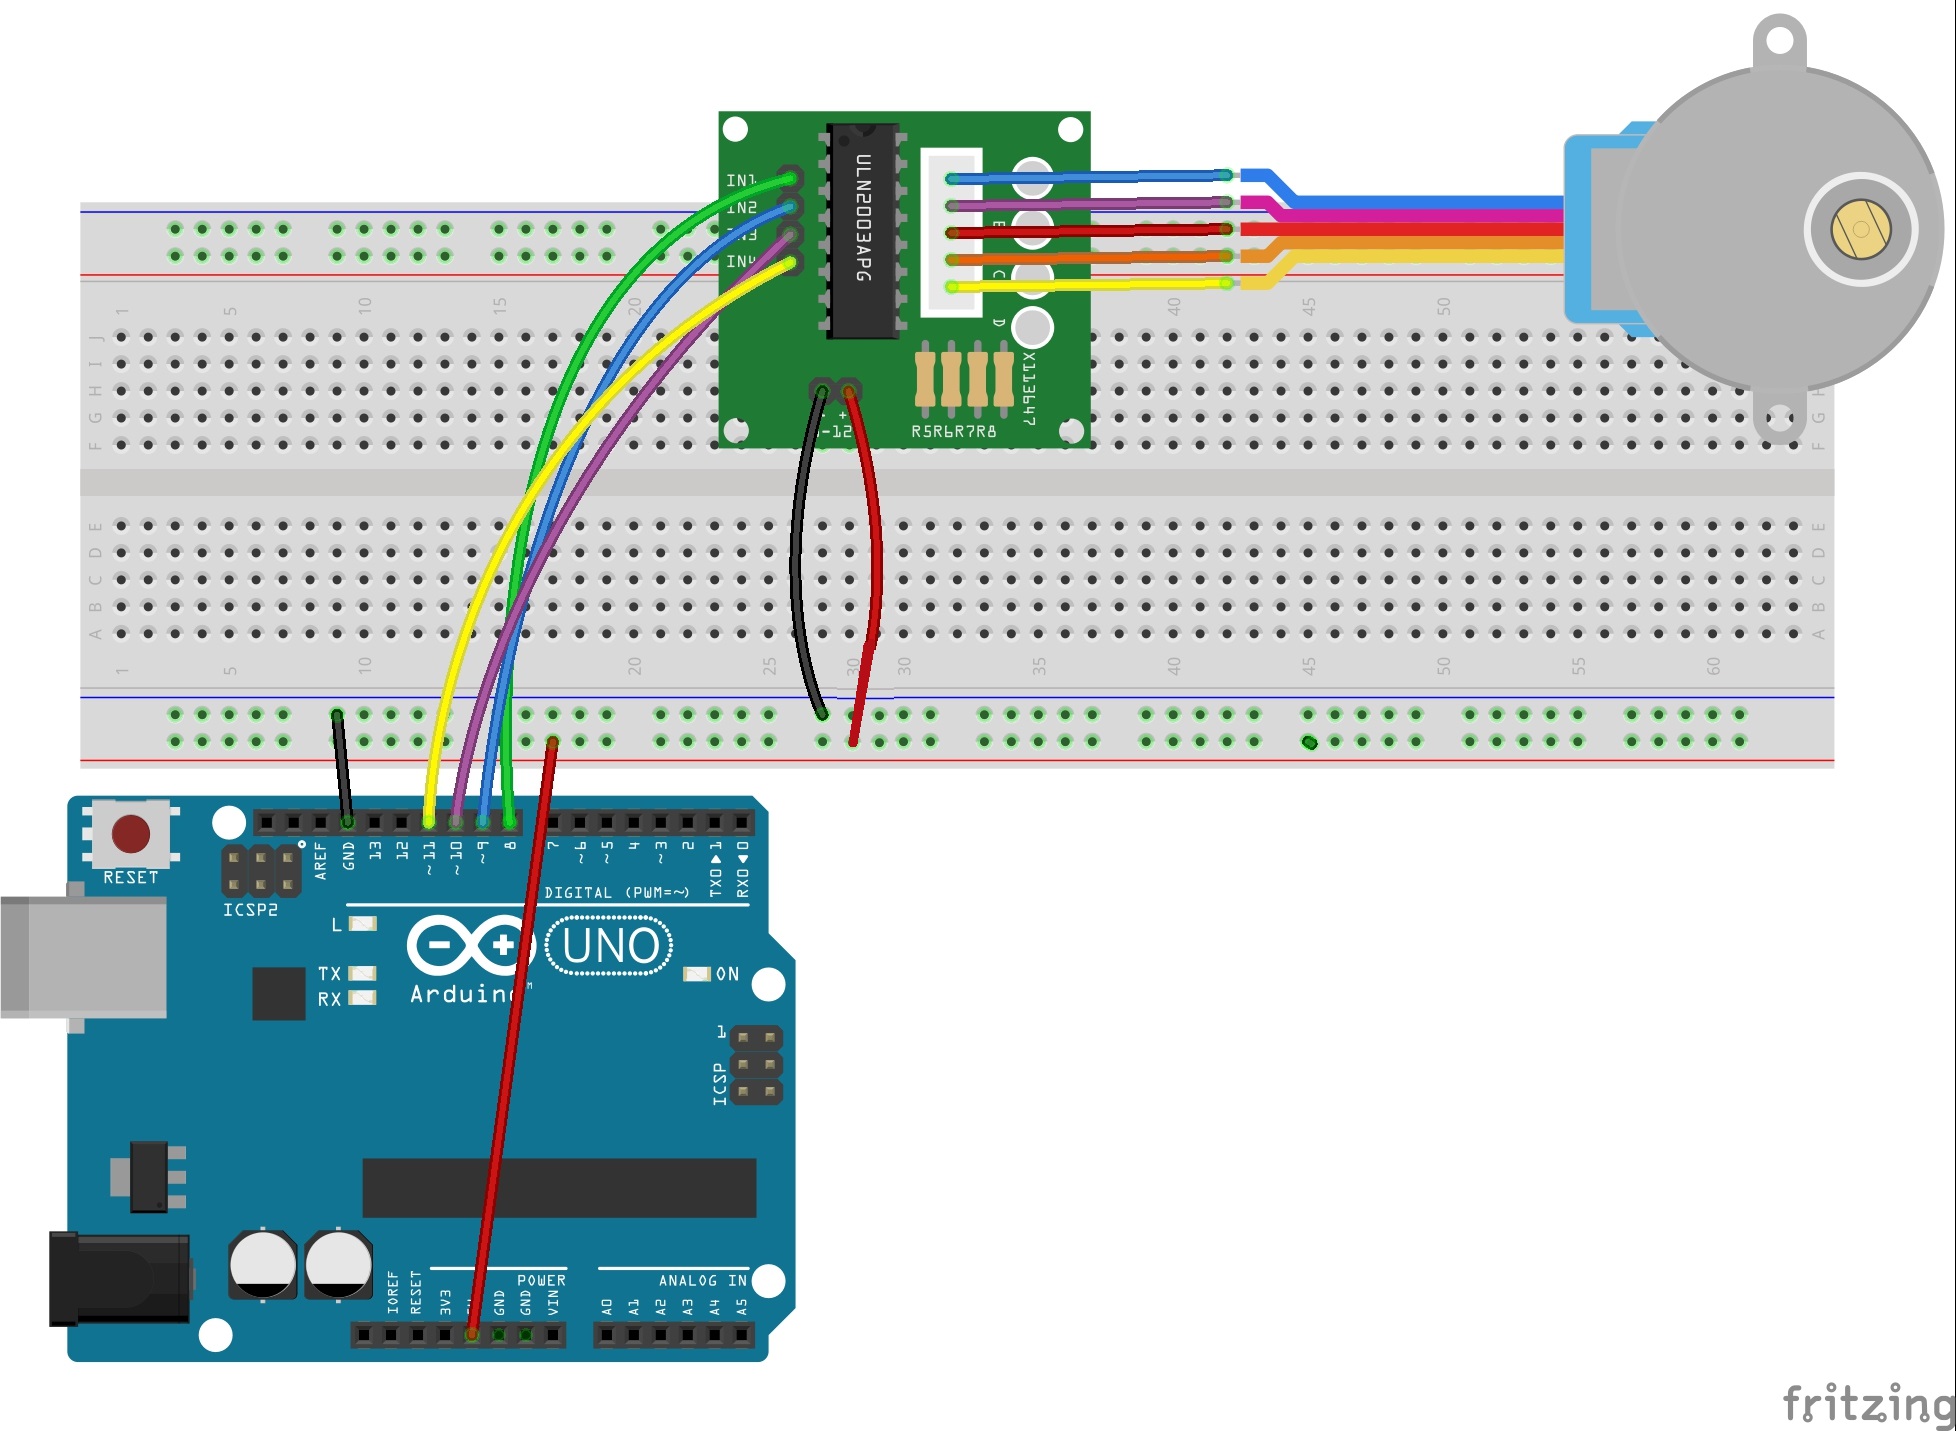
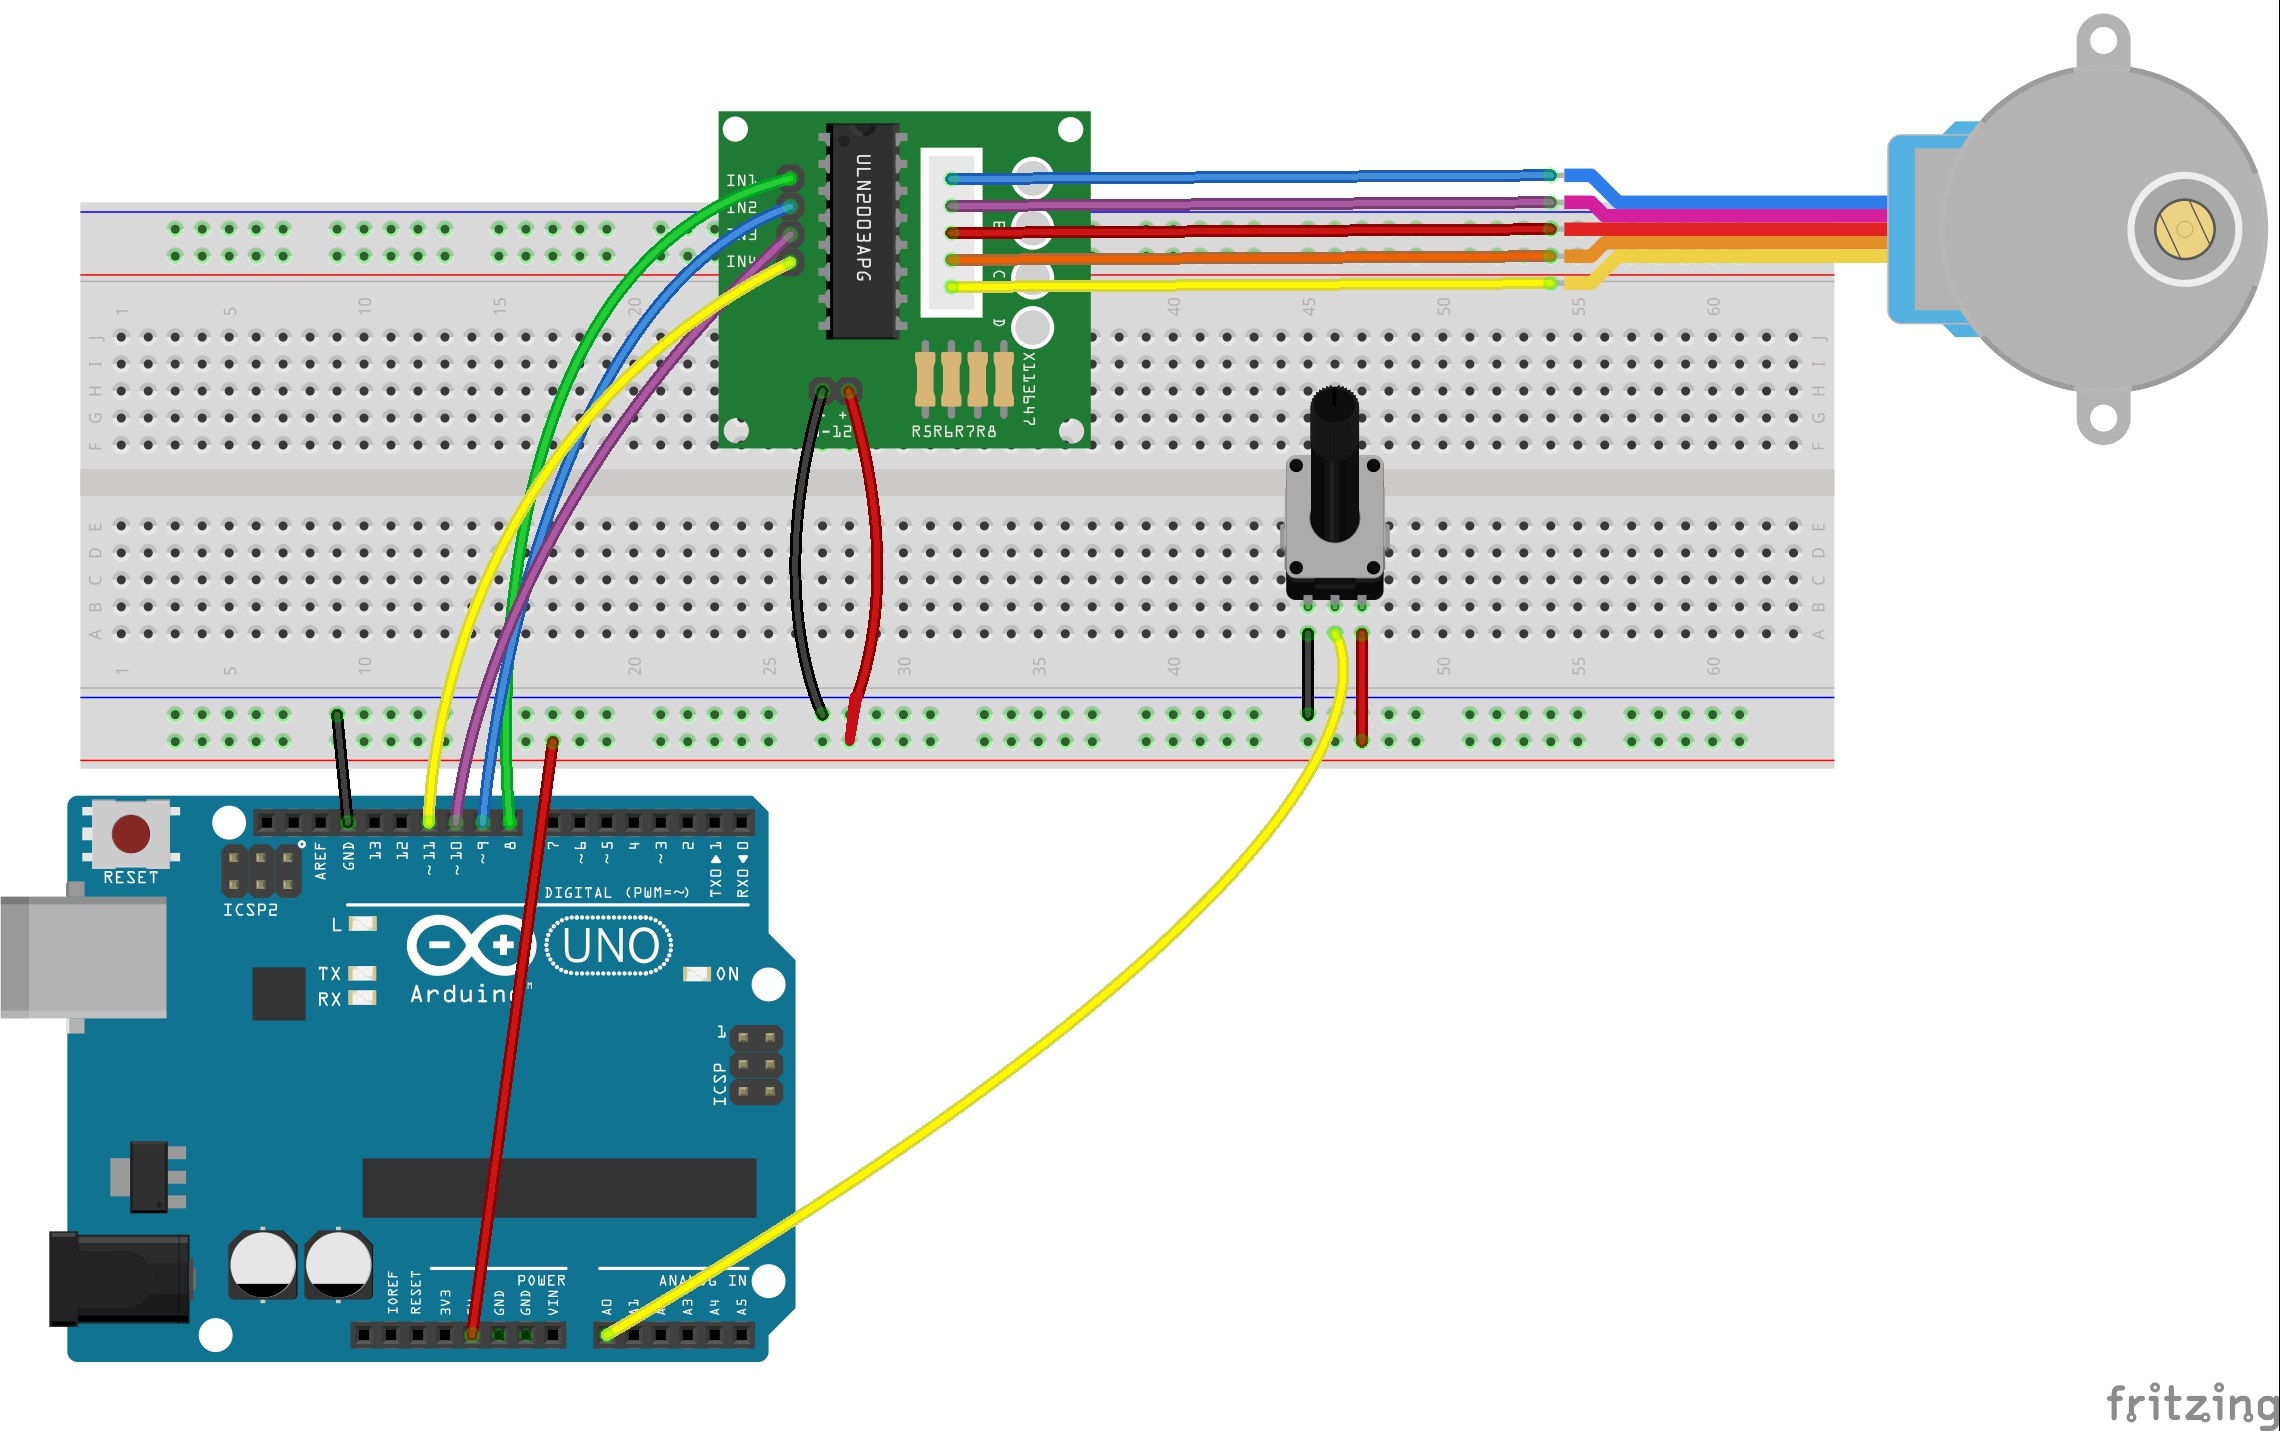
| P12:Project to Test BYJ48 Stepper Motor |
TUTORIAL |
| P13:Use potentiometer to control a servo |
TUTORIAL |
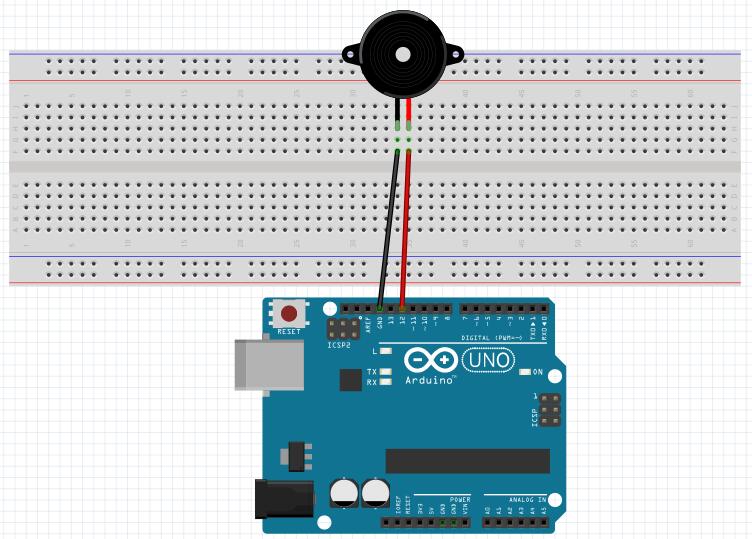
| P14:Test Piezo Buzzer |
TUTORIAL |
| P15:How to read resistor color code |
TUTORIAL |
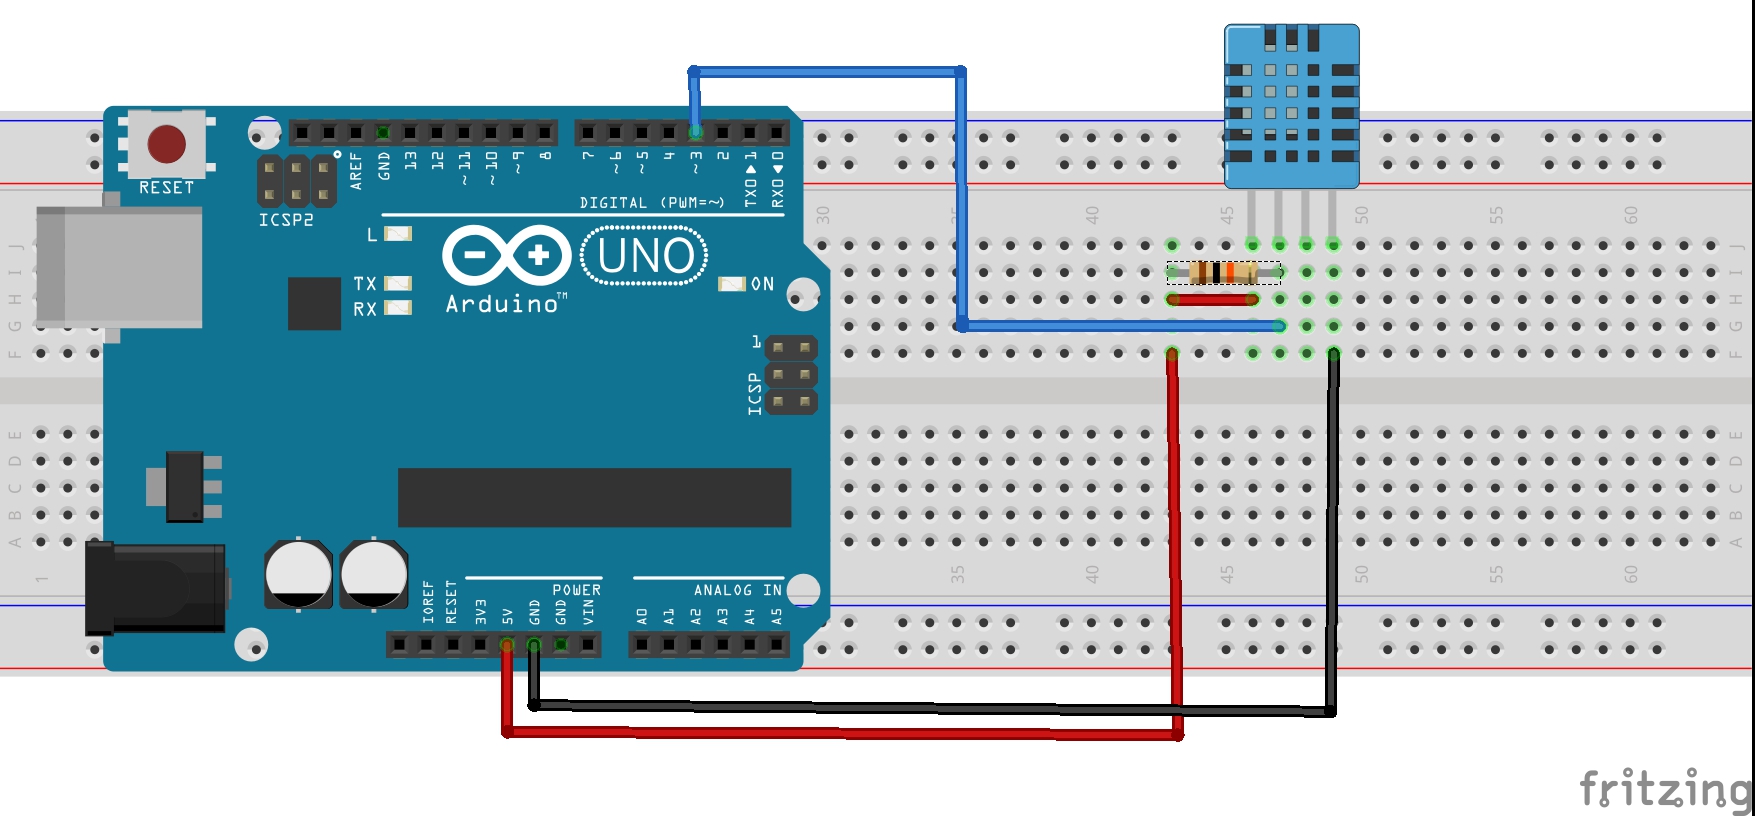
| P16:Use DHT11 detect the temperature and humidity |
TUTORIAL |
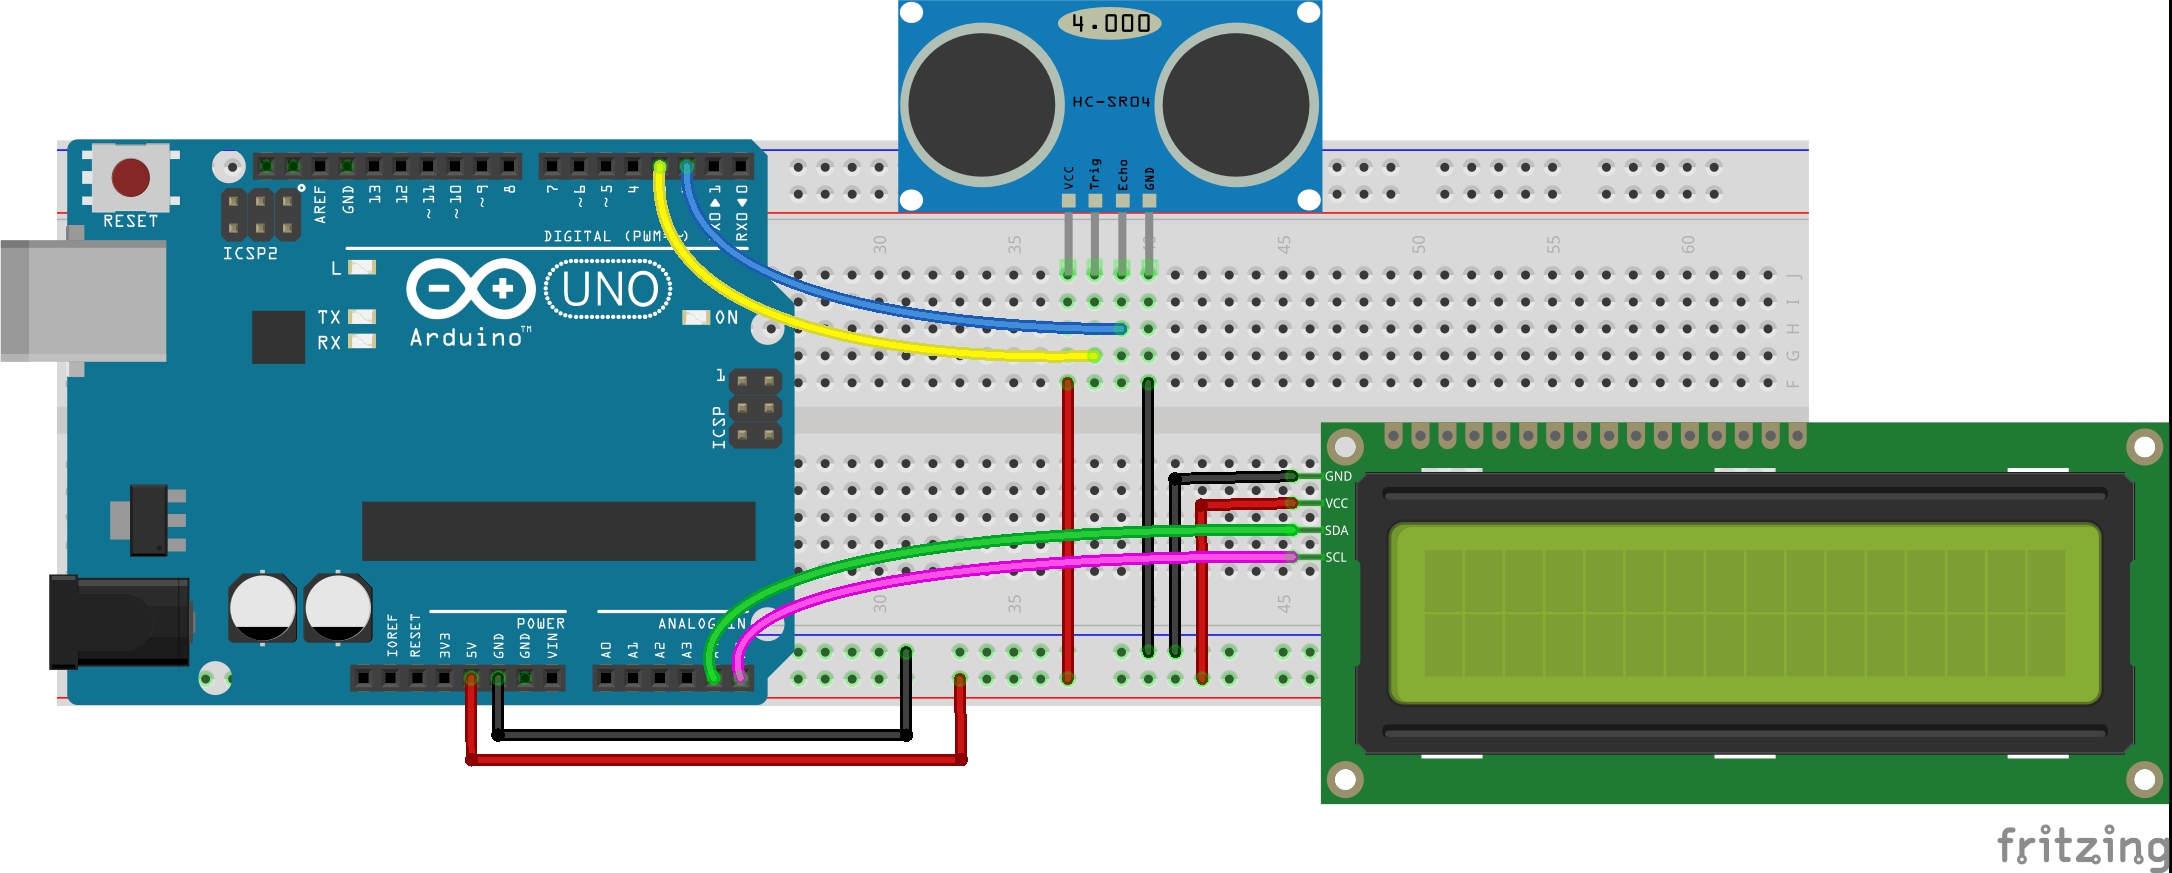
| P17:Ultrasonic distance sensor project |
TUTORIAL |
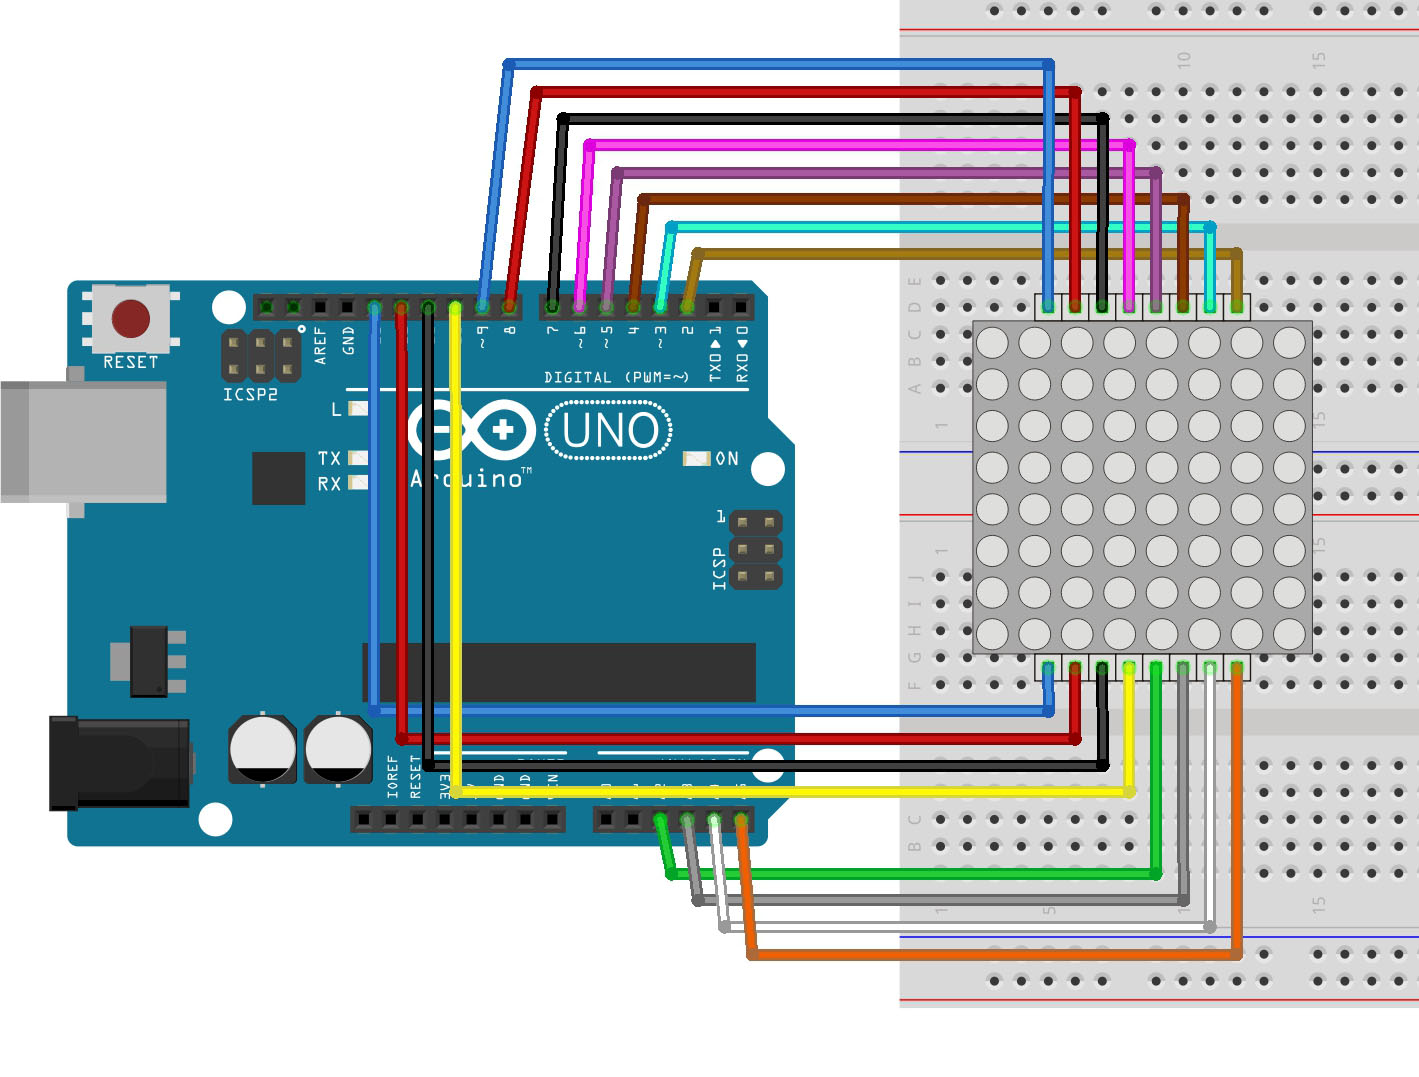
| P18:Dot matrix LED display project |
TUTORIAL |
| P19:Infrared obstacle avoidance test |
TUTORIAL |
Package Included:
-
-
 |
1* UNO R3 Board and cable(fully compatible with Arduino UNO R3) |
-
 |
24* LED(6*white, 6*Red, 6*Yellow, 6*Green) |
-
 |
1* 4-Digit 7 segment LED display |
-
 |
1* 1-Digit 7 segment LED display |
-
 |
3* Photoressitor (Light sensor) |
-
 |
1* Potentionmeter(10k adjustable resistor) |
-
 |
1* 74HC595 Shifting register |
-
 |
1* I2c display(16*2) |
-
 |
1* Stepper Motor+Bridge |
-
 |
1* Piezo Buzzer |
-
 |
1* SG90 servo motor |
-
 |
1* Tilt Sensor(SW-520D) |
-
 |
1* DHT11 Humidity sensor |
-
 |
1* Temperature sensor TMP36 |
-
 |
1* Ultrasonic module HC-SR04 |
-
 |
1* Obstacle avoidance sensor |
-
 |
1* Infrared remote controller and receiver |
-
 |
5* Push buttons |
-
 |
1* Acrylic base plate |
-
 |
1* Solderless prototype breadboard |
-
 |
Resistors:
15* Resistors(200 ohm)
15* Resistors(470 ohm)
15* Resistors(10K ohm) |
-
 |
Jumper Wires:
40* 12cm male-male jumper
15* 15cm male-male jumper
5* 20cm & 25cm male-male jumper
8* 20cm female-female jumper |
Arduino is the largest open-source hardware platform in the world and offers infinite possibilities on what you can achieve using simple microcontroller-based products. Learning how to program using the Arduino platform is a never-ending process. New hardware is designed and unveiled to the market every day, but the good thing is that the basics remain the same.
The Arduino has the best features over any other microcontroller. See a few below:
- Programming is straightforward.
- USB cable is used directly.
- Whether your electronics or robotics project is easy or complex, you can make it quick and efficient with Arduino
- It can be run from a 5v battery.
- The Arduino IDE software is easy to understand.
- The code will be uploaded easily with a basic understanding of C programming language.
This kit includes a selection of the most common and useful electronic components as below list. The Main board included in the Kit is the UNO board, which is totally compatible with Arduino UNO R3. It uses the best quality of material but sells in a much lower price. The Osoyoo UNO board you received is fully tested with preloaded firmware.With the help of this kit combo you can design 13 different projects as per the below mention list.
In addition to a complete set of hardware components the kit has a DVD provide detailed tutorials that you can follow. Starting with some simple LED projects and then moving on to more complicated projects using different modules and sensors, this kit aims to teach users about basic electronics theory, physical computing and how to use Arduino.They come with detailed explanations of the components involved in the projects, fritzing diagrams of the hardware connections and sample codes. The projects progress from the easiest beginner-level tutorials to more complex tutorials for advanced users. These tutorials as well as online tutorials available on the Osoyoo website and blogs will provide you with enough material for your learning needs. After you are done with the tutorials, you should be able to make your own projects using the different components the kit has.
Arduino Lessons Content List:
|
|
|
|
|
|
|
|
|
|
|
 |
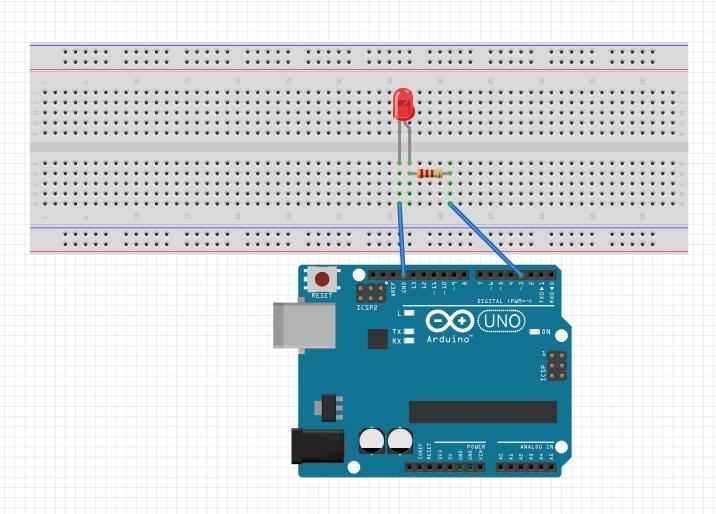
Arduino Lesson 8
LED |
|
|
|
|
|
|
|
|
|
|
|
|
|
|
|
|
|
|
|
|
|
|
|
|
|
|
|
|
|
|
|
|
|
|
|
|
|
|
|
|
|
|
|
We provide the above lessons for now. More lessons will be added in the future.
Last but not the least, work out what you will be doing with your kit and what things you already have. Make a list of the things you will need and how you will design your project. This is one of the most important considerations while choosing the best Osoyoo starter kit.
{:}{:ja}KOOKYE Arduino学習キット中級版
Arduino学習キットです。 様々なArduino実験や開発ができるキットです。
MCU(マイクロコントローラユニット)を学習の初心者に向け素晴らしいdo-and-learnキットだと思います。
このスターターキットを使って、色々なArduinoラボプロジェクトを学習できます。例えば、交通信号の模倣(LEDとボタンが必要) 液晶ディスプレイ(LCD)で文字を表示 サーボモーターをコントロールするために、ポテンショメーターを使って サーボ モーターの制御など色々あります。
ボタン、抵抗器、センサー、赤外線リモコン、レシーバーの基本概念も、色々なセンサーを使って環境の検出も、74HC595というシフトレジスタ ICを使ってArduinoデジタルポートの扩张も学習できます。
このスターターキット内のすべてのプロジェクトは詳細な回路図、詳細な操作手順、テスト済みのArduinoのサンプル・コードが付属していますので、お客様の時間を節約し、Arduinoの学習も上达になれます。
このキット内のプロジェクトをすべて学習したら、もう初心者ではなく、Arduino達人になりますね!
チュートリアル:
内容物:
-
-
|
1* UNO R3 ボードとUSBケーブル(Arduino UNO R3ボードと同じ) |
-
|
24* LED(6*白, 6*赤, 6*黄, 6*緑) |
-
|
1* 4桁LEDデジタル表示管 |
-
|
1* 1桁LEDデジタル表示管 |
-
|
3* 光センサー |
-
|
1* 10KΩ可変抵抗器 |
-
|
1* 74HC595 シフトレジスター |
-
|
1* 1602 16×2 LCD キャラクタ ディスプレイ |
-
|
1* ステッピングモーター&ドライバ |
-
|
1* DC5V ブザー |
-
|
1* マイクロサーボ |
-
|
1* 傾斜センサー |
-
|
1* DHT11 デジタル温度/湿度センサー |
-
|
1* TMP36温度センサー |
-
|
1* HC-SR04超音波測距センサー |
-
|
1* 赤外線障害物検知センサーモジュール |
-
|
1* 赤外線レシーバーと赤外線リモコン |
-
|
5* プッシュボタン |
-
|
1* ベースプレート |
-
|
1* ブレッドボード |
-
|
抵抗:
15* (220 ohm)
15* (470 ohm)
15* (10K ohm) |
-
|
ジャンパーワイヤー:
40* 12cm オス – オス
15* 15cm オス – オス
5* 20cm & 25cm オス – オス
8* 20cm メス – メス |
{:}


 Arduino学習キット 様々なマイコン実験や開発用電子部品キット Arduino UNO R3互換ボード LCDキャ…
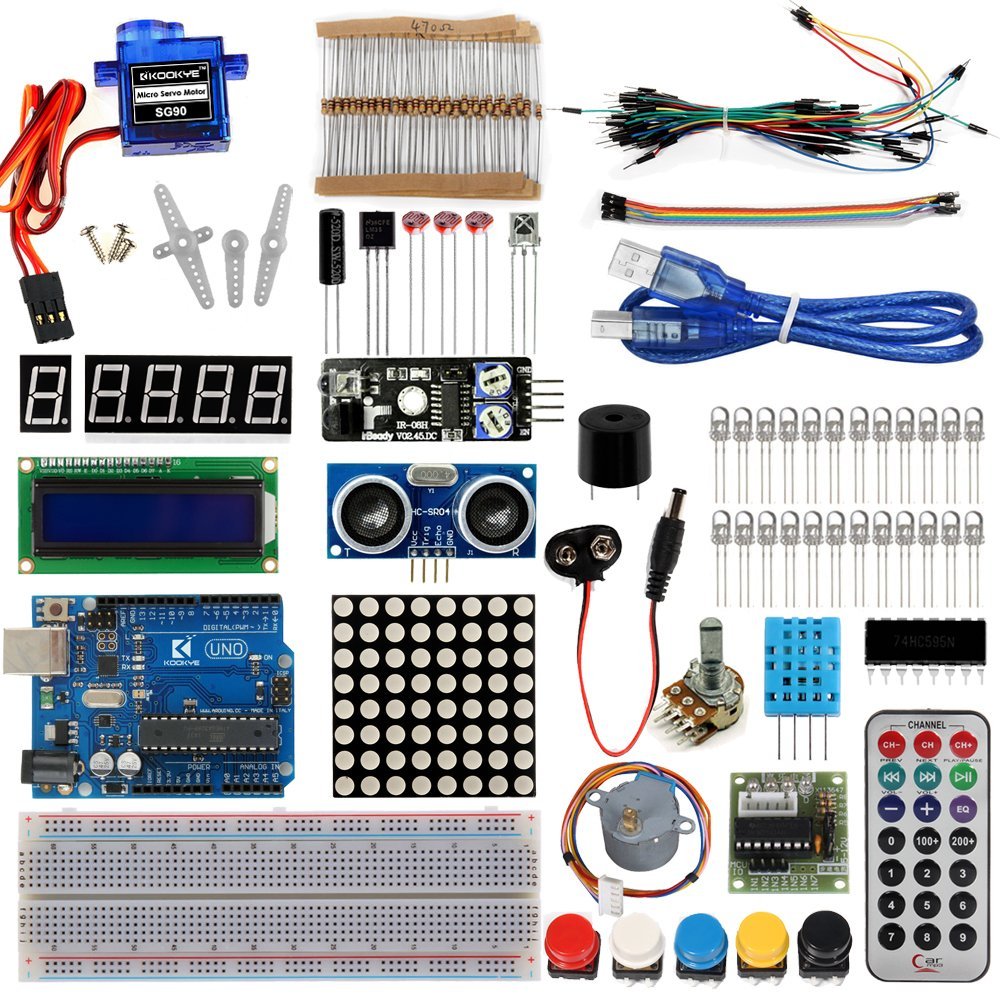
About the Author